Jerry Holway
-
Posts
842 -
Joined
-
Last visited
-
Days Won
68
Everything posted by Jerry Holway
-
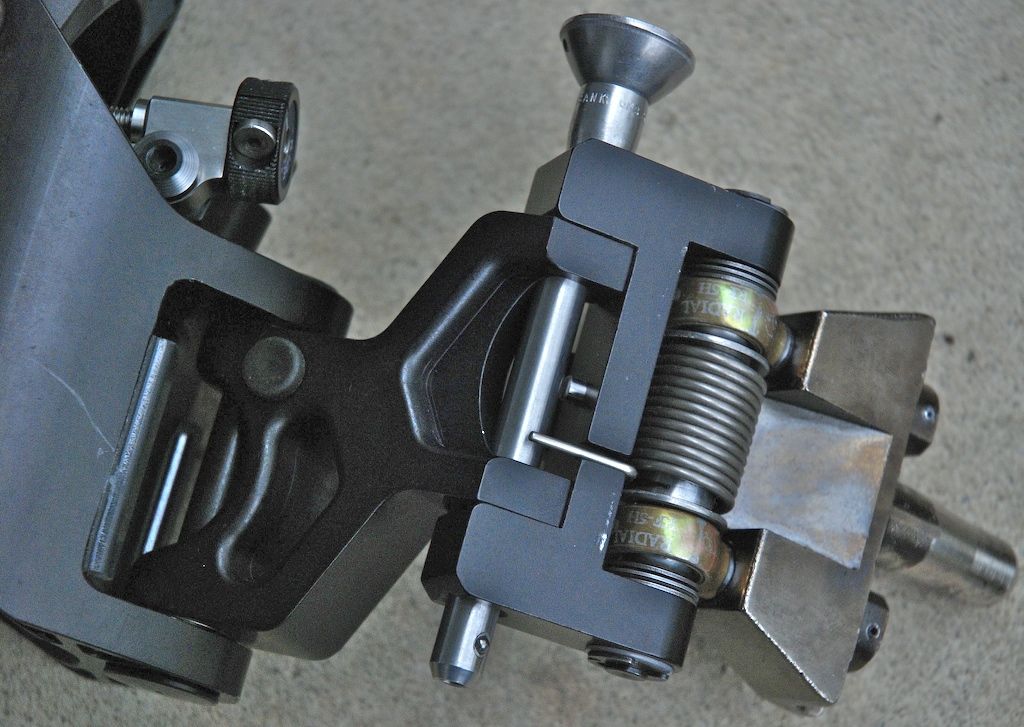
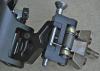
FYI, the corresponding piece in Tiffen arms has been the same for years - at least since 1995, possibly back to 1978 (?), and is of a different construction. A pix of the G-70 (with the "drop-down-kick-back" link) is attached for comparison. Jerry
-
Charles- I doubt it was any different; that would have meant a new part and new "threads" for the operator. I do not remember any of that - especially the threads changing, so I suspect it was all the same. But we need a response from someone with an EFP in their hands for this. It looks like the mating of the two parts is okay as well. Jerry
-
3 Questions regarding the Flyer and balancing
Jerry Holway replied to Darren Schmidt's topic in Steadi-Newbies
1. NO. The sled should be slightly FRONT heavy without a camera, but don't waste your time without a camera attached. 2. NO. Doesn't matter what camera or lead weight is carried. If the arm carries it, the sled has no preference for camera brand, shape, material. The only thing that matters is the mass and its c.g. 3. YES. So as we repeat endlessly on this forum (spank spank, you could have searched): Take a workshop, and get the EFP video training manual (click on the blinking Tiffen logo), and download the dynamic balance Primer. Jerry -
Allen- With no ability to move the battery or monitor, you have to devise a way to add weights, and at least one of them must move independently of everything else. The original ProVid with the original batteries was, I think, okay for dynamic balance, but in your case, one or both have changed, so you must do some work. Read the dynamic balance primer, then use the dynamic balance spreadsheet to figure out what weight or weights to add where to get your sled into dynamic balance, then give yourself some leeway with one of the moving weights. This technique works for any Steadicam sled that wasn't designed for dynamic balance, or has new monitors or batteries that have different weights than the originals. If you don't want to do the math.... you can just play around with some 1 to 3 pound weights, some out with the monitor, some with the battery... but it's a lot easier (I think) to spend a little time with the spreadsheet. Remember, camera and lens weight does not matter (one rebalances... oh just go read the Primer). Jerry
-
where have steadicam video tutorial in internet??
Jerry Holway replied to sun chao's topic in Steadi-Newbies
If anyone is doing a funny walk to operate Steadicam, I would suggest that it is both non-productive, not good for operating nor your health. Stand up and walk as normally as possibly. Groucho? And get the EFP video training manual from Tiffen for $20. Please. Jerry -
Several folks have asked me for a pix of the method I use... alas no good ones available right now, but here is one - the loop from the camera to the hand is short and you can't see it laced through the fingers and over the thumb, but it's what I have about. Time to take some better photos. Jerry pastedGraphic.tiff
-
A rather specific note for Ultra2 owners: I've put up on my website, jerryholway with no spaces and the .com, a couple of useful files. It's the Frameline generator instructions extracted from the Ultra2 manual, but they lack the greyed background and they are expanded to a full page - so they can reproduce easily for quicker reference in the field. The full Ultra2 manual is also there as one big file... Jerry
-
look forward to getting into trouble with you in Italy Rob- Hope to see you there - Italy will be awesome! Looks like lots of steps! Jerry
-
My two cents: I think it's great that we have to sort though all the posts and re-think what makes us Steadicam operators and what makes for good rigs, accessories, operating techniques, aesthetics... and we can praise or discuss or trash any and all of it if so inclined, so long as we take the heat for our posts. If we don't want to read about someone's idea of a new rig or the eternal wonderment of newbies too awestruck to dig through the archives, ? or anything else ? we don't have to... but we might miss something along the way, or forget the wonderful crazy road we took to get here. Here's to participatory democracy and even anarchy (in the civilized sense, of course). The alternative is frightfully boring. Jerry
-
Need used docking bracket
Jerry Holway replied to Nicholas Davidoff's topic in Steadicam Marketplace - Wanted
Nick- I currently have two unused Tiffen docking brackets with collars; will sell for 1/2 list. Jerry -
Yes, it is now available from Tiffen for $20, shipping at end of this month. Finally. Quality better than original VHS... mostly digitized from my submaster. Jerry
-
Mikko- Yes. It's sort of like this - a proper dovetail clamp wedges things in two directions - against a flat and sideways into the angled surface of the opposite side of the dovetail, and this is key - compressing against the flat as you say, but also on the side opposite the clamp. When in low mode, if the force applied to the clamp has to lift the camera as well as shift it, there's a chance the plate won't shift sideways and fully engage the beveled surface - it will be out of square slightly and not pressing hard against the flat on the far side. Then when you tilt or move the rig, things can shift, get loose, and slide. Every dovetail in a machine shop works this way (and some of the mechanics are absurdly clever); look carefully at them next time you visit your local machinist. Jerry
-
Eric, No, in high mode and the post vertical, the sled supports the camera weight. If the dovetail slips when you tilt down in high mode, then most likely the clamping wedge is bottoming out because either it or the dovetail (or the combo) is just enough out of spec, OR possibly the camera weight is just too much for the little wedge to hold. Can you get ahold of another dovetail plate to test? Otherwise, see remedies above. Also check if somehow your stage is bent open. Lay a straight edge across the top. That used to happen to 3A stages if stressed, I think. I have this recurring nightmare of hitting an old floppy stage with a large rubber hammer or chicken... You only need to support the camera weight when clamping with the camera hanging below (low mode) Good advice for all makes and models, not just yours. Jerry
-
Eric, In low mode, lift the camera before you clamp down; i.e., support the camera's weight so the clamp isn't trying to do that job as well as clamp. Jerry
-
Recommendations for good training DVDs?
Jerry Holway replied to Peter Hoare's topic in Steadi-Newbies
Regardless, the EFP video is the classic. Just under two hours. Nothing else like it. Jerry -
Recommendations for good training DVDs?
Jerry Holway replied to Peter Hoare's topic in Steadi-Newbies
FYI- the soon to be released (shipping by the end of the month, I'm told) EFP video training manual on DVD is the 2 hour, comprehensive video that Ted and I did back in 1990 - and aside from the EFP specific bits, all the info, exercises, demos, insights, etc. still apply to operating today. I think one of the best things about it is Ted's energy and dedication to the craft (and to the arcane bits and pieces of our gear!) which shines through the material. The other, later videos, like the SK one, did not need to repeat, nor go into the detail, that this one does, so they are much more rig specific and cursory in the operating sections. And, for those of you who still have the original tape- the DVD image is clearer than the VHS, as it was largely made from an "sub-master." It also mostly lacks that burned in clock... Jerry -
Add my name to the AF crowd who would like a discussion free of nuts and bolts - it's the "operator," right?. Garrett gives a wonderful lecture on the moving camera, i.e. what makes a shot more or less satisfying, regardless of rig, "authorship" or other concerns (like they chose the wrong take, even). The key is not to get into the "I like it, I don't like it" mode as the end point of the discussion - as meaningless as chocolate vs. strawberry - but to give some critical eye to what's going on image-wise, how it relates to the task or story at hand, etc. Tough enough to do in graduate level film school, but I think it's worth a try here, as ultimately it's what counts. Jerry
-
Sometimes we all feel like a broken record (remember those?)... anyway, all these sorts of questions and concerns are worked on in workshops, this is basic stuff. So for basic stuff, take a workshop and get a comprehensive overview so that the bits of cherry picked advice given here on the forum fit into a larger picture ? rather than it is your picture. So many of the tips and ideas (even in short workshops) are useful only if you have some perspective... Sometimes even during a workshop it's very hard to figure out why someone's basic technique isn't working, there's some nuance of posture, handgrip, some combination of obscure things that come together to screw up the operating, and it takes a while to sort it out. Techniques that work for most or for one operator don't always translate well to others. One avenue other than the broken record, "take a workshop," route will soon be available for $20 - the re-mastered EFP Video training manual on DVD, with Ted and yours truly demoing the basics, about as comprehensively as possible in the time alloted. It's not a workshop; nobody's watching you operate closely over and over, but you can see what decent, basic technique looks like and what it gets you. And I look younger! And it's now so easy to ignore the EFP specific stuff (use the remote, Luke)... Jerry
-
Just so everyone knows, Alan is the creator of the wonderful video for the Pilot. see it here: http://www.steadicam.com/images/content/pilotVideoCode.htm He also took the SOA workshop and did great and is a nice guy to boot. Jerry
-
Matt- Full Steadicam workshop just organized for Stockholm, March 30 - April 6th through Hofmann Technik,AB. It will be conducted in English... Jerry
-
For Sale: Ultra Cine system (original Ultra) Sled, vest, arm, w/ std. cases, cables, & accessories, 3 years old, light use. Latest upgrade: Ultra2 style gimbal clamp, 12/2007. The sled is standard, but was upgraded in mid-October to use the new IDX PowerCube batteries (a non-destructive and reversible upgrade). I will sell it with or without the upgrade, your choice. With the upgrade you get four PowerCube batteries, one VL-4S four position charger, and the dual battery mount, plus a custom battery meter. Or, if you want to stick to the original 28v NiCad battery system, you will get 5 batteries (4 is std.). 3 batteries are essentially brand new ? re-celled in the last year. Two batteries need re-celling. Included are two PAG 304 chargers and 5 battery cables (1 single channel charger and one cable is std). The monitor is an HD UltraBrite - 8.4" color, 1400 nits. HD component and composite (NTSC/PAL). Monitor bracket upgraded to Ultra2 type. The arm has a prototype arm post holder (part of which is used in the Ultra2) - and the original spring-type holder is included. Otherwise std. with two arm posts, regular and 12". The vest is standard, with a mod to one of the vest clips ? which is the method we use on the Ultra2 vest, and a re-orientation of the spar back inside the waist band ? also the scheme used on the Ultra2 vest. Upgraded bridge plate (non-slipping) as well. Hard cases for the vest and arm, and for the sled. Soft bags for the vest and the arm. Hard case for the Nicad batts and chargers (if purchased), Pelican case for the IDX system. Price: With the 4 PowerCube batts, adaptor unit, and 1 charger: $47,500 USD. With the 5 NiCads and two chargers, $45,000. Contact Jerry Holway via this forum for details, pix.
-
As I understand it, one of the issues for HDSDI is in the shielding. Even a slight gap encourages problems, and there are shielding gaps in all the Lemo connectors we use. Multiple connectors will create multiple gaps, therefore more issues and opportunities for problems. The Lemo connectors are okay for composite and for component (RGB) HD***, but not good enough for HDSDI. *** I should be clear that it works at least for component the way Tiffen does it: one Lemo connector at each end and the "post break" done with a special coax/"no-shield-loss" connector. Not sure what effect a couple of Lemos in the post would have. Sleds without post connectors (like the EFP) can get by with a single, well shielded coax cable, and do better with a special BNC designed especially for HDSDI at each end of the sled. My suggestion before anyone rips apart their rig is to make a test cable using ALL the same connectors, cable lengths, power, etc. and see how it goes first. Jerry
-
Absolutely the voltage bumper is unnecessary. Voltage from 2x Lithium batteries in series hot off the charger is 33.6 volts, which under load almost instantly drops to 32 volts, then rather smoothly and slowly drops to 29.6 volts (the "knee" of the voltage curve), and then drops off very rapidly. Voltage per se should never be the issue with these batteries and the cameras we use. Other battery chemistries have different voltage curves and "knees." Wasting power with improperly sized wiring and connectors is not a great design choice (yet rarely a fatal one), nor is adding unnecessary converters or voltage regulators. There's a big regulator already in all the cameras we use, BTW, and several other small ones for the electronic boards. We've also neglected the 18-24 inch power cords (adding 3-4 feet to each "run", the cables to the battery, all the connectors in the line, etc., so without specific side by side testing, the amount of wasted power/dropped voltage is fairly speculative. Thank modern chemistry that Lithium Ion batteries have much more power density than the good old NiCads, (but there are trade-offs). With heavy draw cameras whatever situation you have is made worse... and don't forget all those other gadgets like monitors, transmitters, recorders, and obie or ring lights which also use up a lot of power and draw on the battery, tax the wiring and connectors, etc. So do some tests on your own rig and see if it works with a heavy draw... if not, add a battery (about two pounds with connectors) and a separate wiring run (use 12 gauge monster cable for speakers) outside the post (horrors!) directly to the camera. I think all the rigs we are talking about work, clearly some more efficiently than others... Jerry
-
Jaron- You are correct about the U2 with a Lemo 2B 303 connector which is rated at 17 amps; the 2B 308 connectors mentioned in other rigs are rated at 10 amps. When I wrote the other post, I was thinking of the original Clipper (I think I was thinking) with the same stage as the Ultra 1, therefore the same connectors. The later Clippers with the new stage use smaller connectors but have the same size power wiring harness. The 0B 303 connector is rated 8 amps, so it will be less efficient than the larger connector. I would not recommend running a Genesis all up (13 amps or so, I think), but it should be fine with everything else. You have lots of "headroom" with the voltage off the lithium batteries (fewer amps required). I don't think it's worth changing the connector (not sure it can fit, either). Hope this helps.... For others with questions, download the LEMO Unipole/multipole catalog from Lemo.com and look at page 45-49 for amp ratings. The whole power issue is more complex... how may connectors are in the line, the draw, how close the connectors are to each other. Test it in the field. Jerry
-
James- Also read the Bartech instruction manual (available online) - there's more information on interference, using multiple units, etc. Jerry