Leaderboard


Popular Content
Showing content with the highest reputation since 07/13/2024 in all areas
-
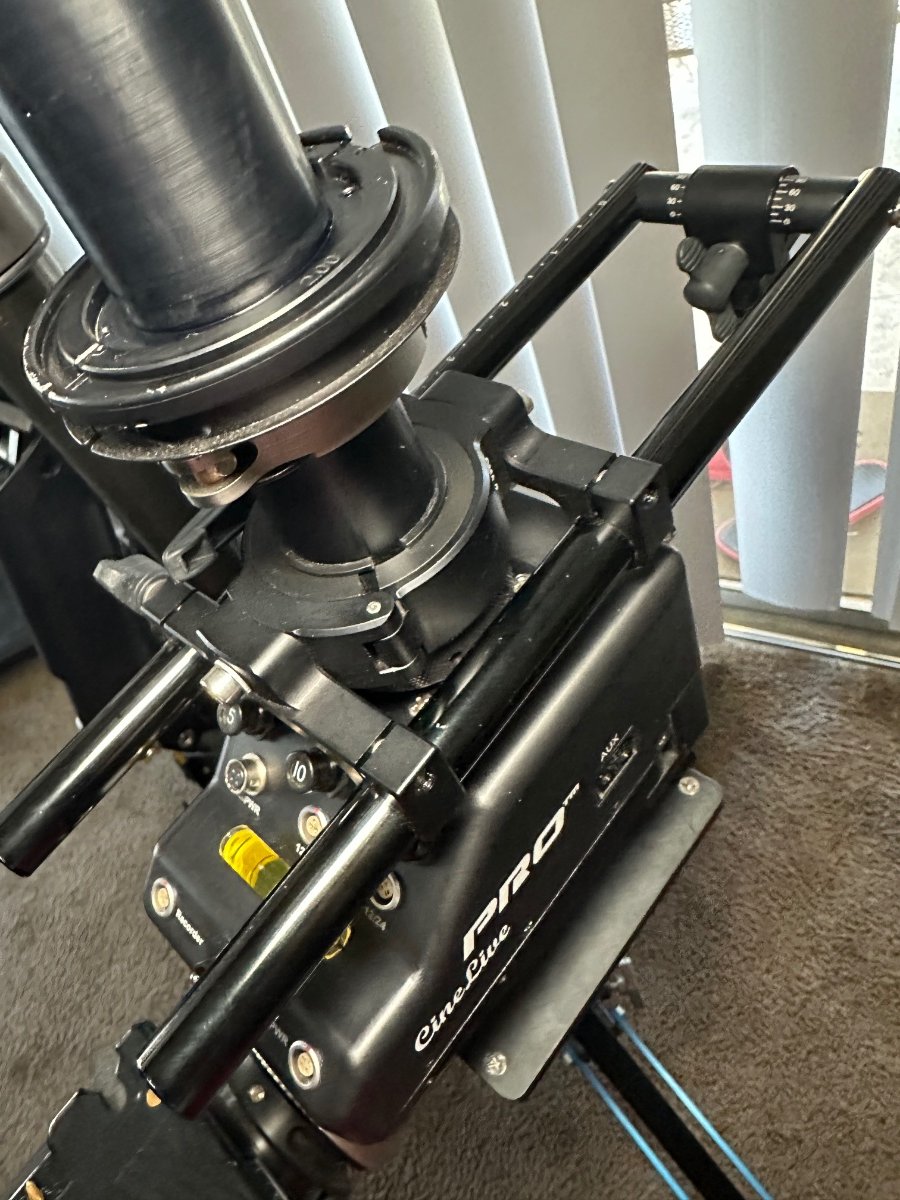
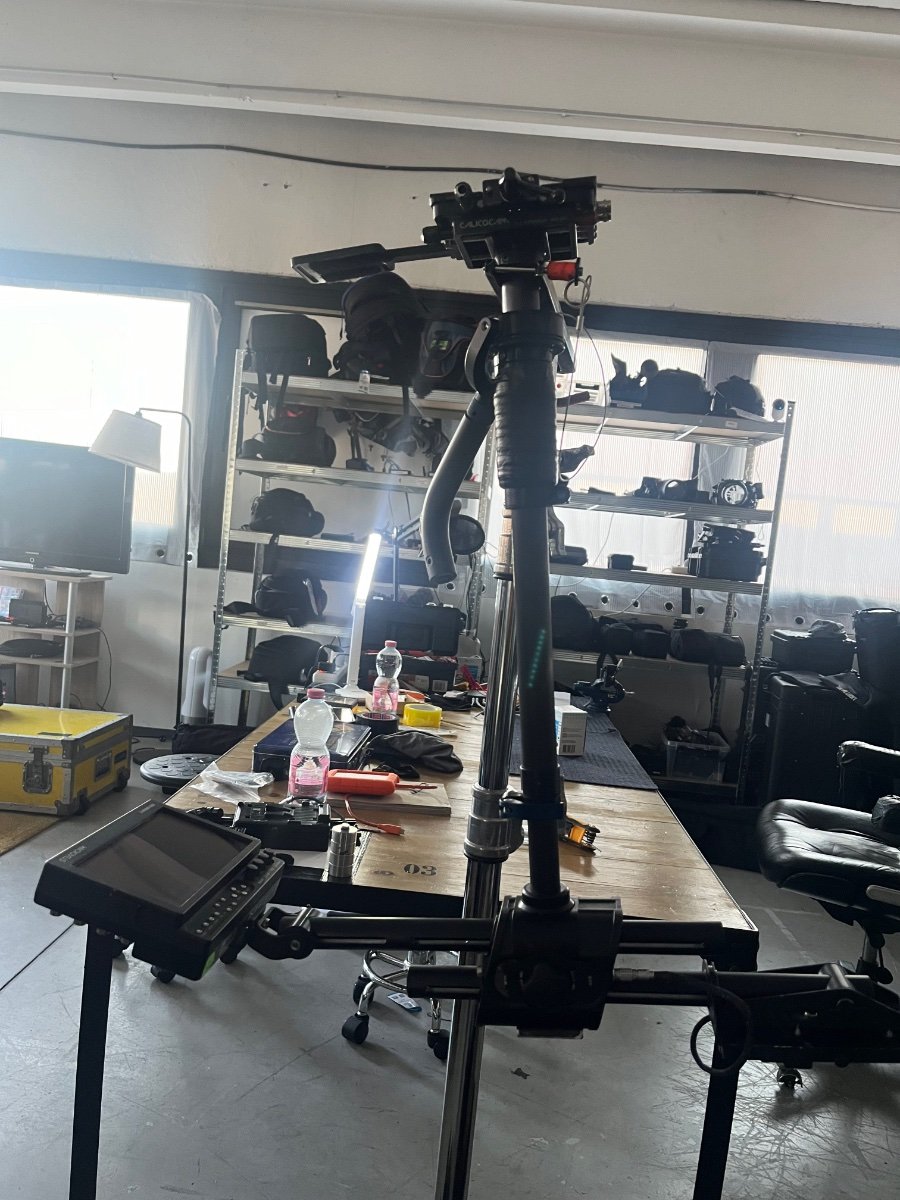
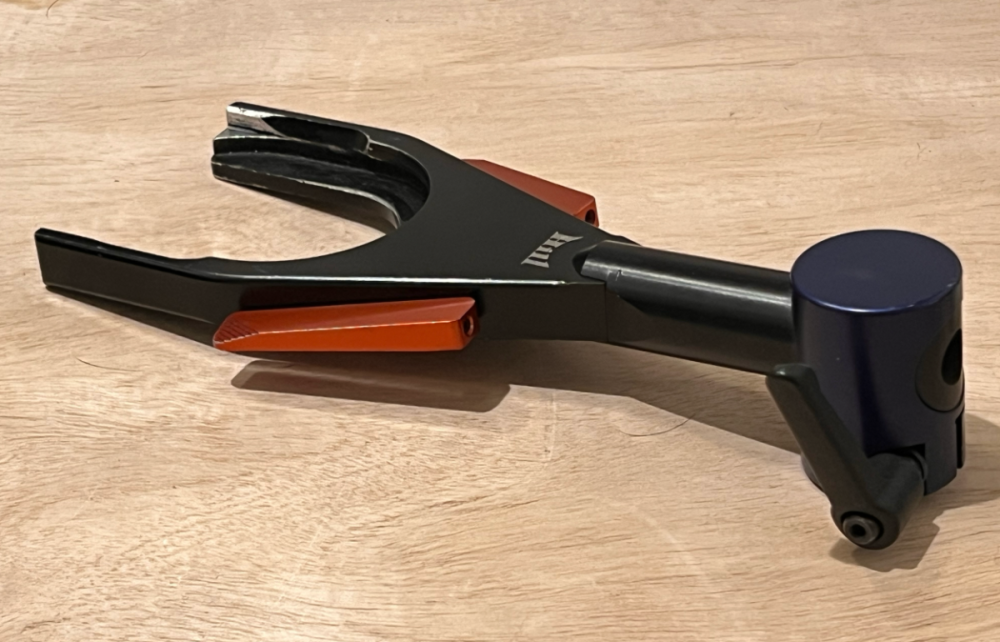
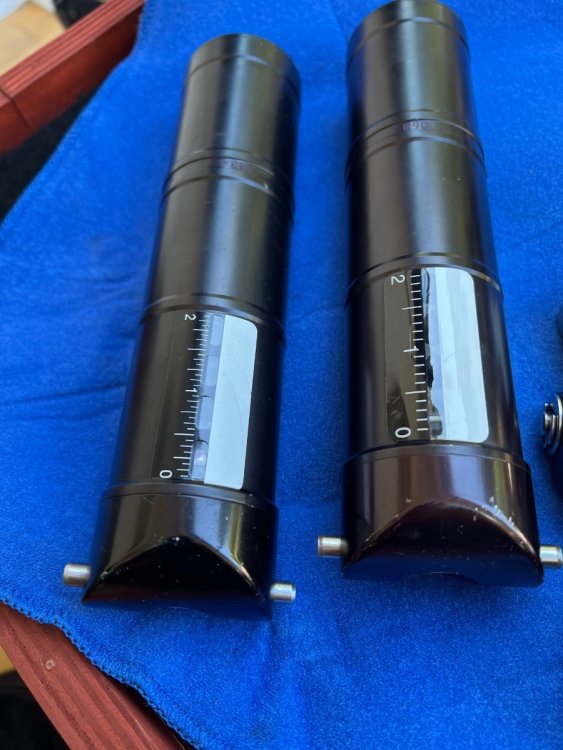
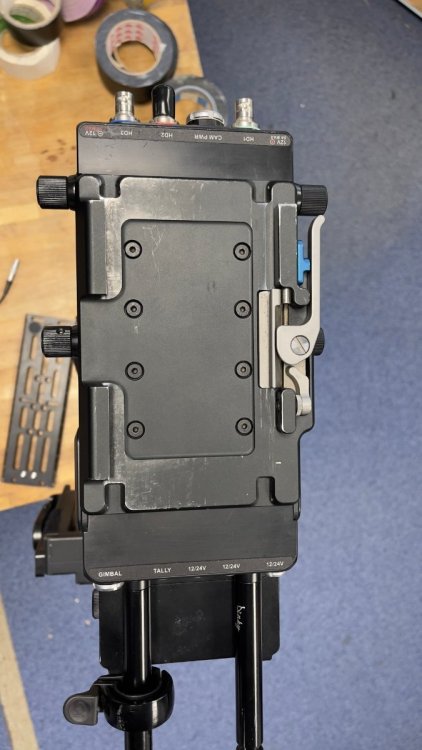
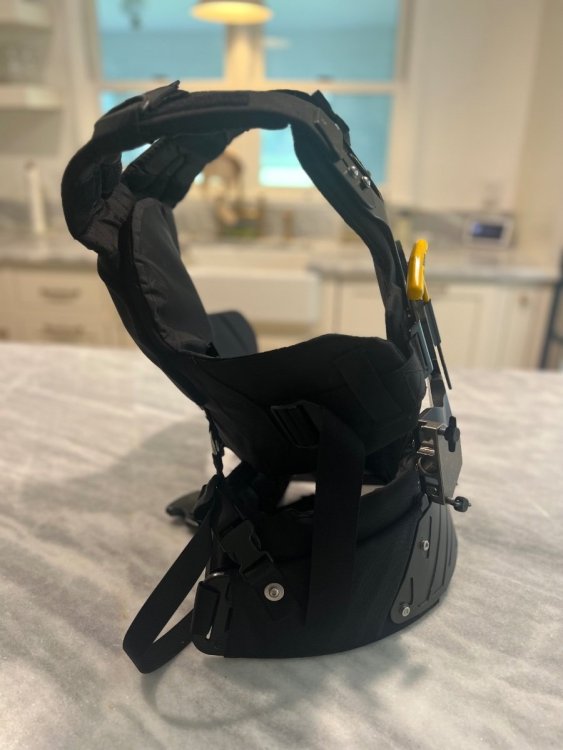
Hi All I have had the Level on several jobs now. It performs really well. This is still a prototype. The final version will be shorter by an inch or so, and have WiFi so you can do software updates without sending it in. Plus more user inputs. Super simple to use, and much easier to set up than the Wave. The balance is not as critical. For example, this last show, I took the prompter and receiver off mid show and just kept going after just a regular Steadicam balance. This would have required a total rebalance on the Wave. There is still no manual lock, but this was not an issue because there is a pause button that locks the level in place. Really quick to do, as in this past commercial, I had to do some off angle shots as well. Just one button, press and go. Very low profile and discreet as the footprint is much smaller than the Wave. Although it only has 6° of adjustment, because it has a low center of gravity, it actually represents a big correction of horizontal control. You can see this when turned on and the level powers up. The locking screw is plastic but solid. Feels a little cheap. There are rubber footings that aid in keeping your camera plate from sliding at full tilt. The return to level after a full tilt is smooth. Looking forward to the final when mine gets switched out. One concern is how weatherized it is. You can see the inner circuit board between the level plates. I believe this too will be addressed in the final version. Looks to be end of this year. Cheers Taj2 points
-
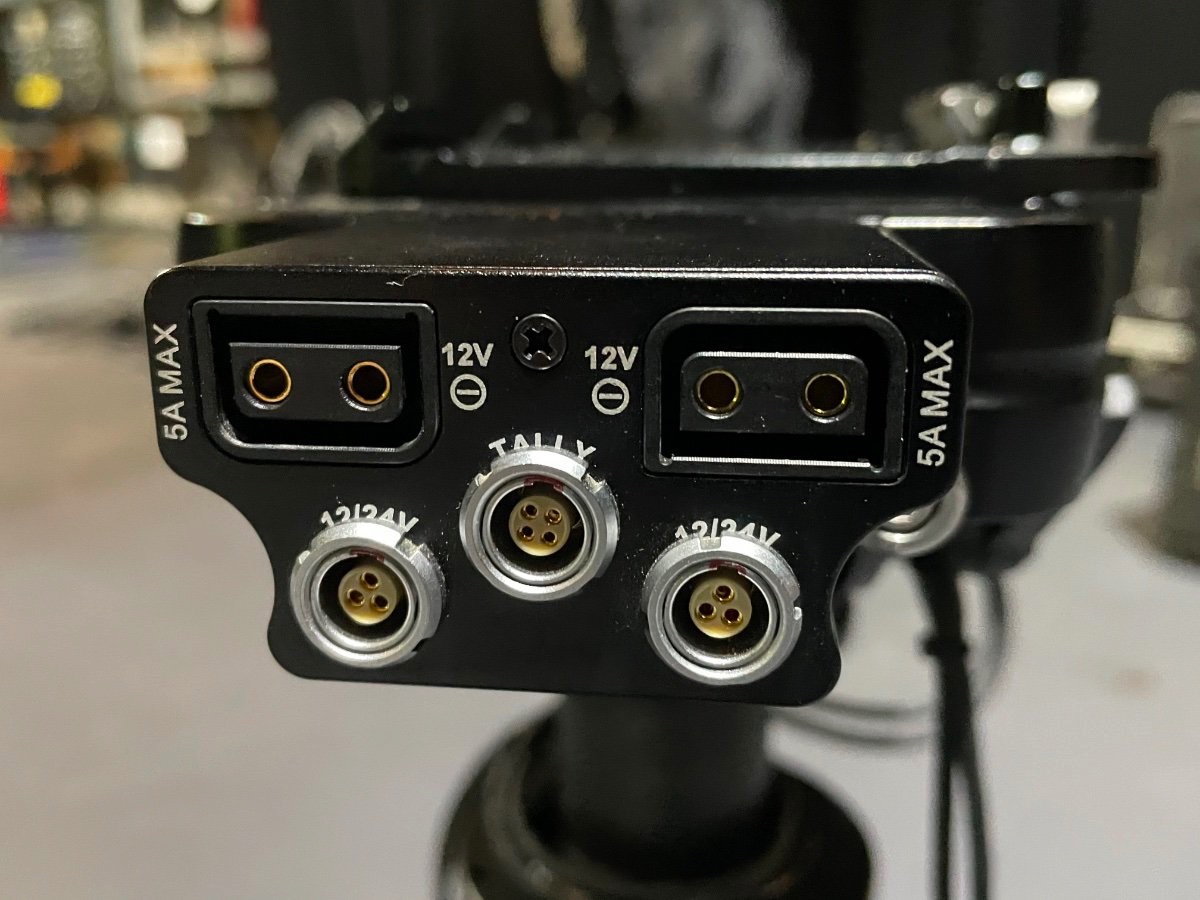
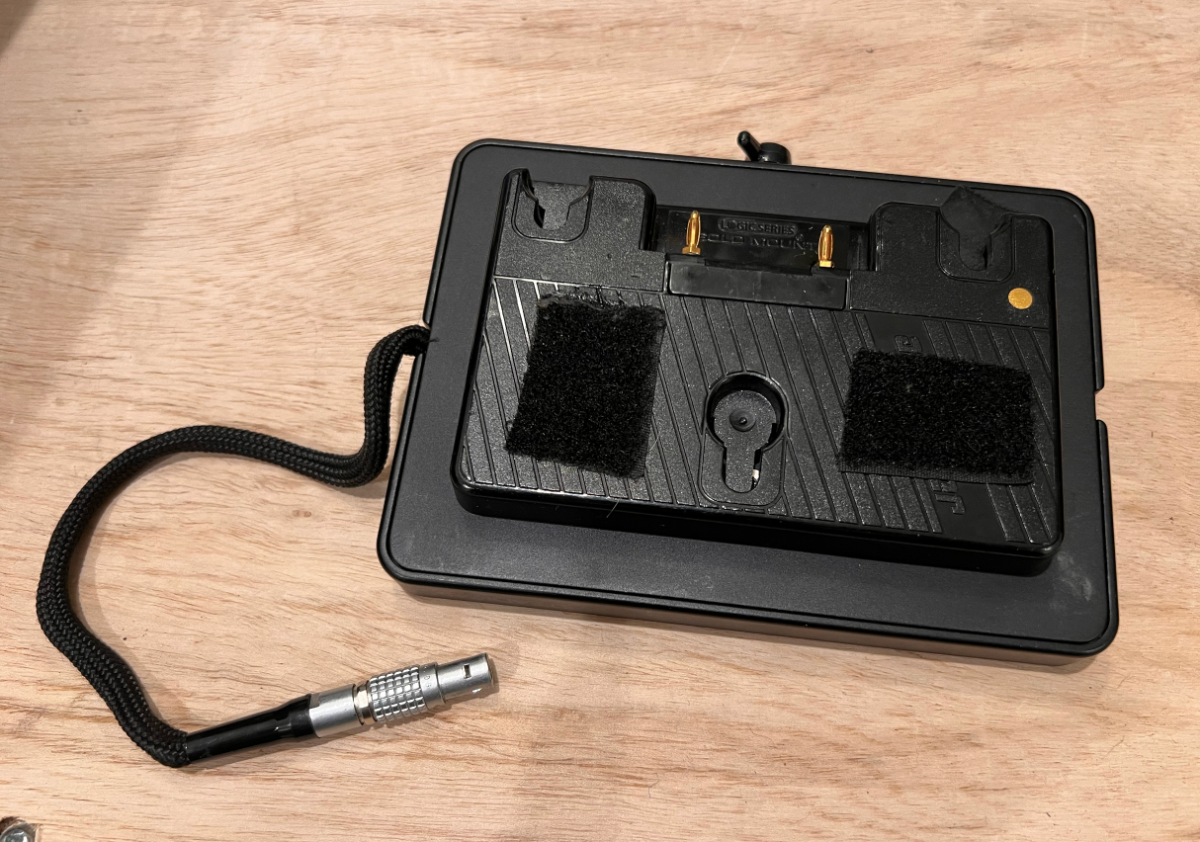
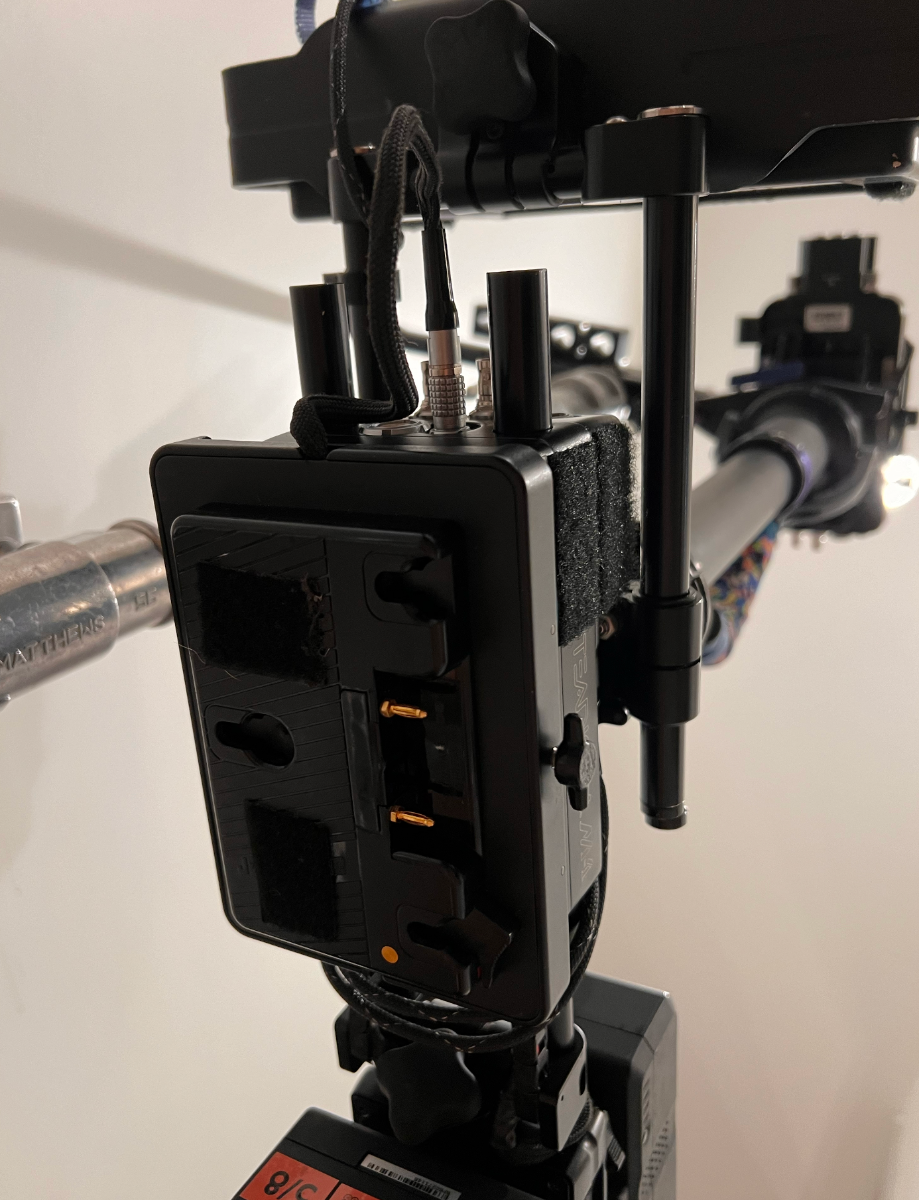
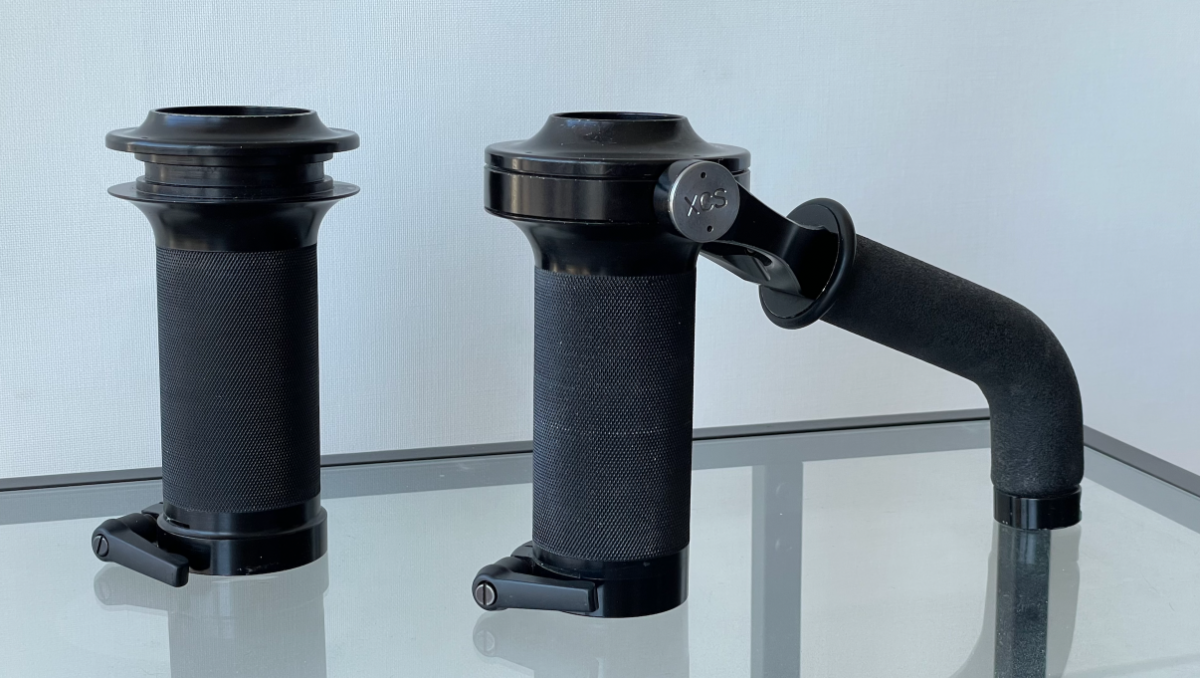
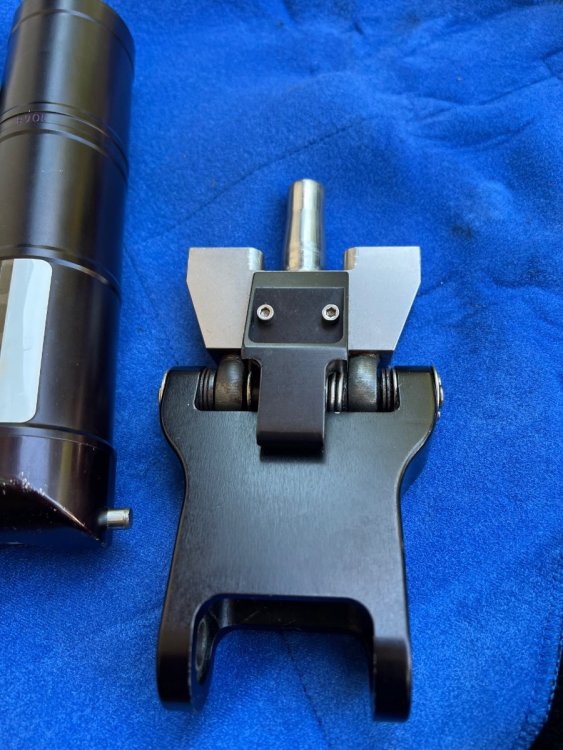
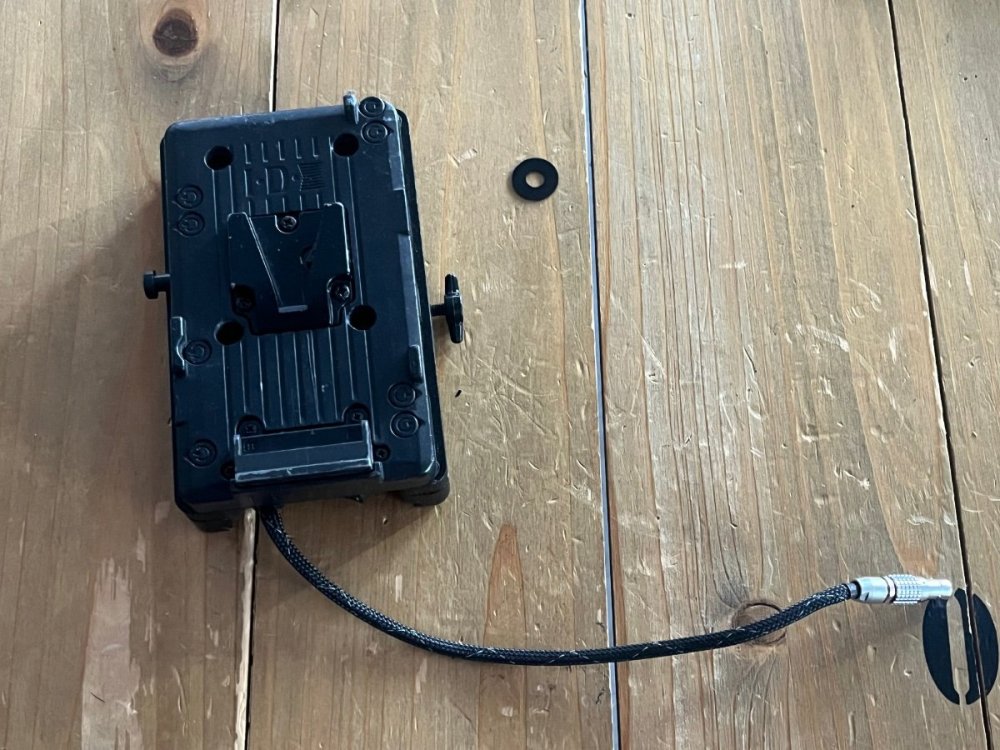
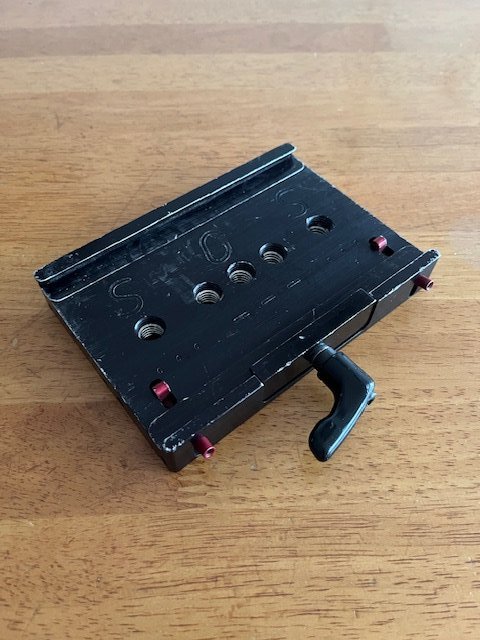
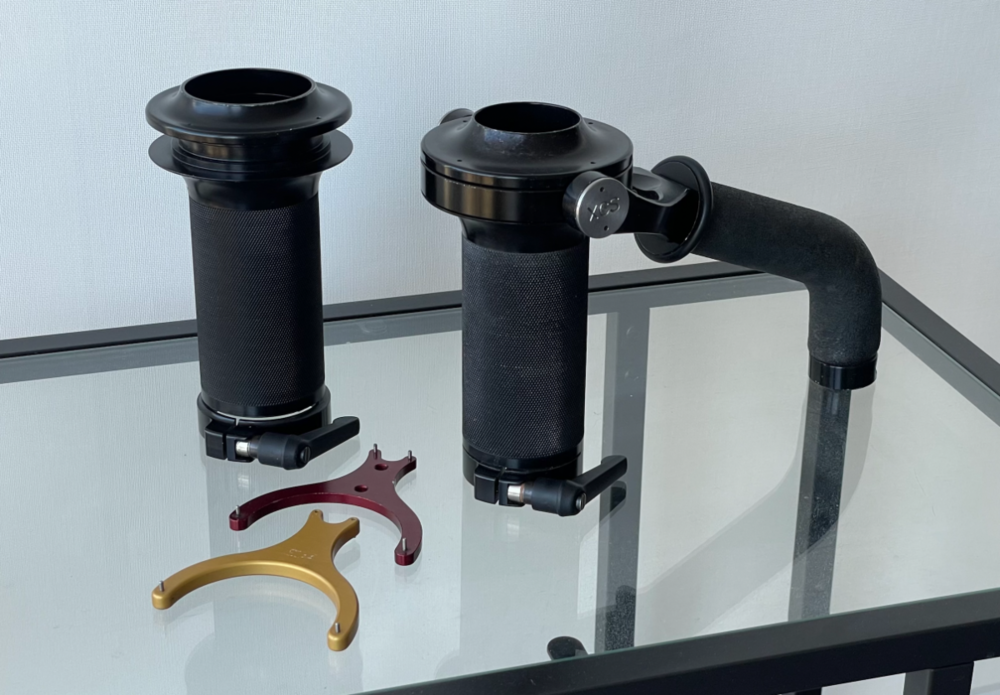
New 2nd battery mount for Axis A customer asked for this, so I made a secure, low-profile battery holder for him. One piece clips on and bolts directly to the bottom of the Axis. The 2nd piece holds the V-mount (or AB mount, not shown). Use the D-tap for power. Sold with, or without, the PV-2 or AB Gold mount. Note the heavy duty protector for the V-mount battery release button. Price without the PV-2 or QR-GOLD plate $60. With either plate, add $130. Price includes shipping in USA, international extra. jholway@comcast.net2 points
-
Level has landed and will be using it thoroughly next week on a job. Cheers all and thank you for helping out.2 points
-
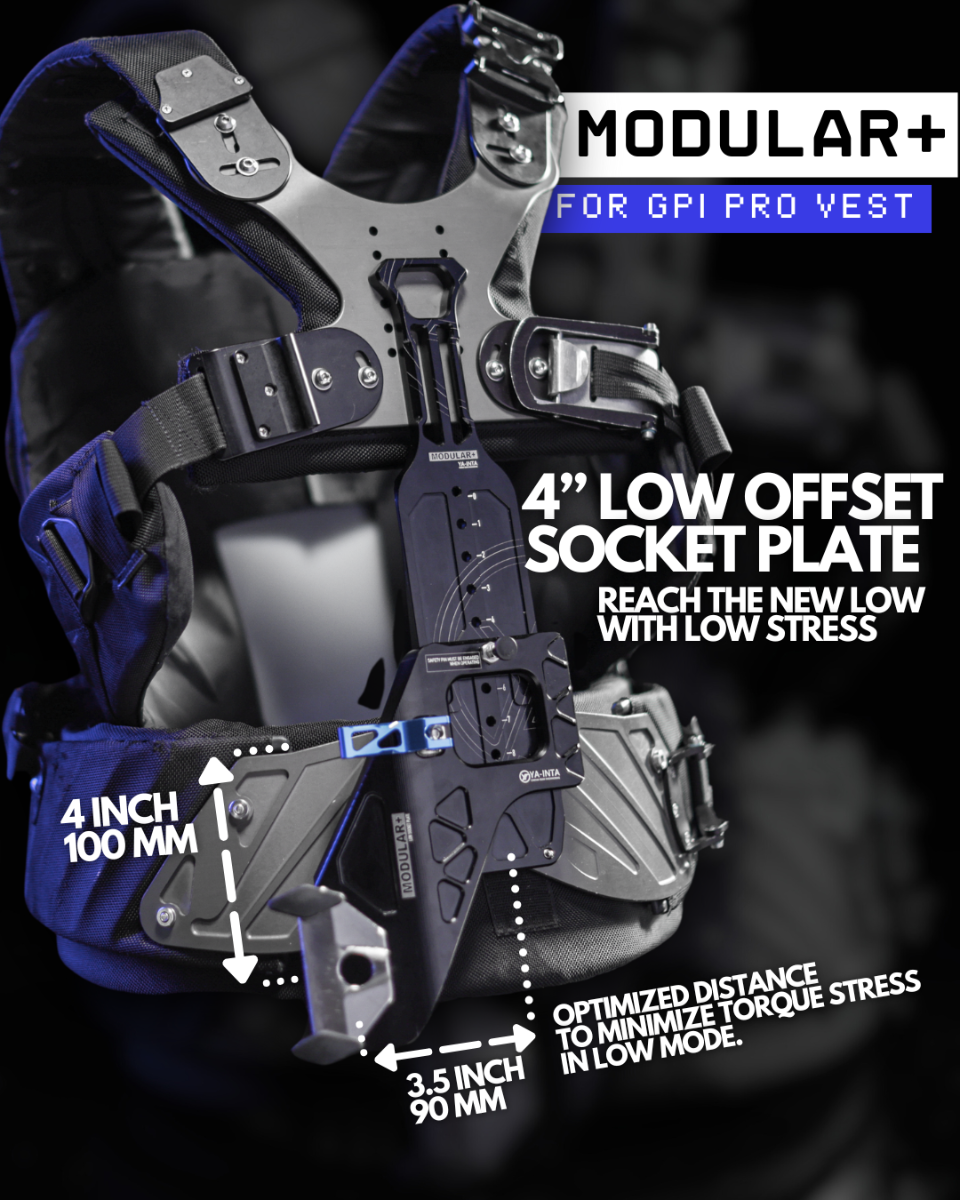
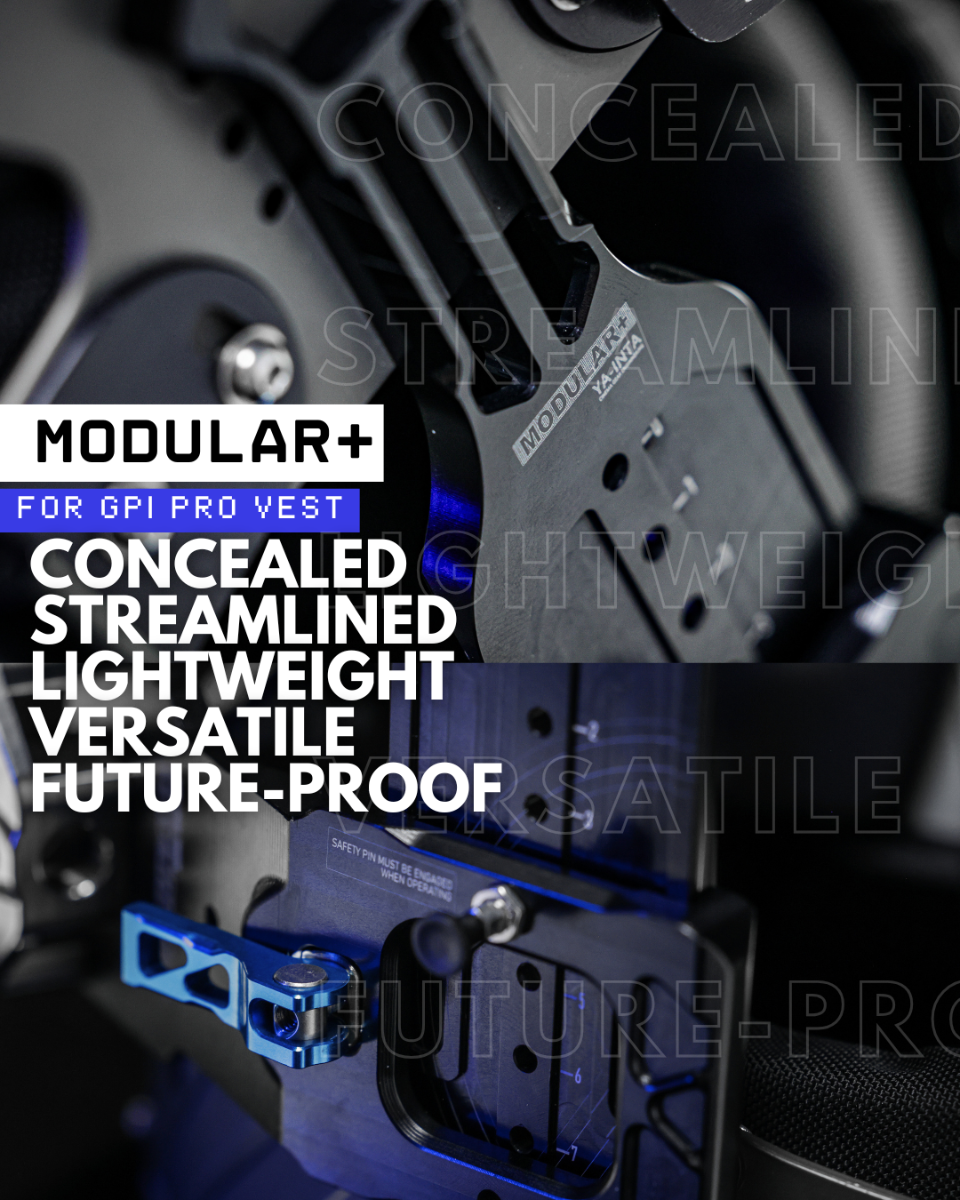
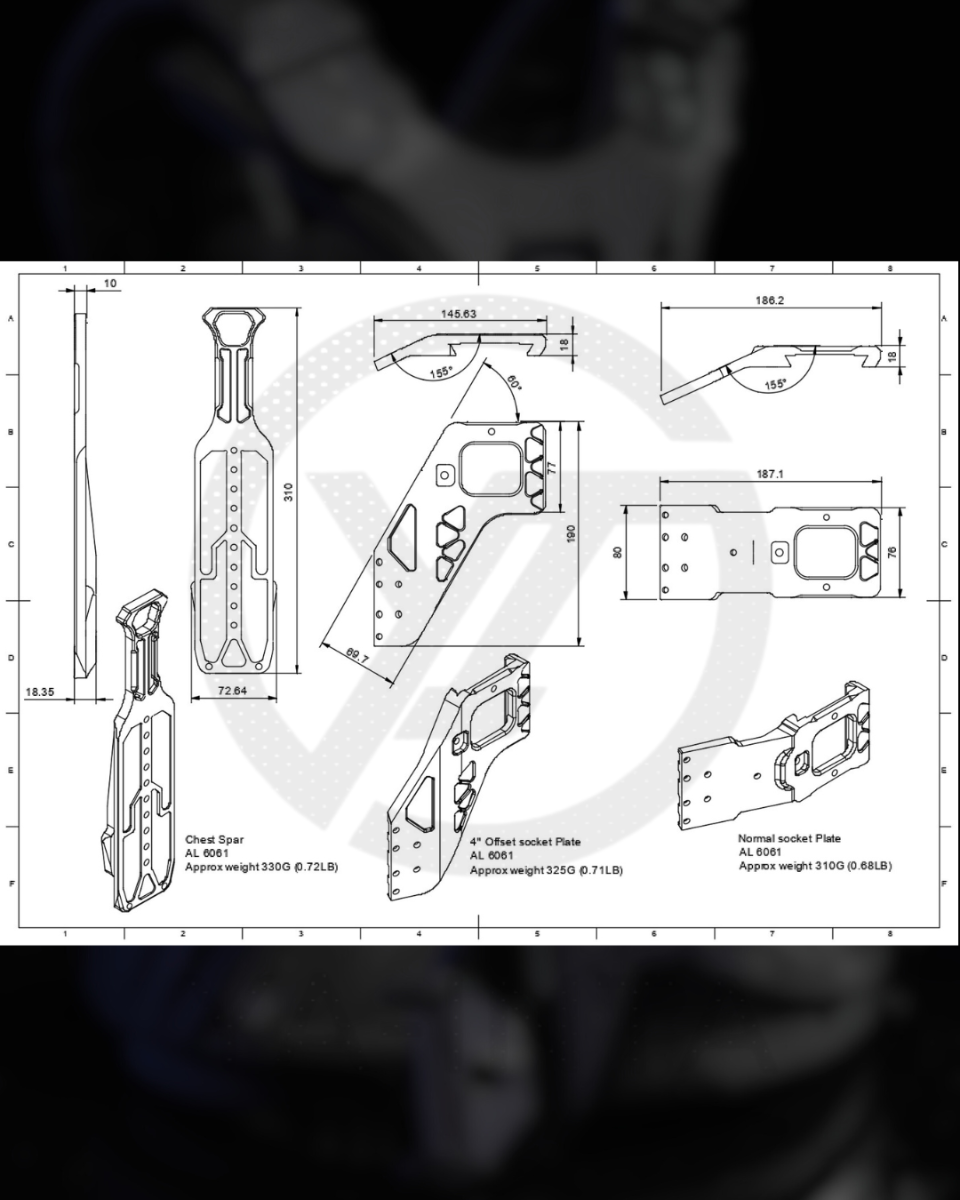
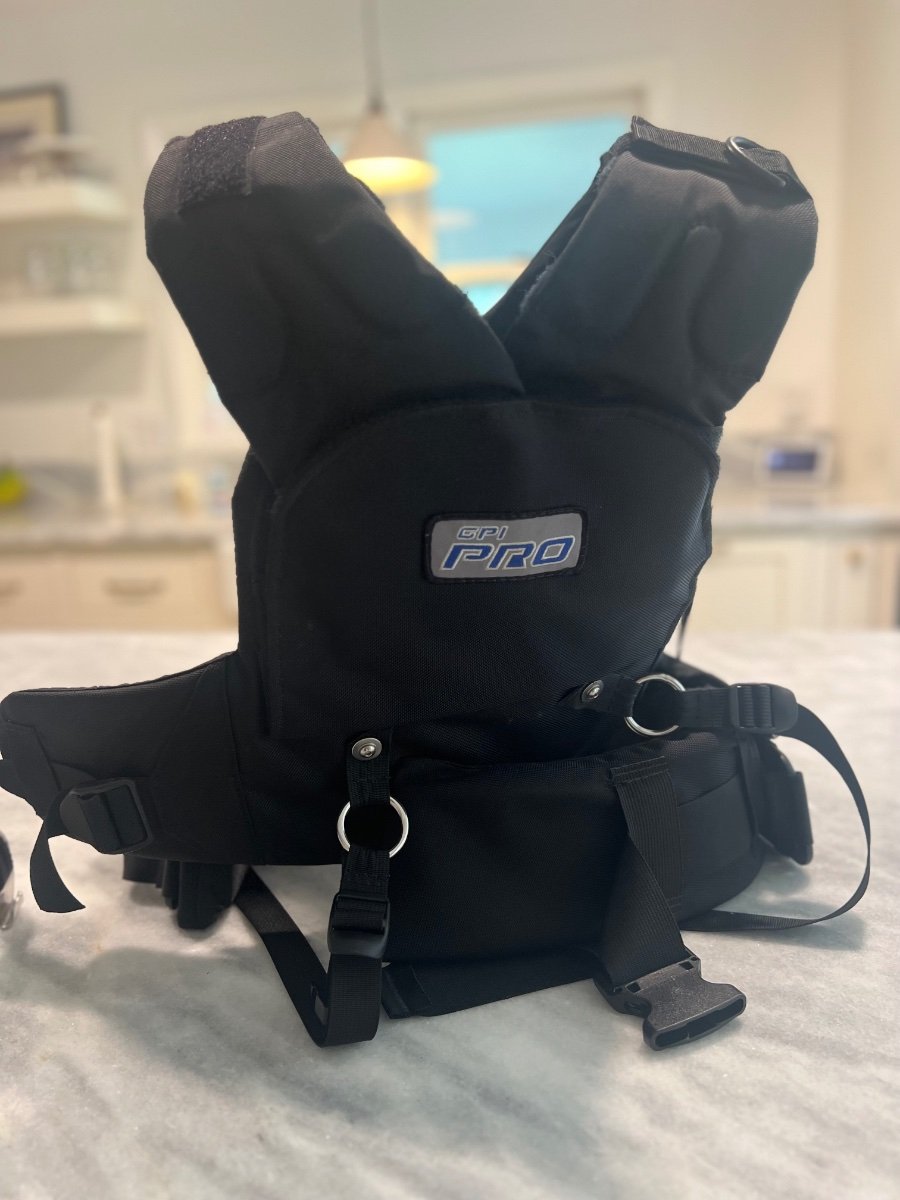
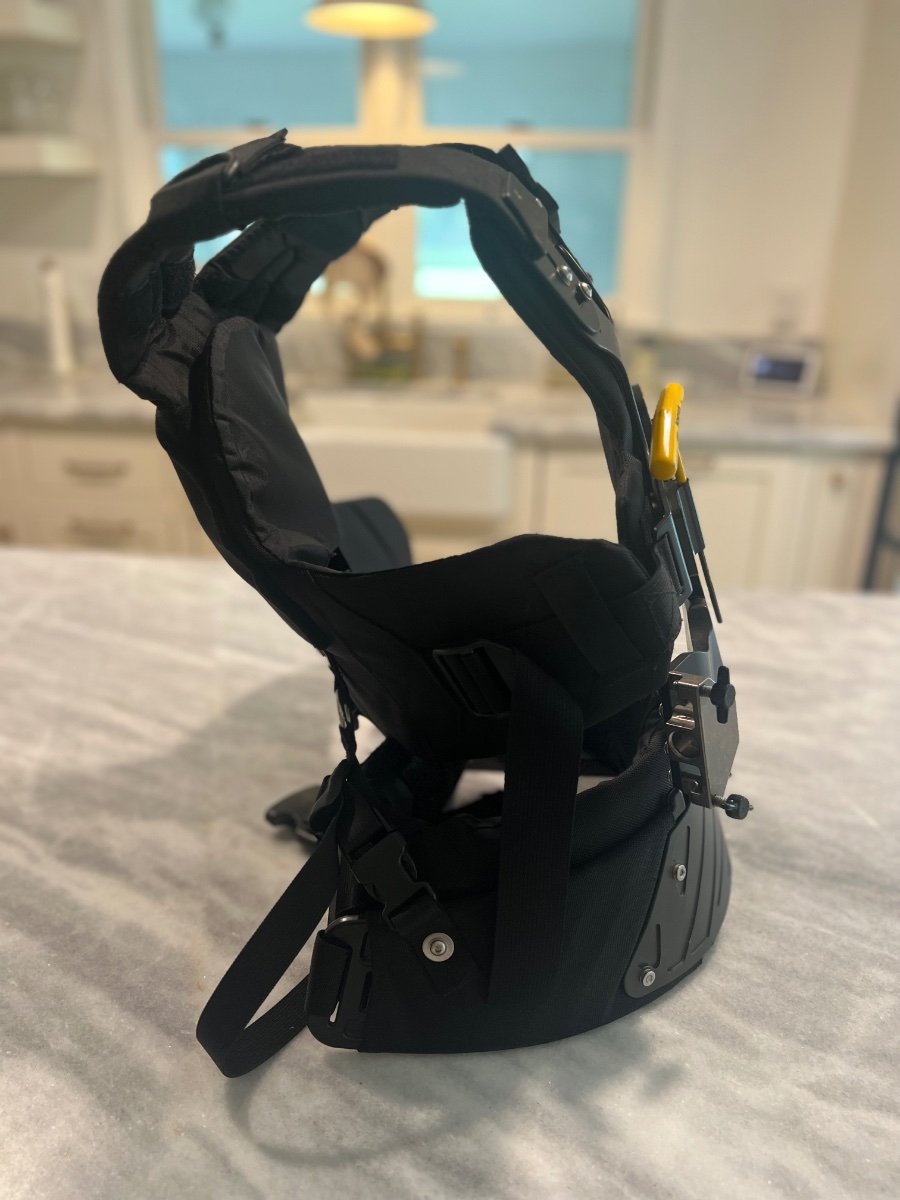
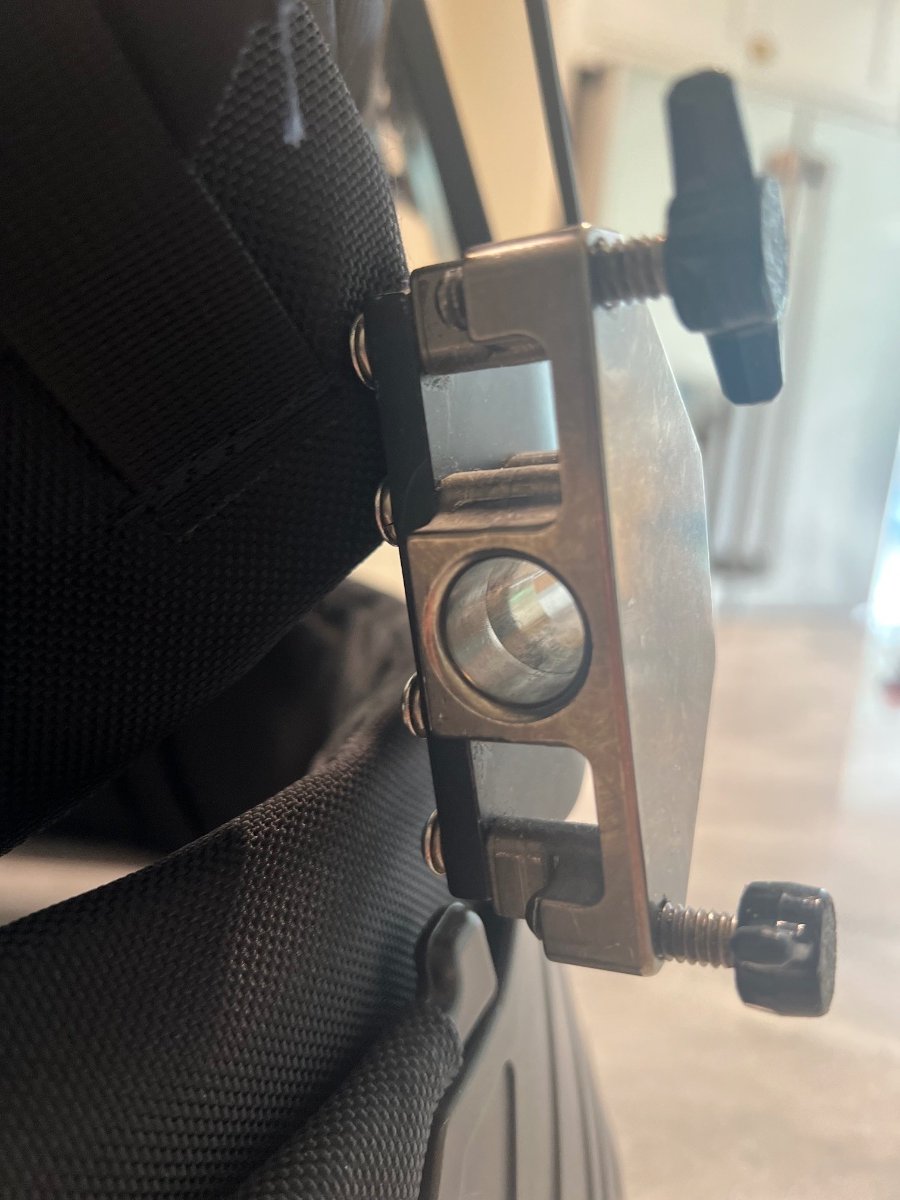
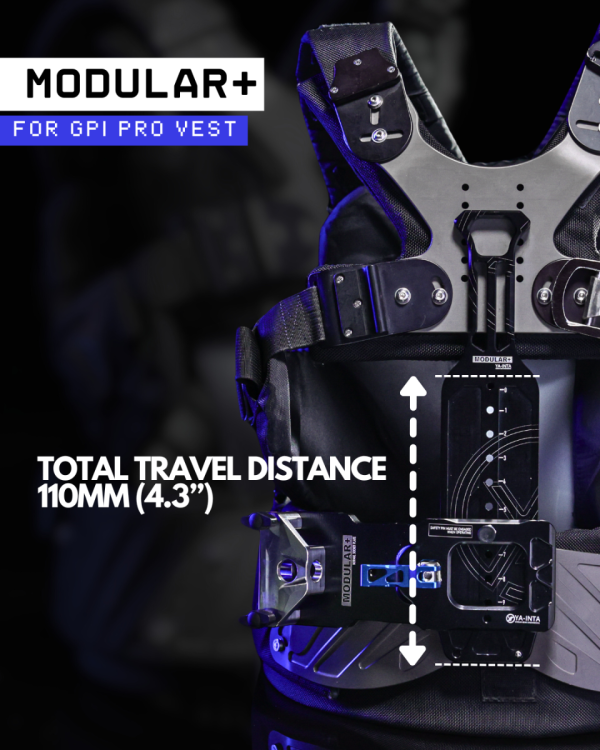
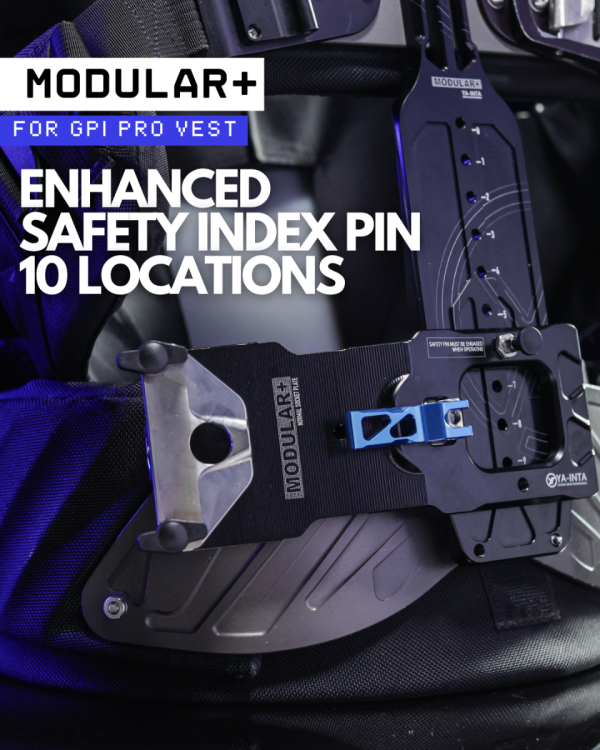
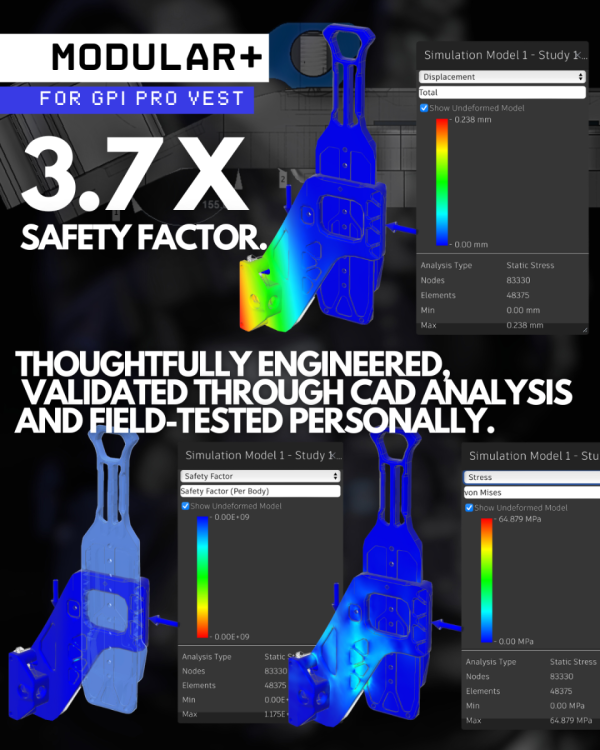
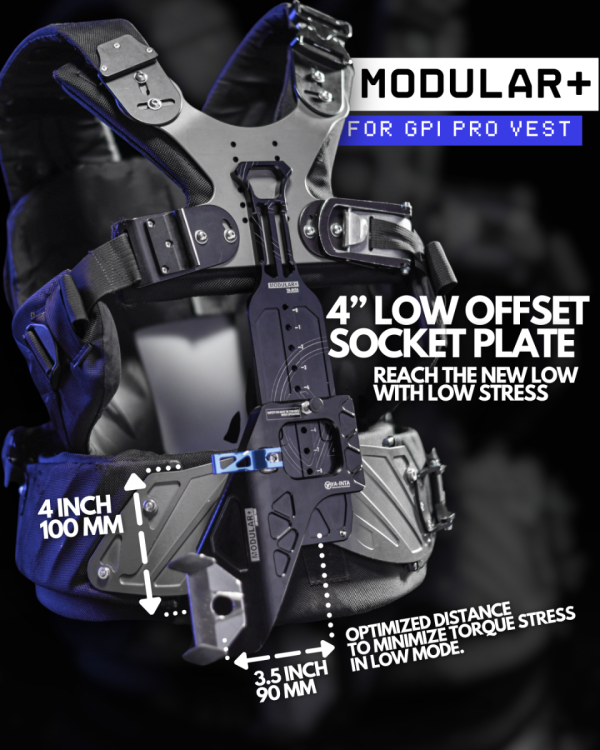
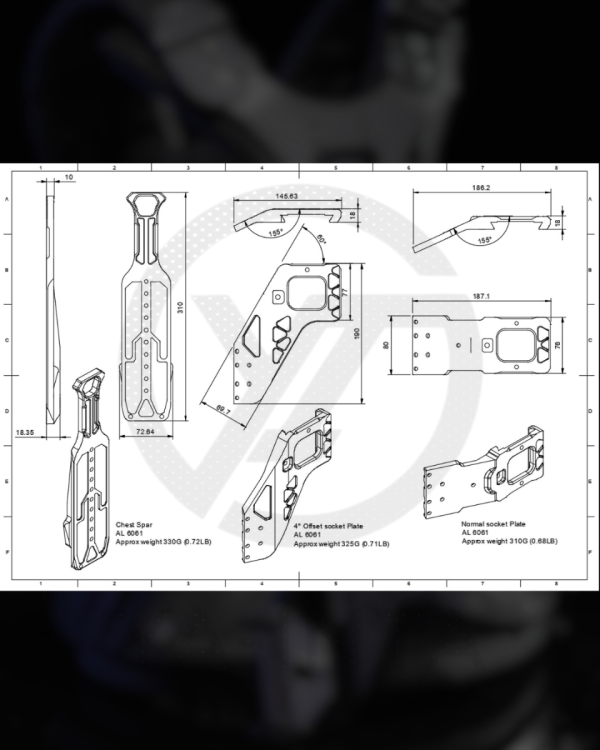
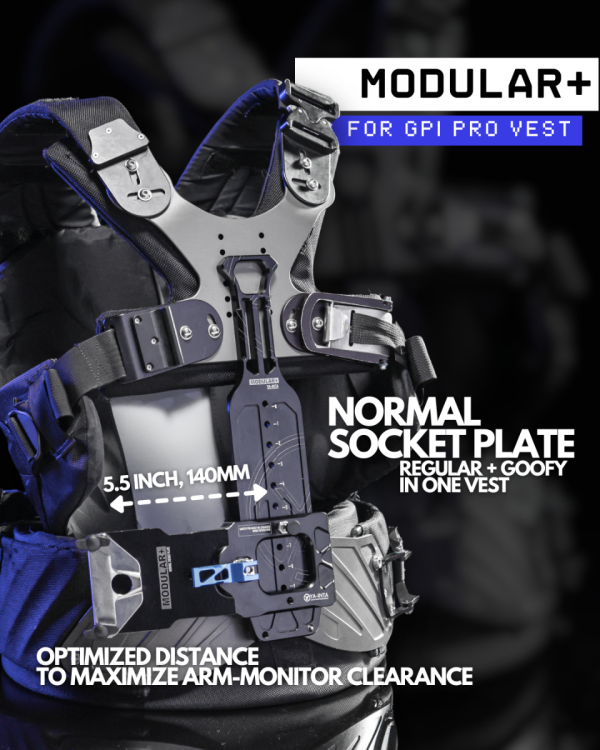
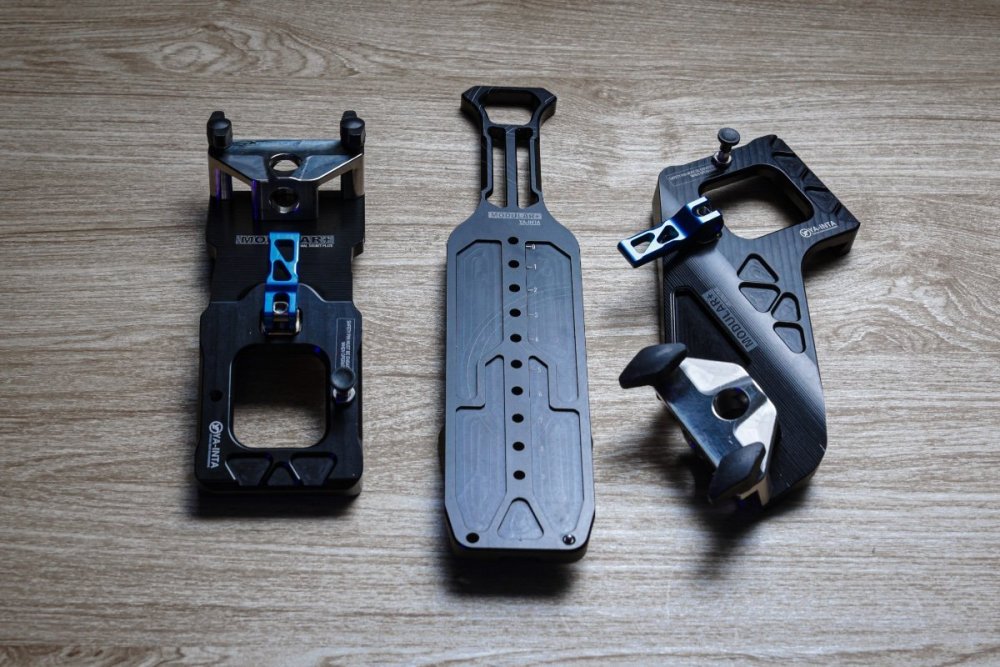
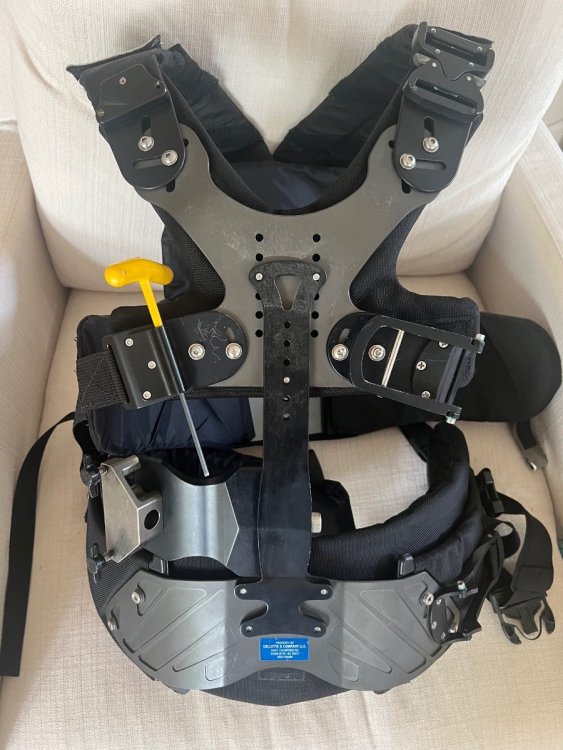
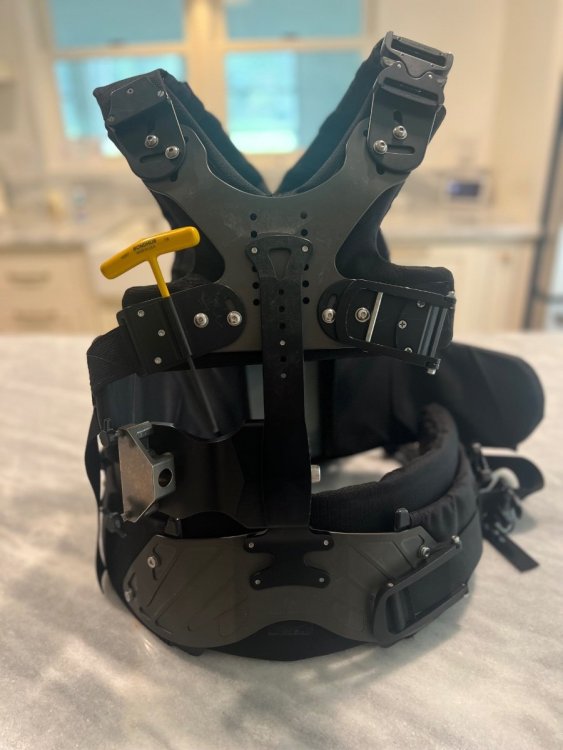
Hi guys. MODULAR+ (Modular plus) upgrade kit for GPI PRO vest is now available for pre-order 🔥 Check it out 📍 https://www.ya-inta.com/store/p/modular-upgrade-for-gpi-pro-vest Detail: Modular+ enhances the versatility and modularity of your GPI PRO vest. •Adjustable socket height •Reversible socket block plate***, allows regular and goofy in one vest (ideal for rental vest or specific shots requiring a side swap) •Low mode socket plate is optimized to minimize torque stress in low mode •Normal socket plate is optimized to maximize arm-monitor clearance view •Enhanced multiple safety pin lock locations •Laser engraved reference position Engineered for strength and efficiency, the Modular+ is lightweight, rigid, and streamlined. Precision-machined in-house by Koon W. Ya-inta, SOC, ACO, using multi-axis CNC machine. R&D + field testing + continue improvements over 1.5 years Designed with the future in mind, the Modular+ system offers a clear upgrade path. Additional accessories in the Modular+ product line will continue to expand its capabilities. Specs: Material: Aerospace-grade 6061, Stainless Steel 304 ***The normal socket plate is reversible for both regular and goofy operation. However, when mounted in the goofy position on a regular vest, there is a clearance limitation. A dedicated adapter for using a regular vest with a goofy setup is currently in development. If your vest is already configured for goofy operation, this issue does not apply. Check out promo video here

 2 points
 -
All right, everybody level has shipped as of today tracking is in hand. looking forward to using it2 points
-
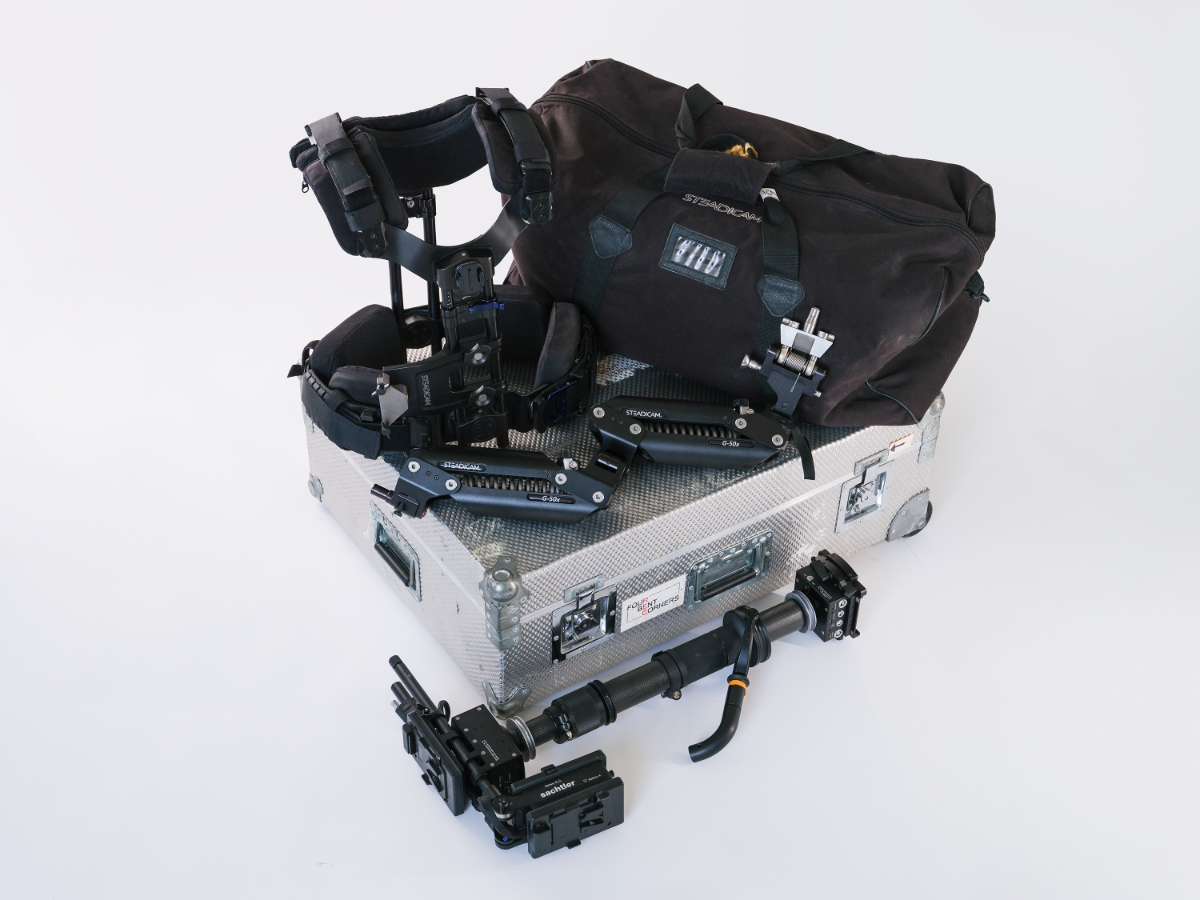
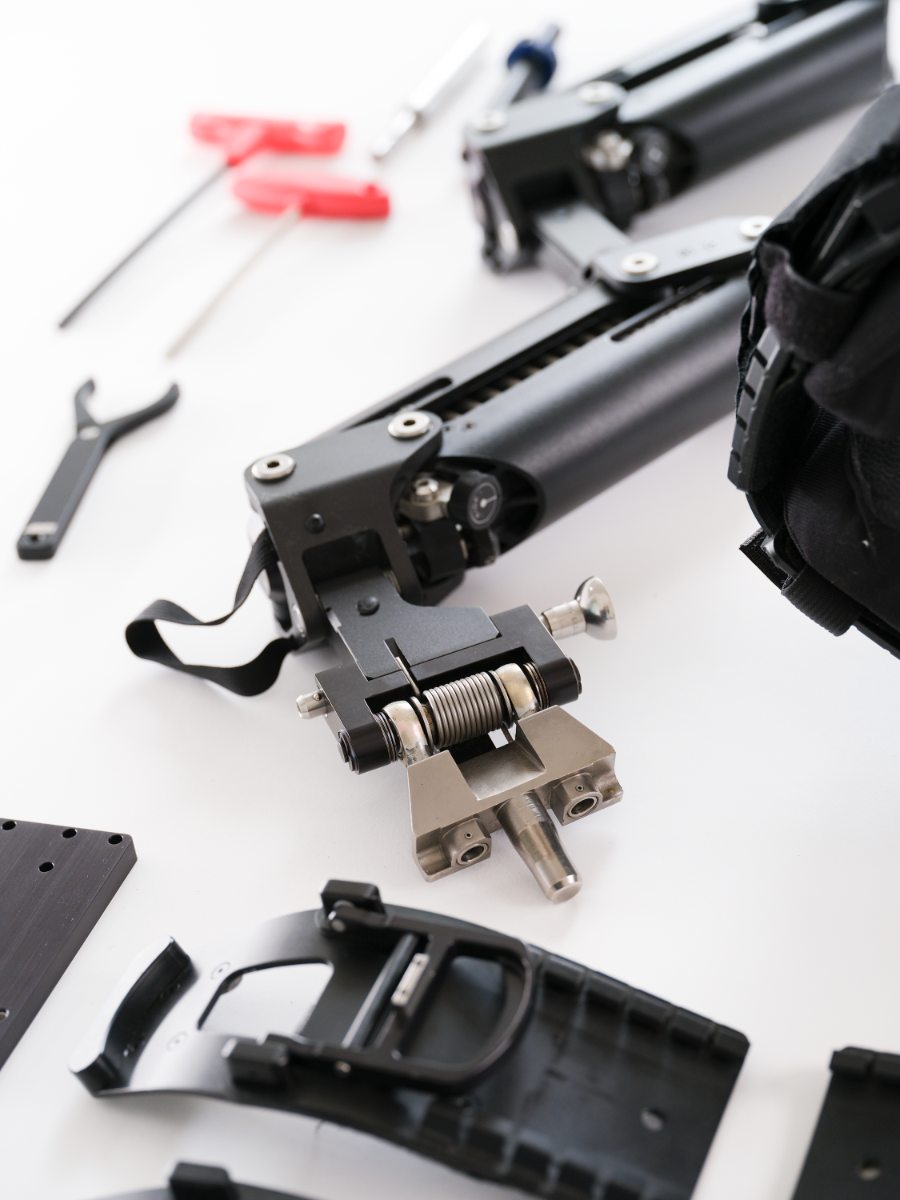
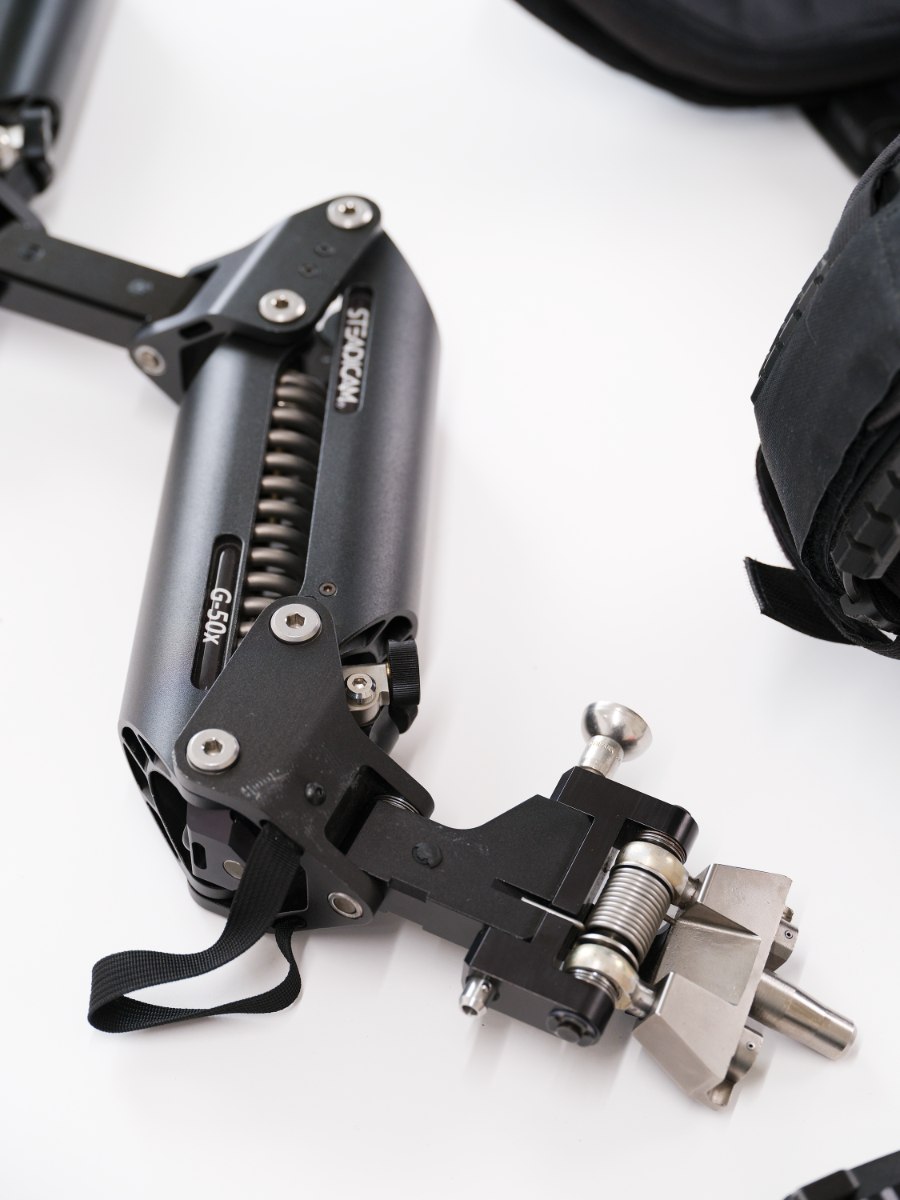
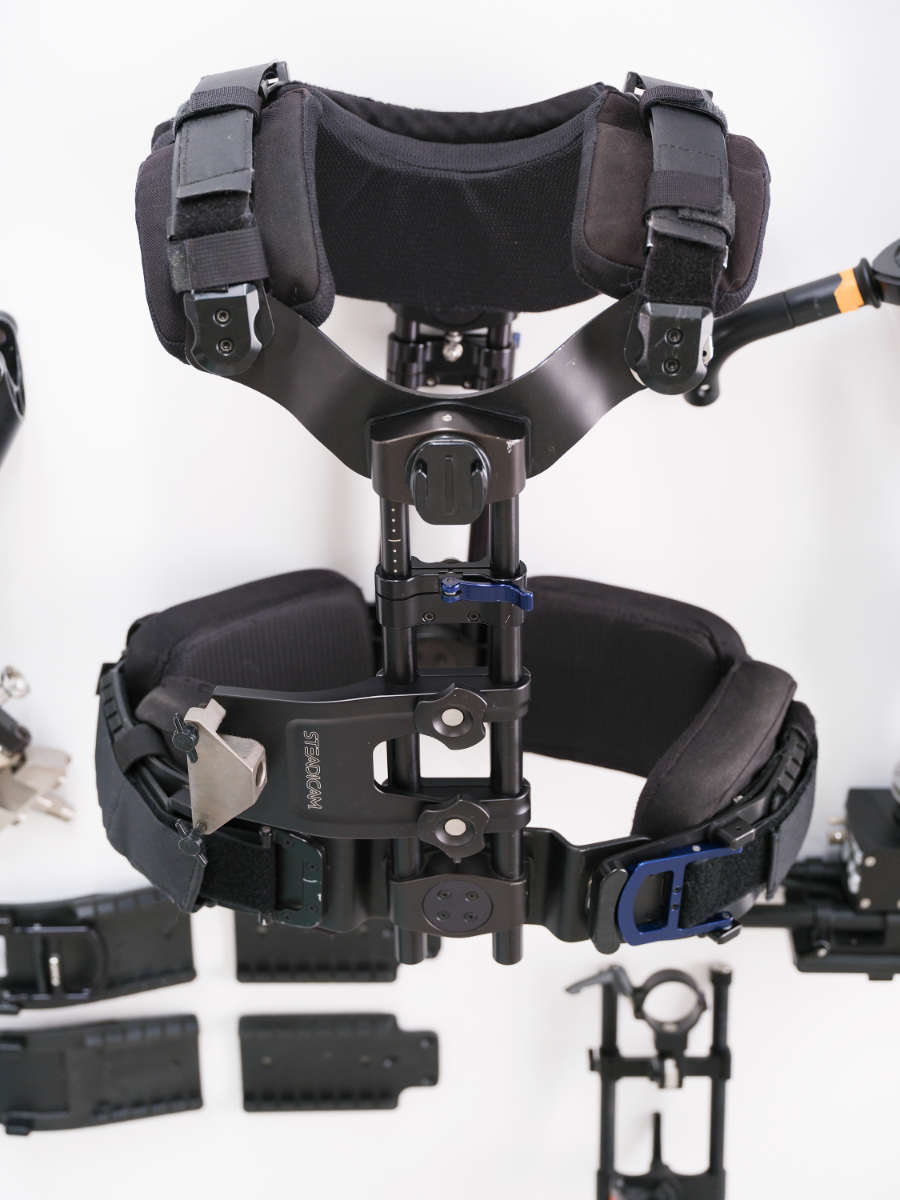
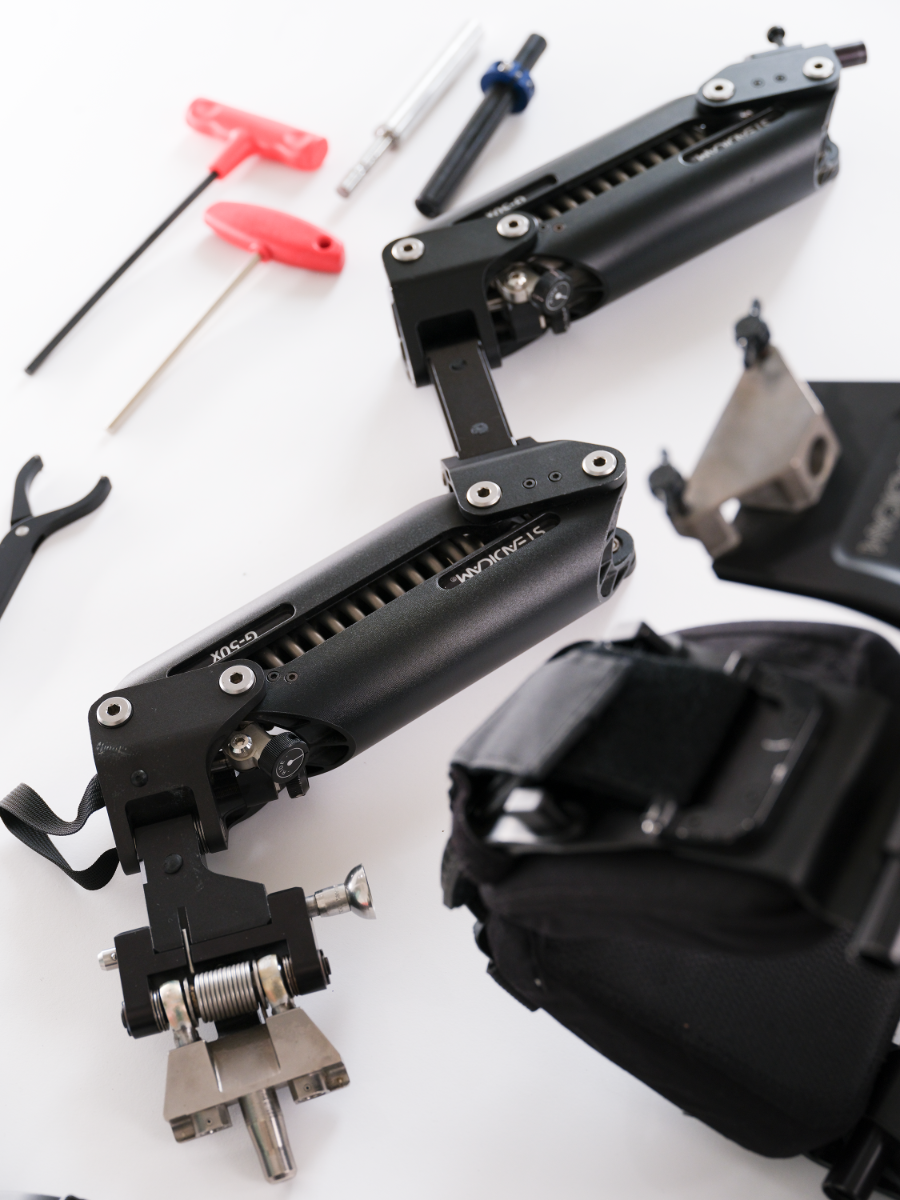
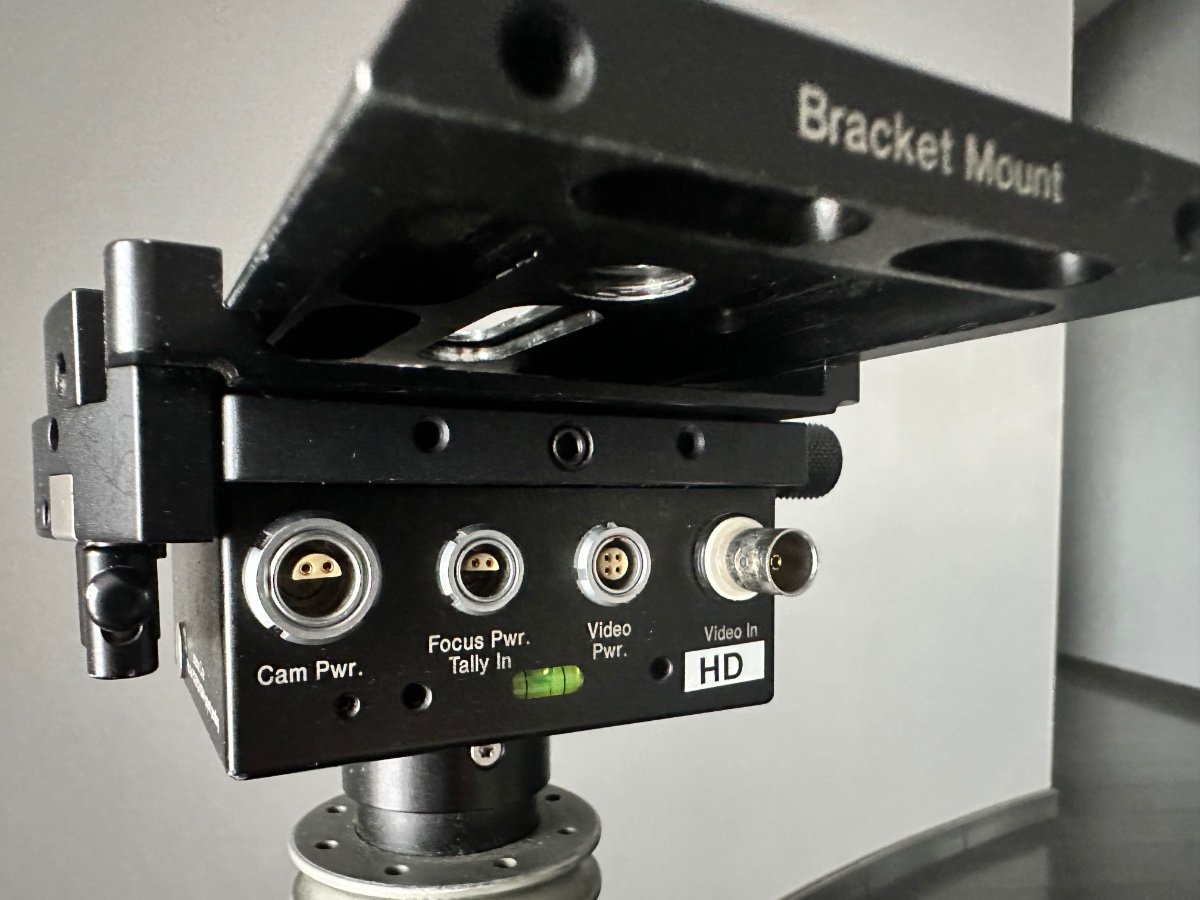
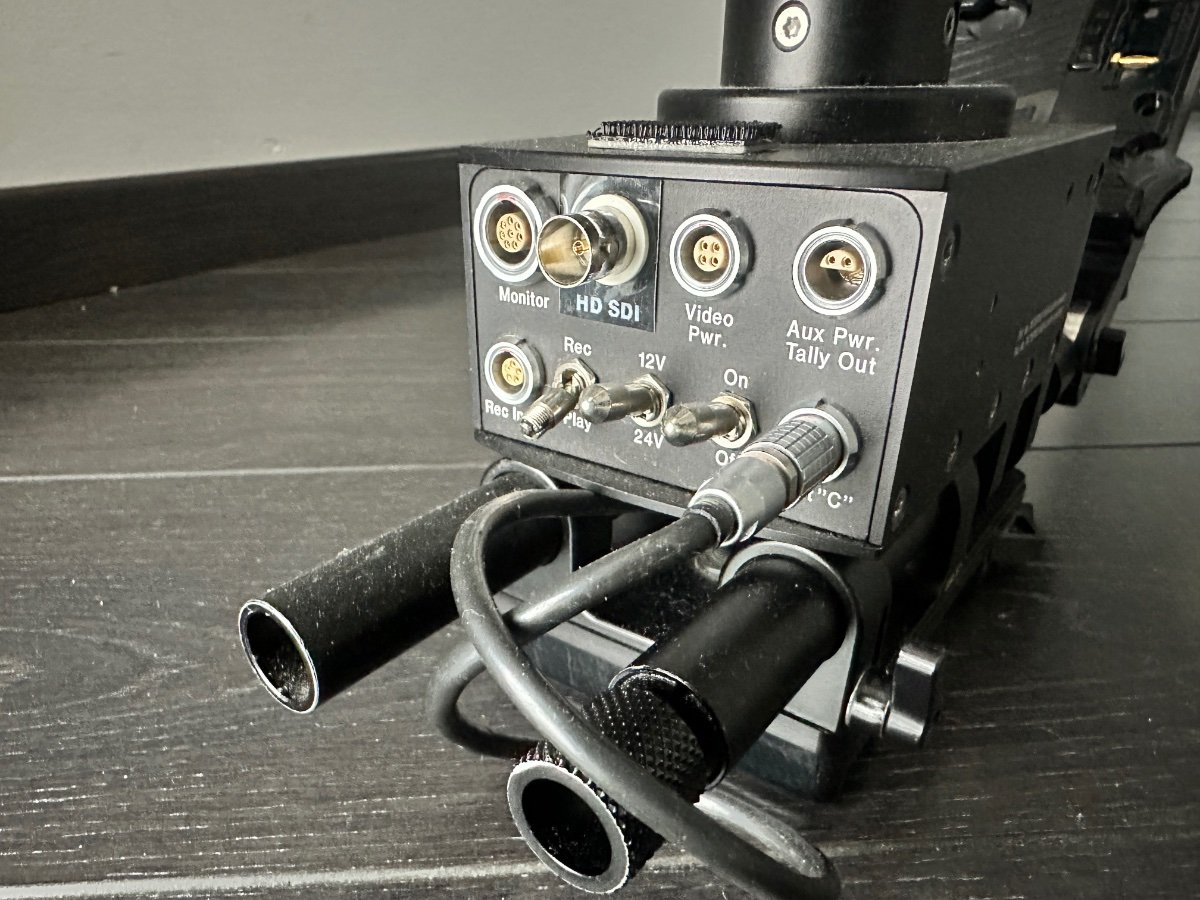
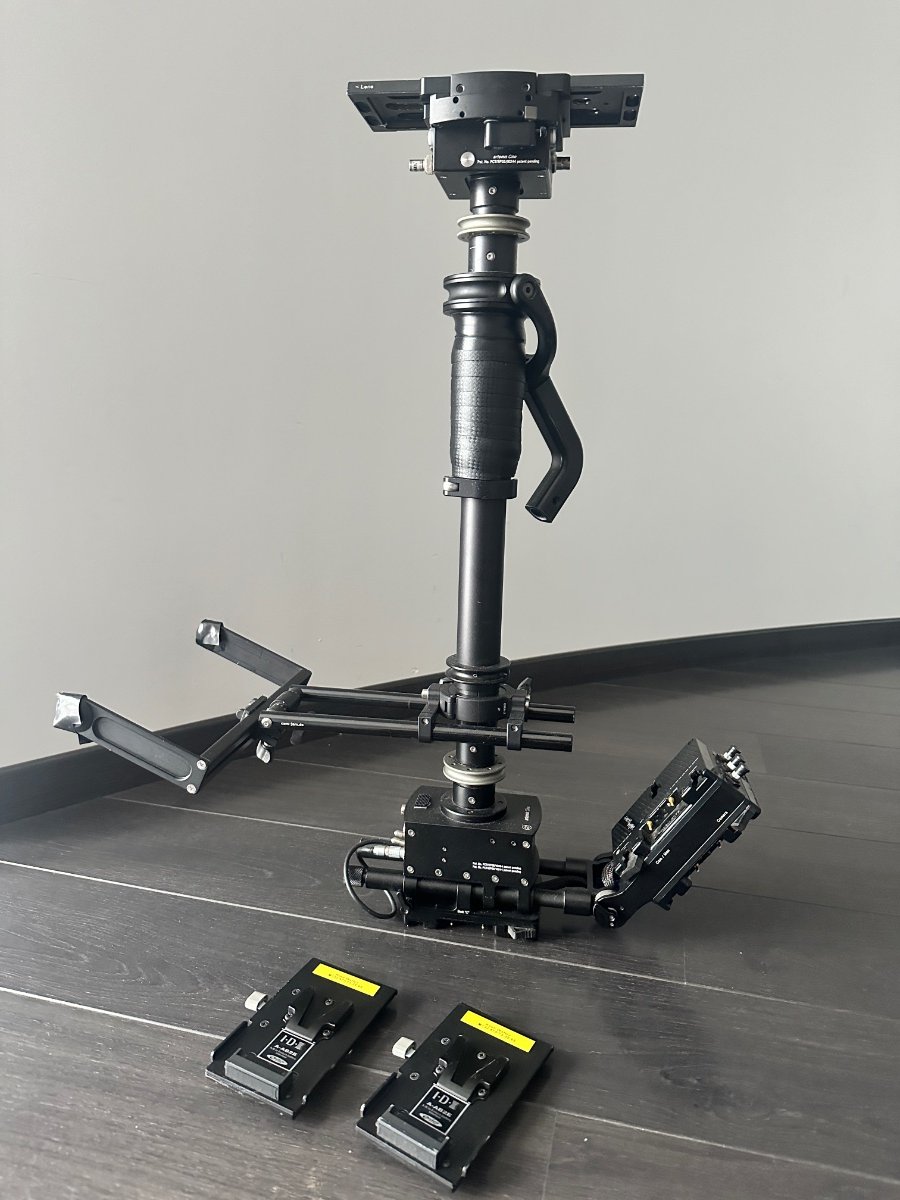
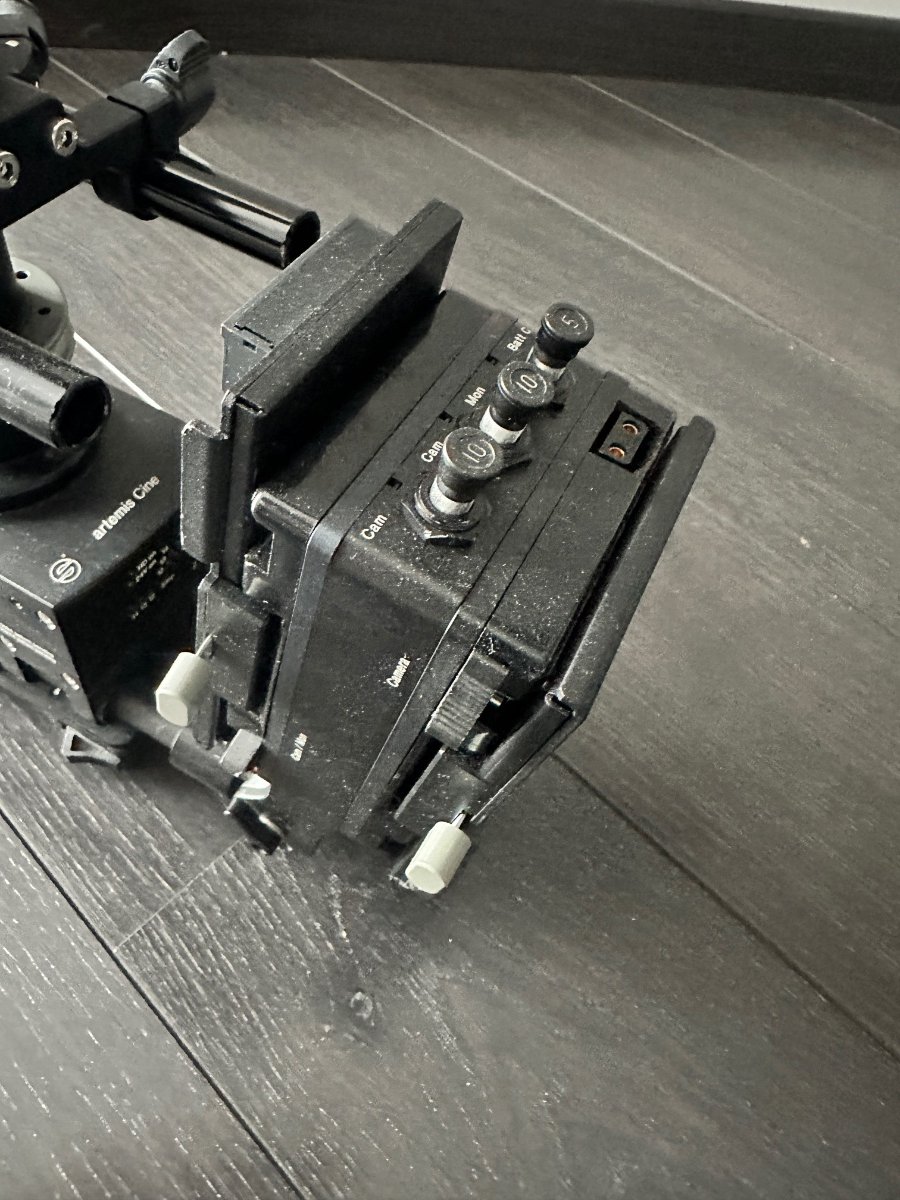
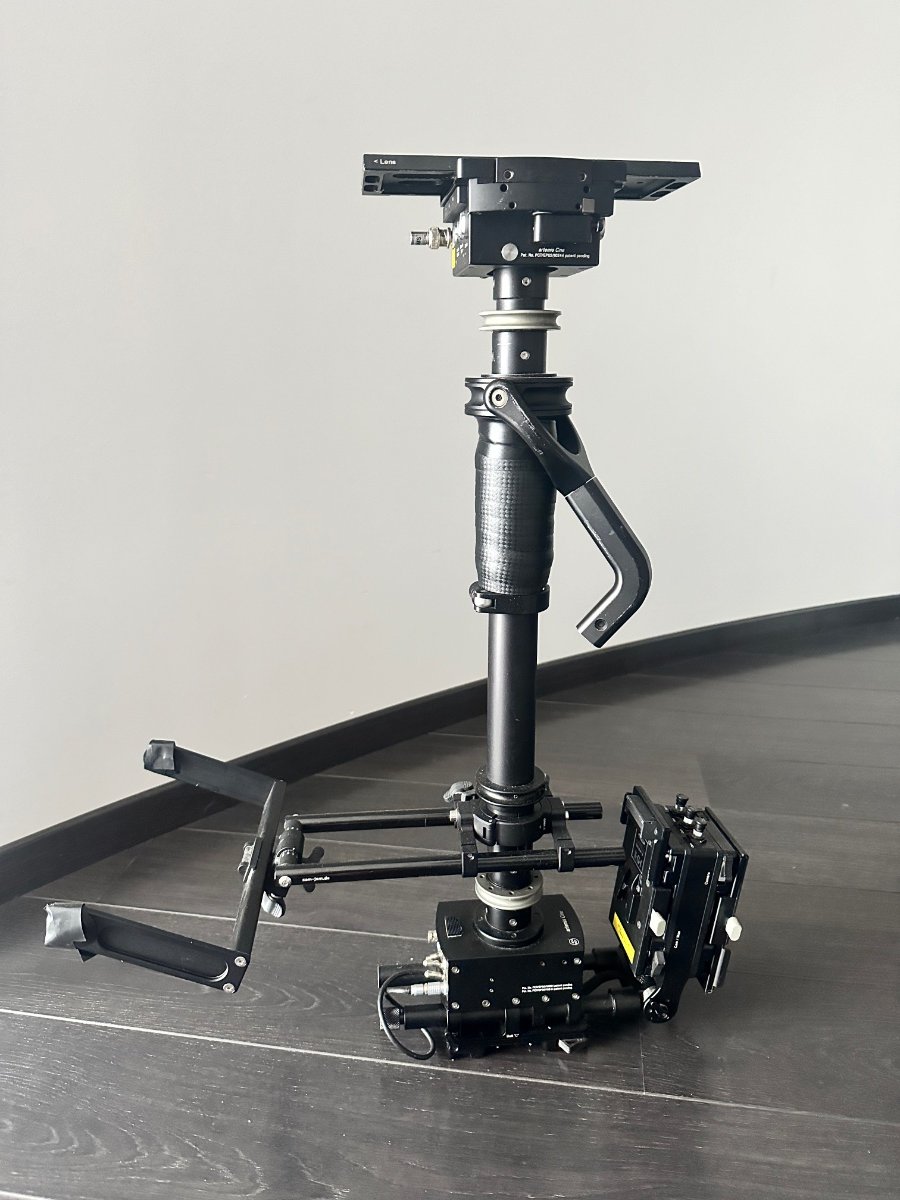
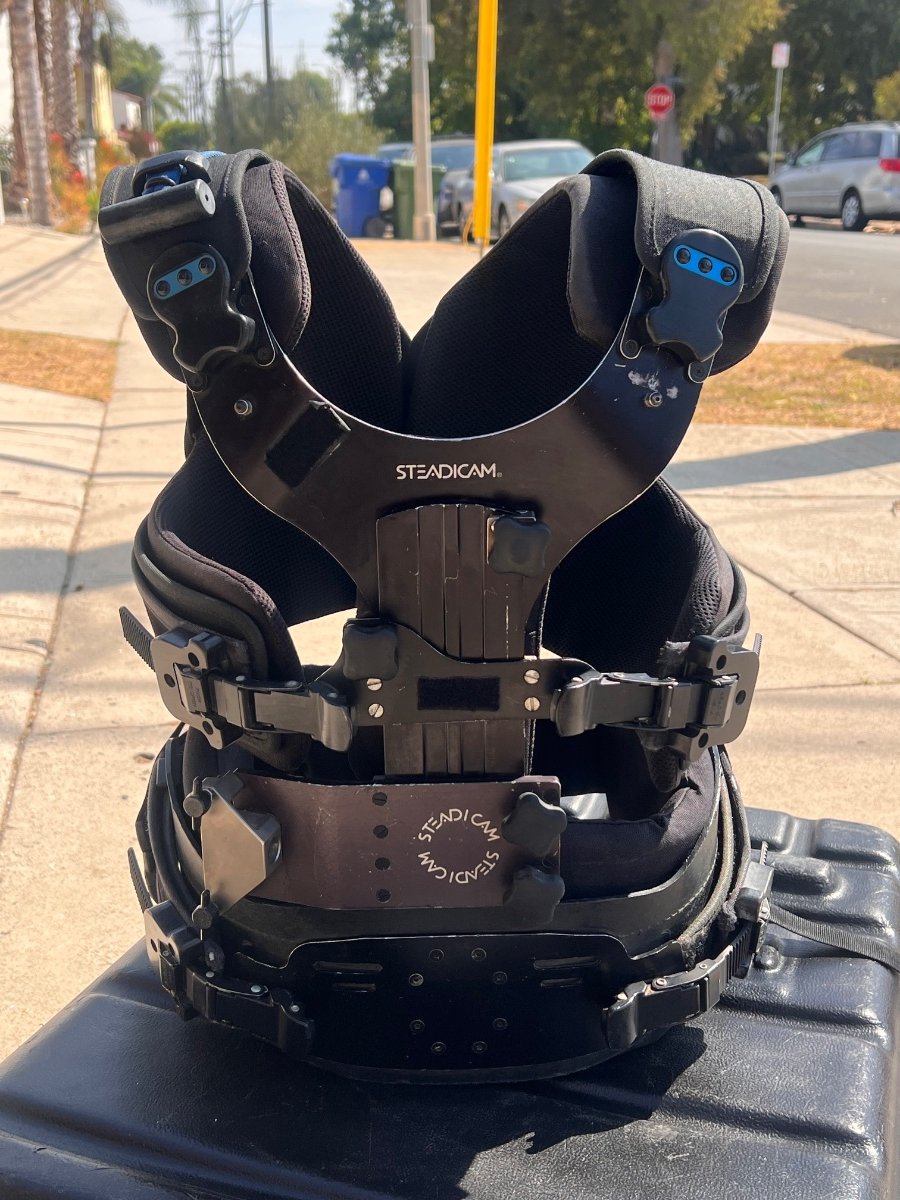
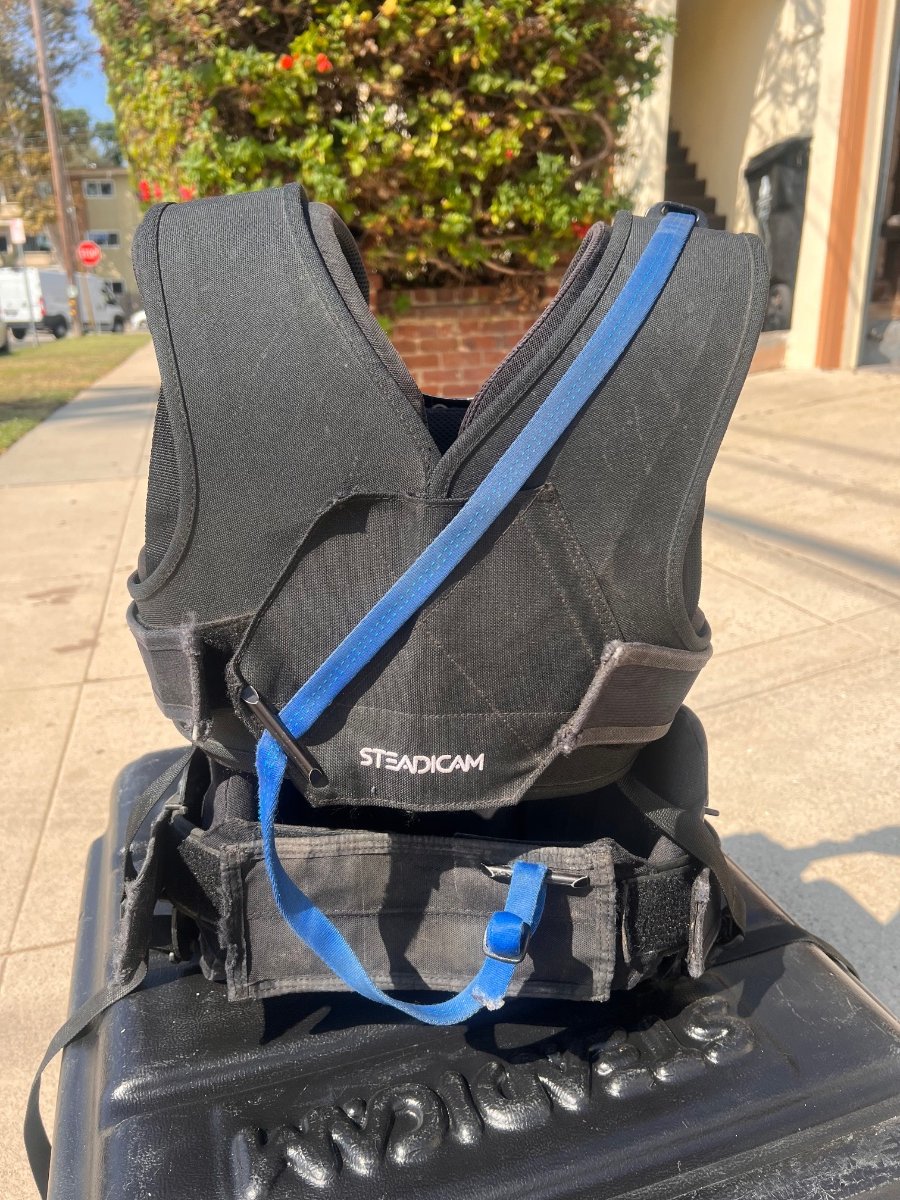
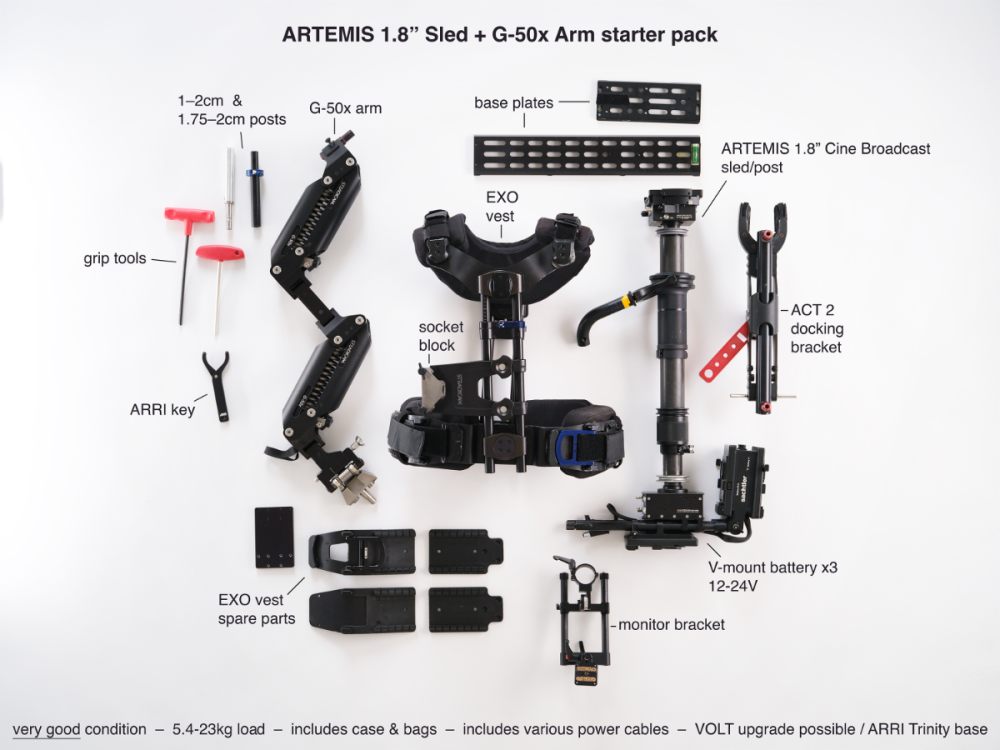
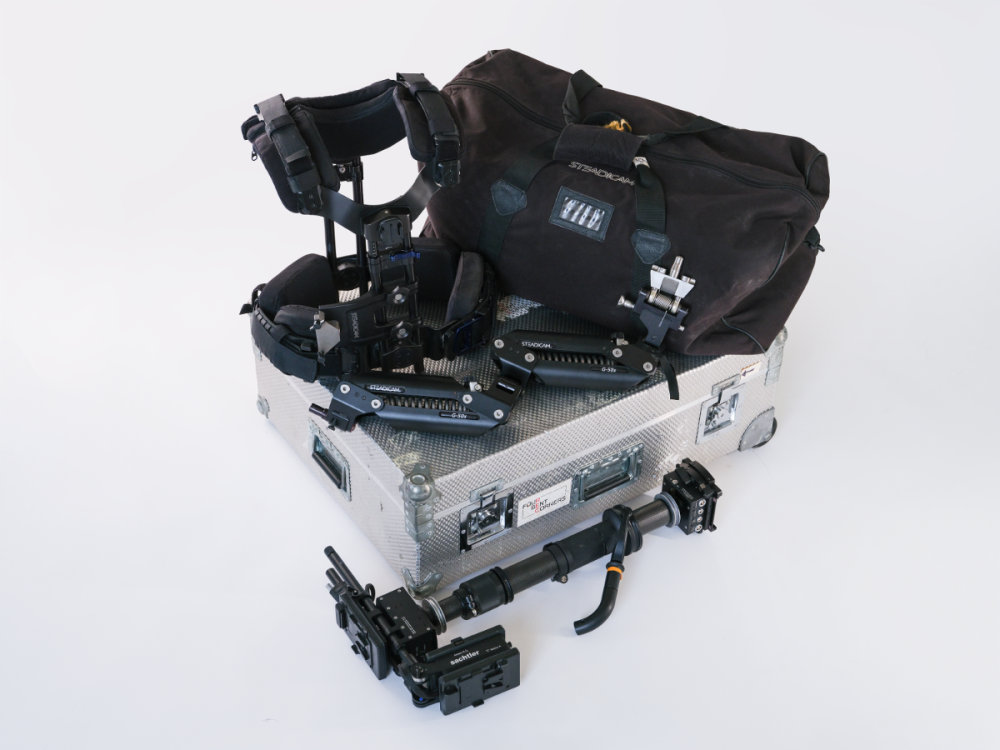
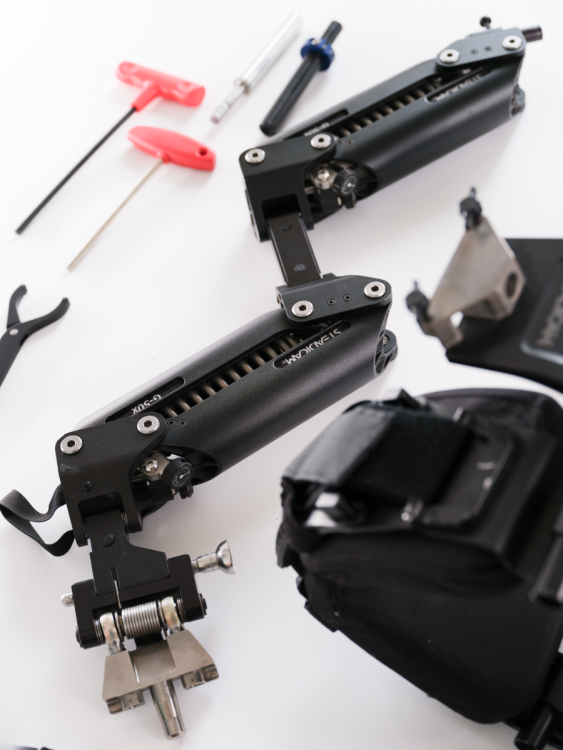
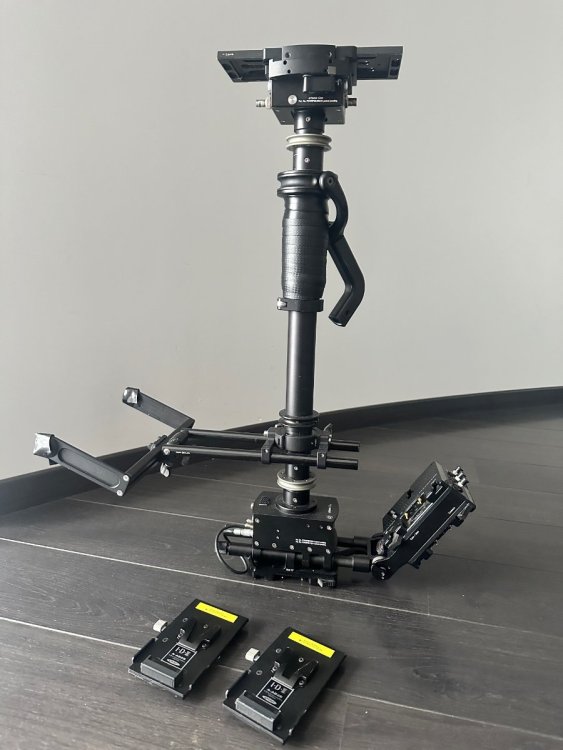
Hello Steadicam Operators, I’m parting with some incredible gear that has served me well over the years. The Steadicam G-50X Arm, ExoVest, and Sled are all in excellent condition, ready for a new owner who can put them to work on set. Over the past several years, I’ve transitioned more into a producer role, so I haven’t been in the camera department as much as I once was. Parting with this gear is bittersweet—it represents many great creative days on set. I know it will continue to serve someone very well. One notable selling point: the sled is the base for the Steadicam Trinity, and as confirmed by ARRI, it’s also upgradable to the 1.8 Volt post. The asking price for the complete package is $19,500 USD. If you’re looking for a high-quality rig that’s been well cared for, this is the one. Feel free to reach out with any questions or for more details! If you are interested, please reach out, and we can discuss the details further. Kind regards, Richard Included in the package: ARTEMIS 1.8" Cine HD Pro Sled (V-Mount, 12V/24V) G-50X Arm ExoVest Additional Accessories:Peter Abraham Zalex Longplate ACT 2 docking bracket 8" dovetail plate ExoVest Replacement Parts Telescopic Monitor bracket Custom milled G50X Pin to Mount Pro sled gimbal Cables: 12V XLR HiCap cam power cable (4pin Lemo 1S to 4pin XLR) 12V XLR power cable (3 pin Lemo OS - 4pin XLR) Cam Power / 24V ARRI 2pin Fischer cables Preston MDR Power 12V cables (6" and 2') RED EPIC Cam Power Cable (HiCap, 4pin Lemo 1S - 4pin Lemo) RED Cam Power Cable (HiCap, 4pin Lemo 1S -> 6pin Lemo B2) Cam Power cable (24V Panavision 3pin Lemo S) Case: Robust build, originally $800


 2 points
 -
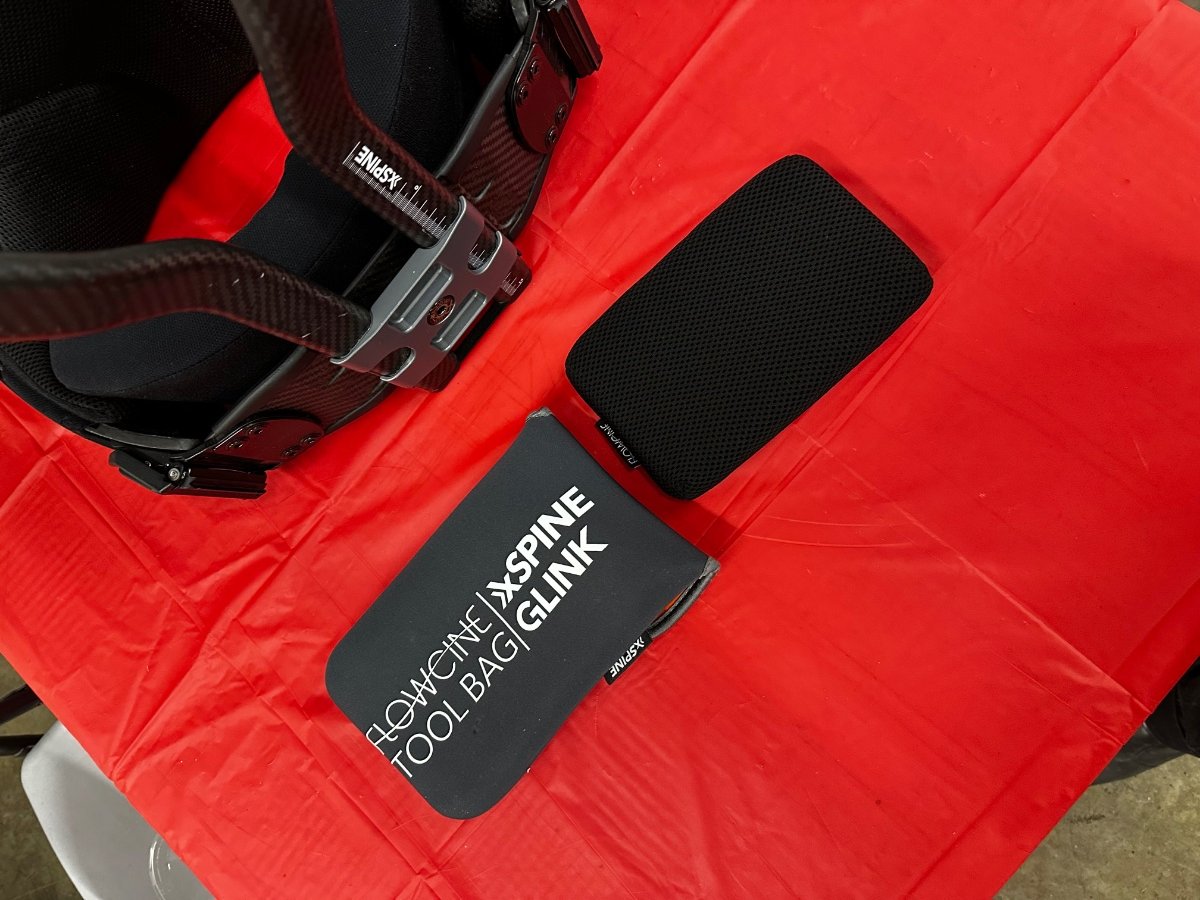
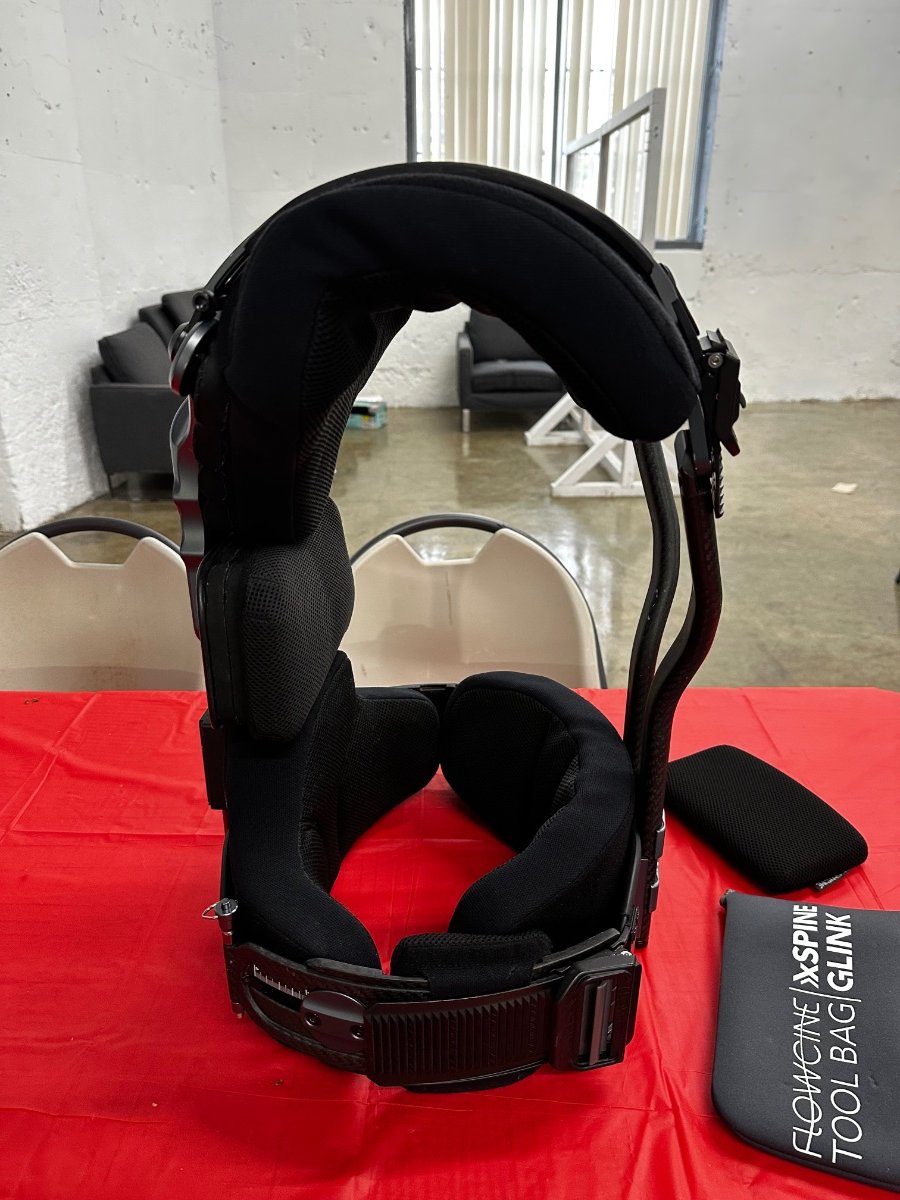
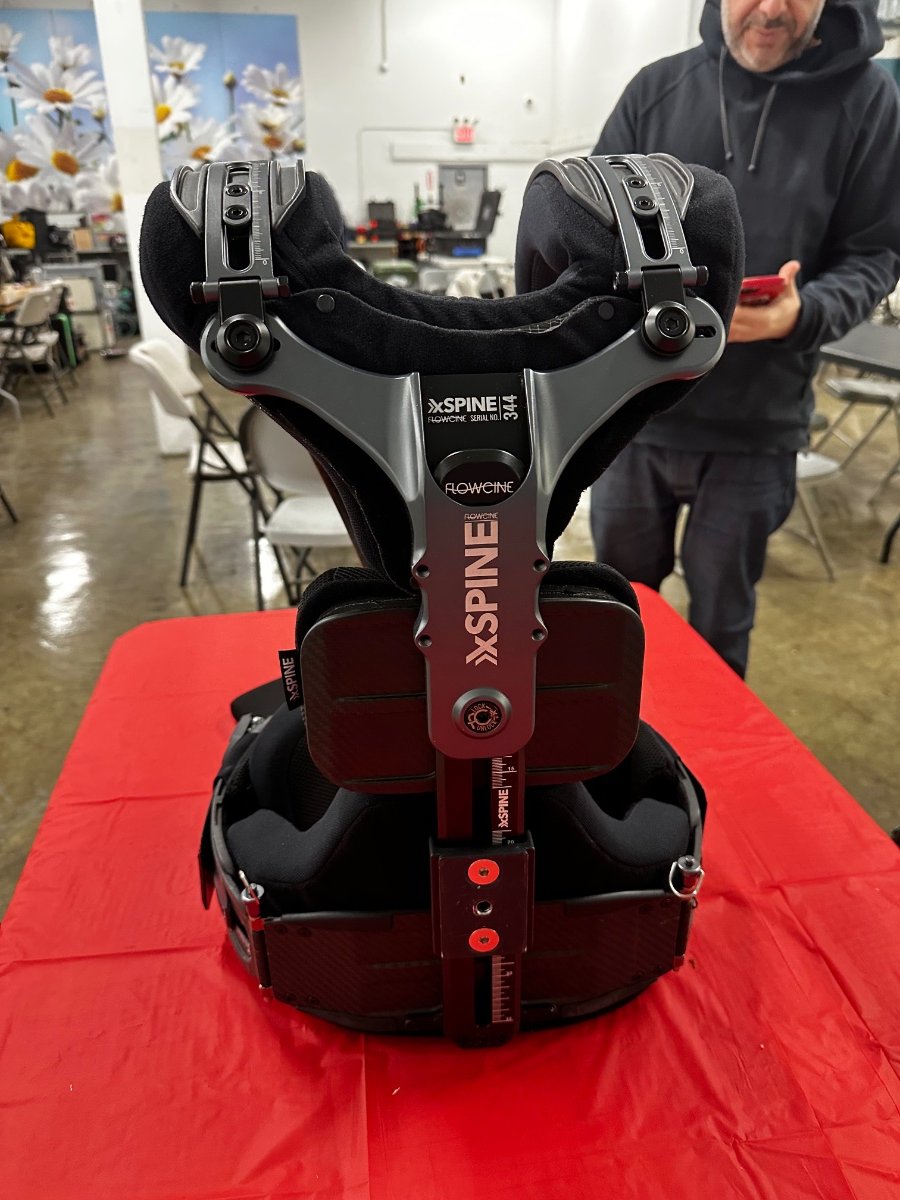
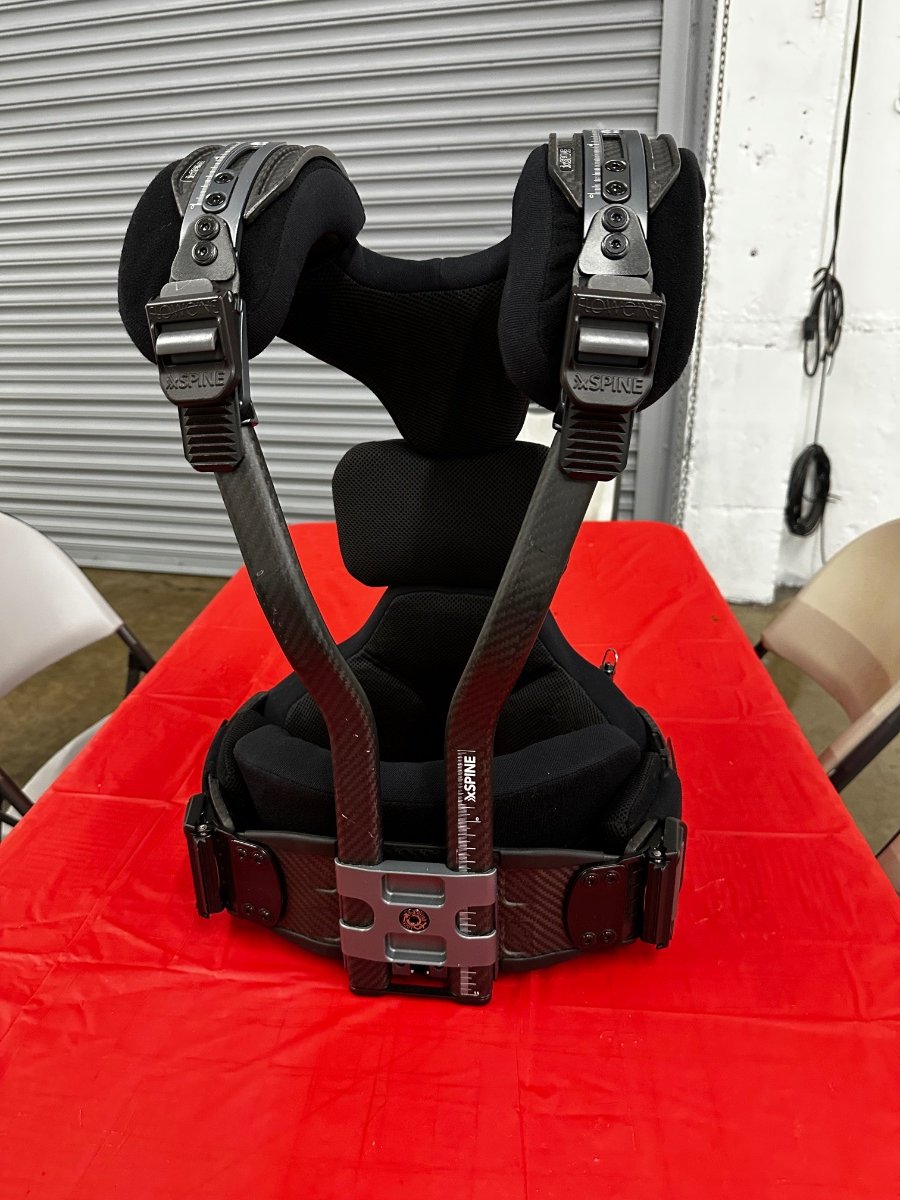
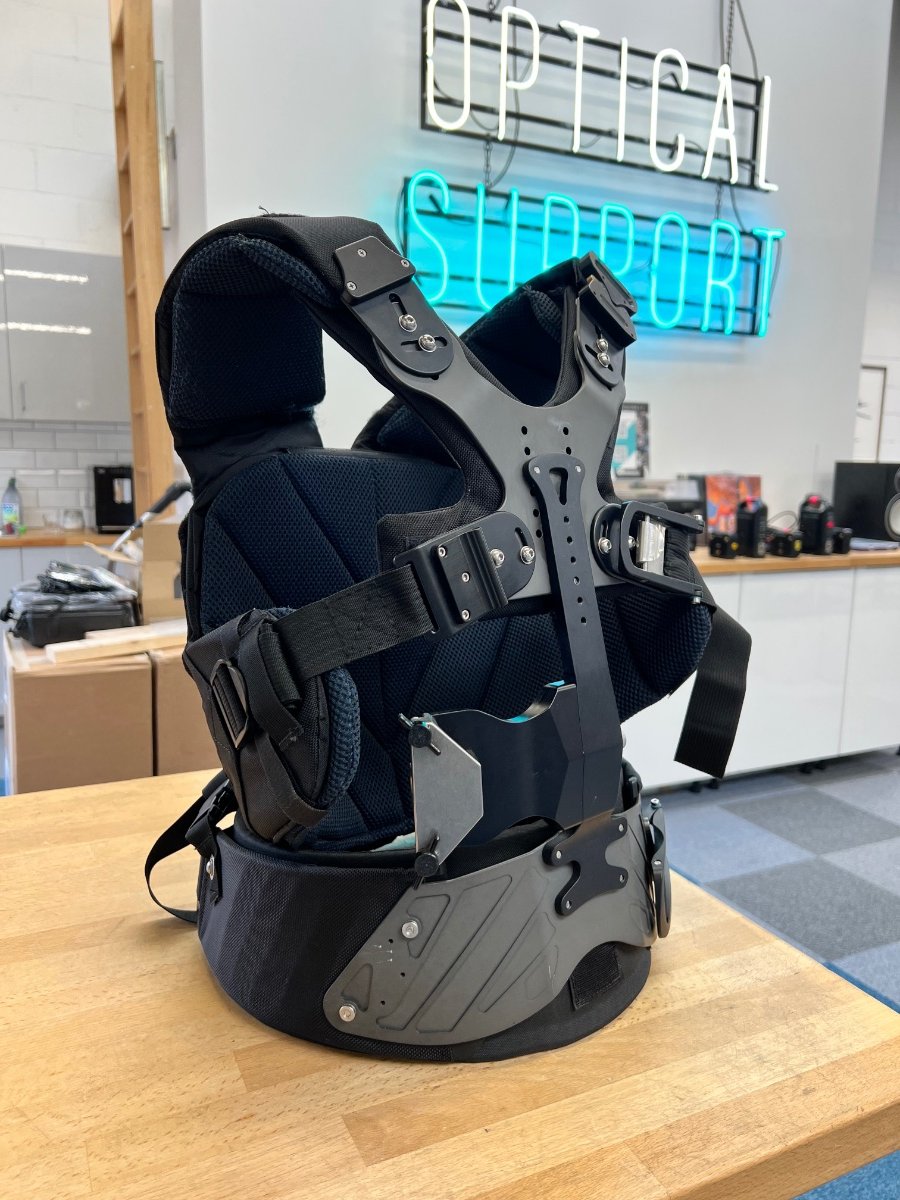
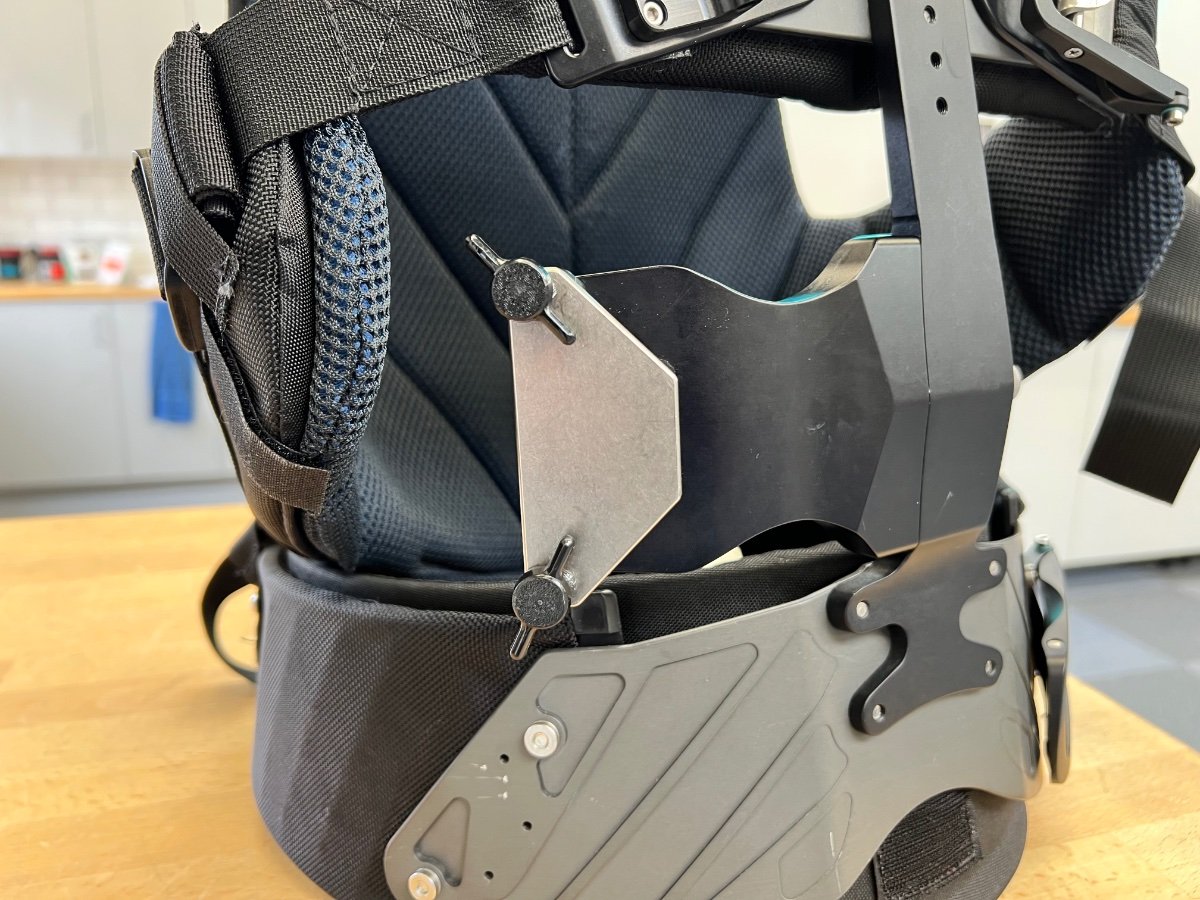
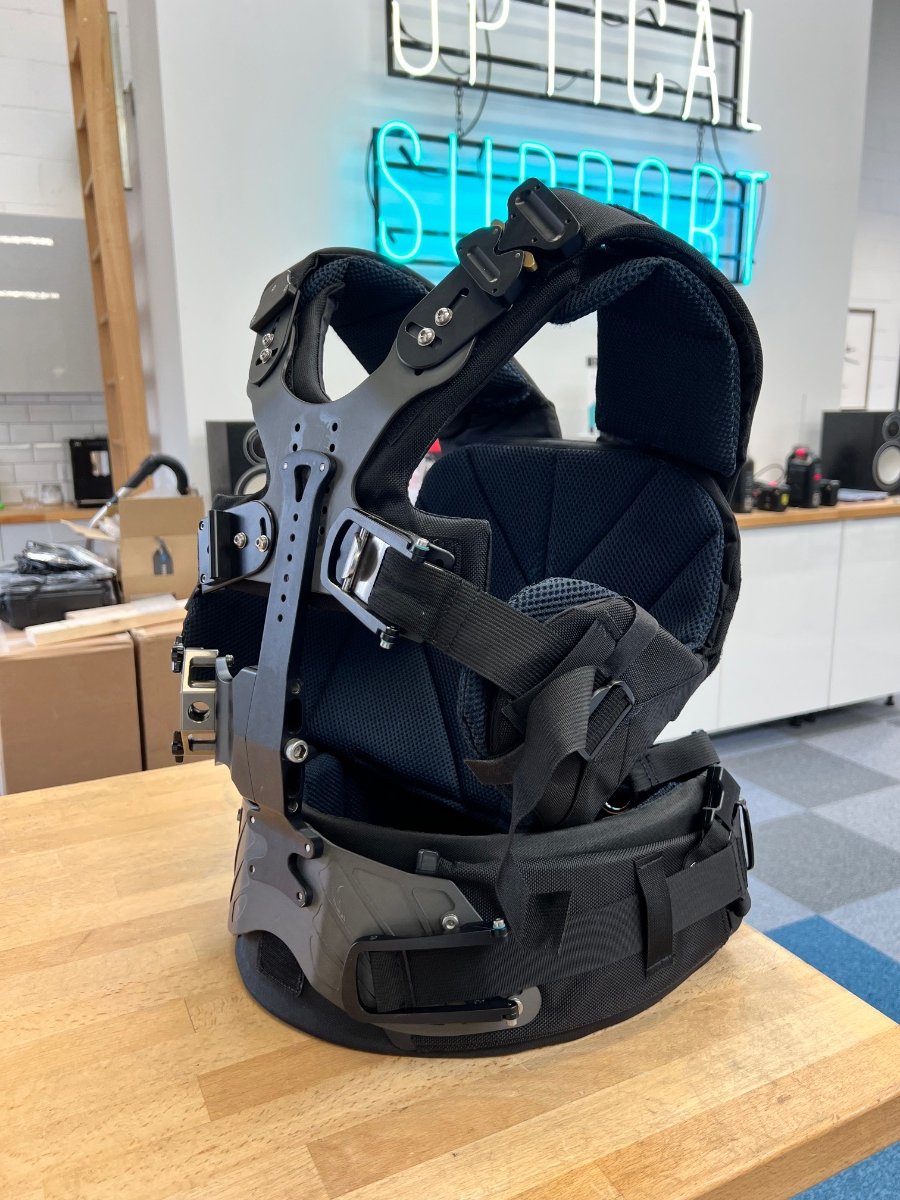
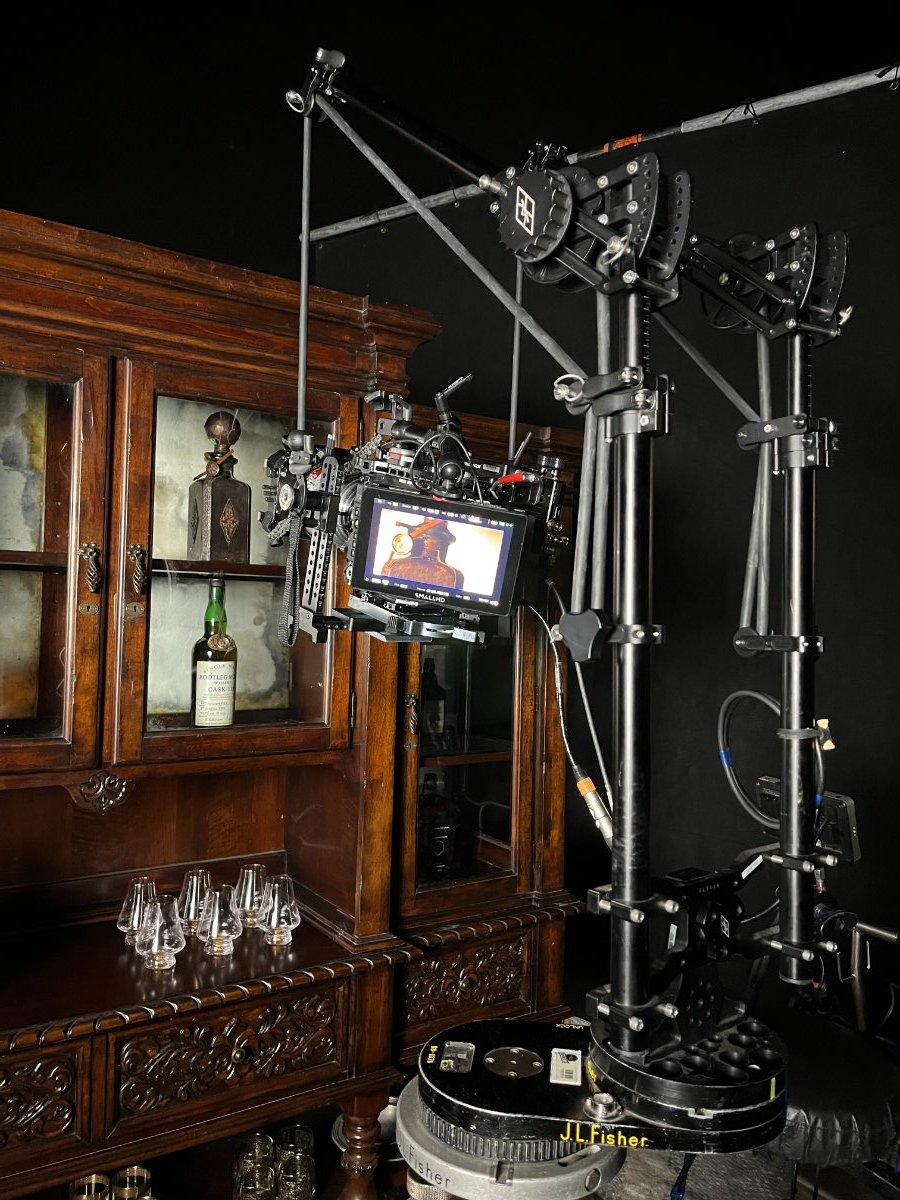
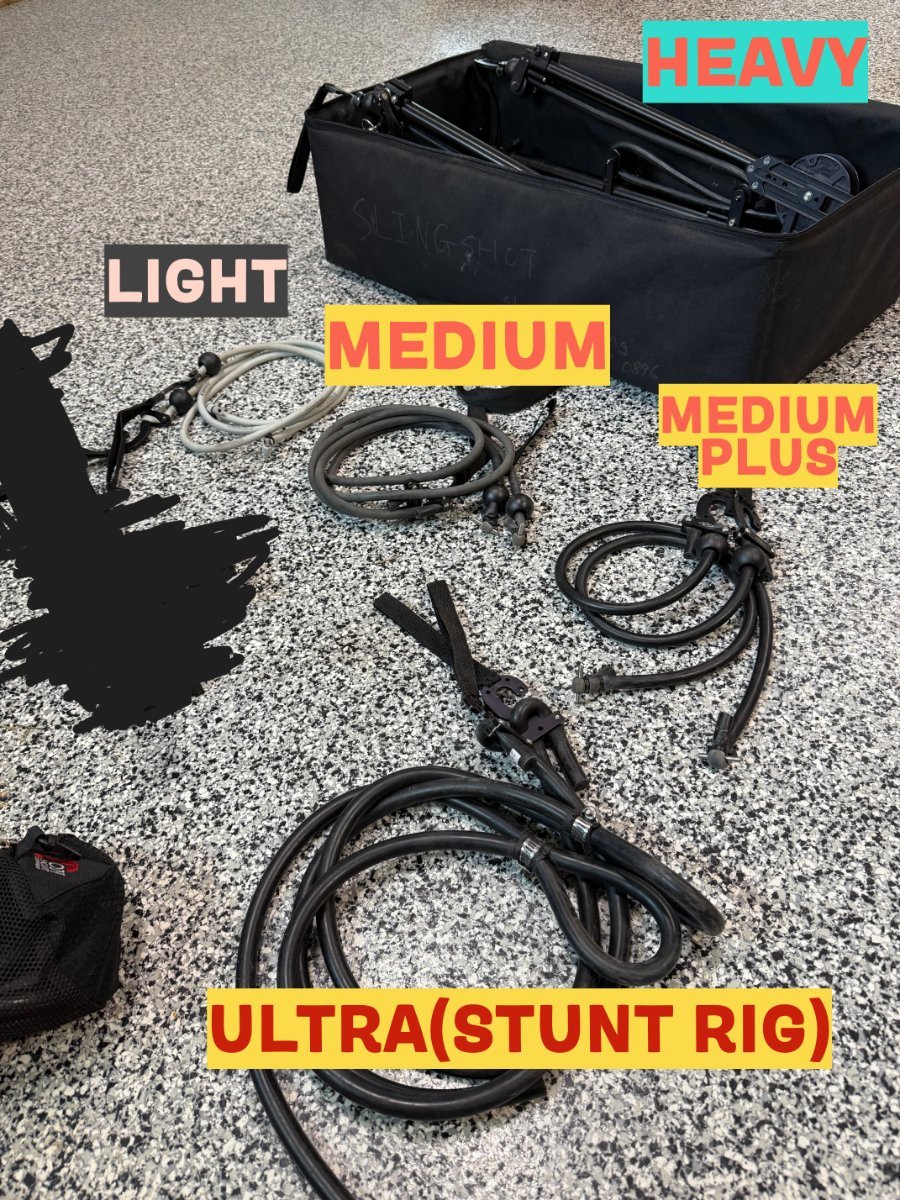
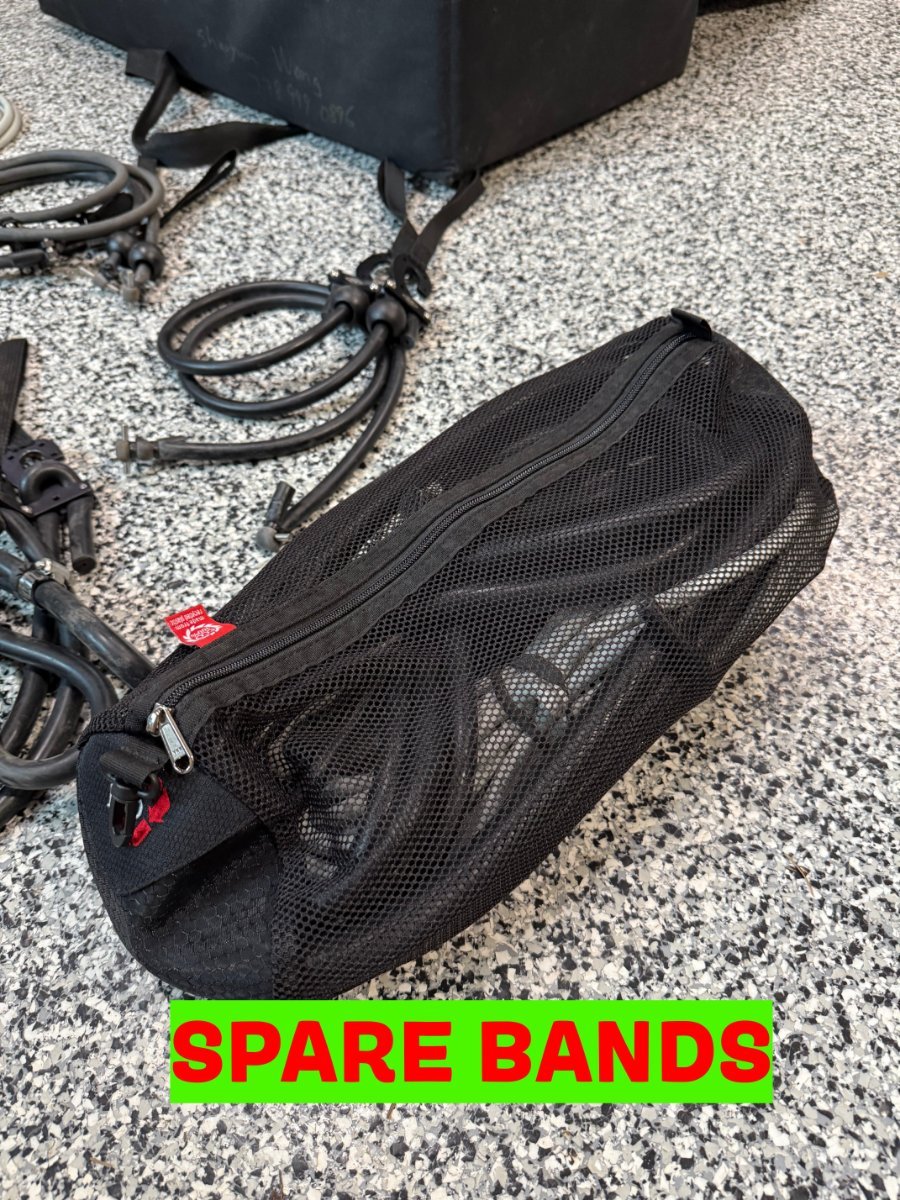
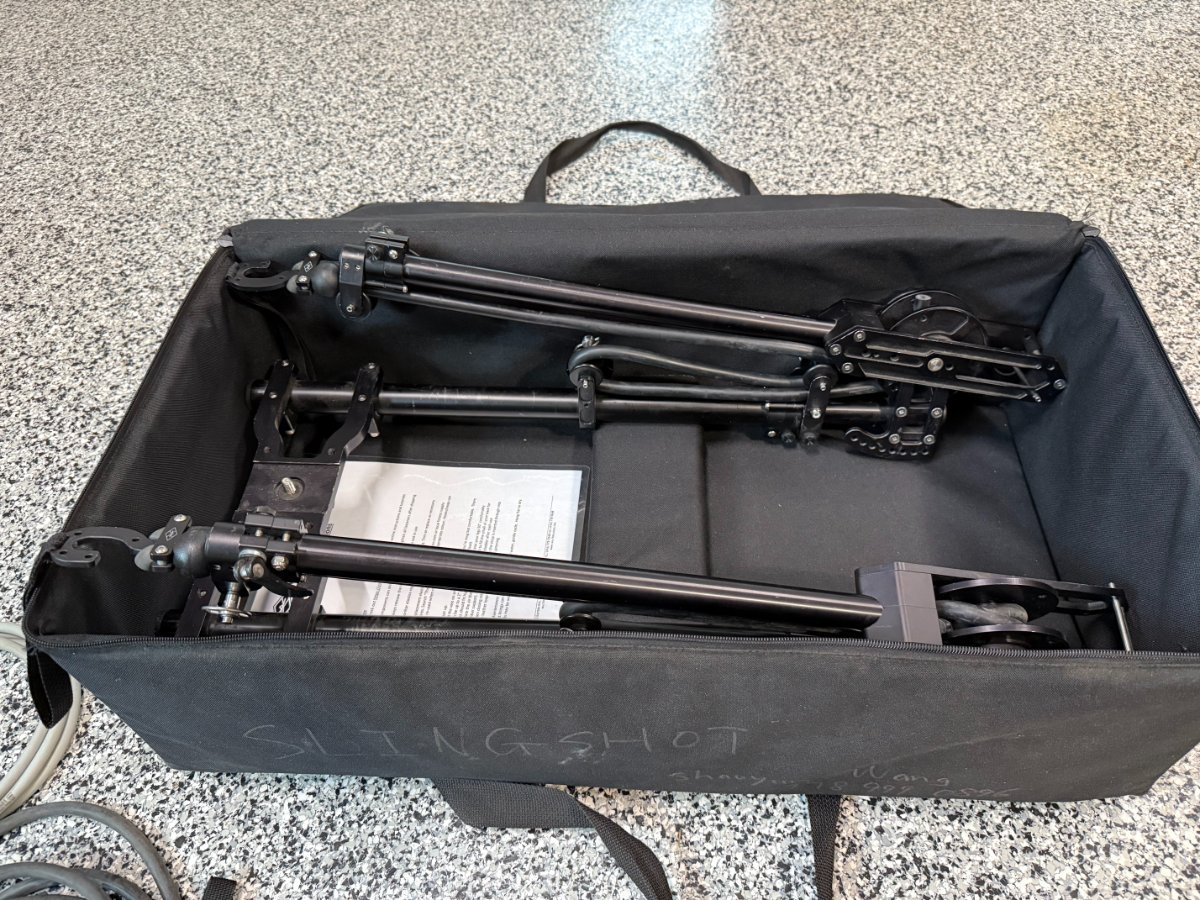
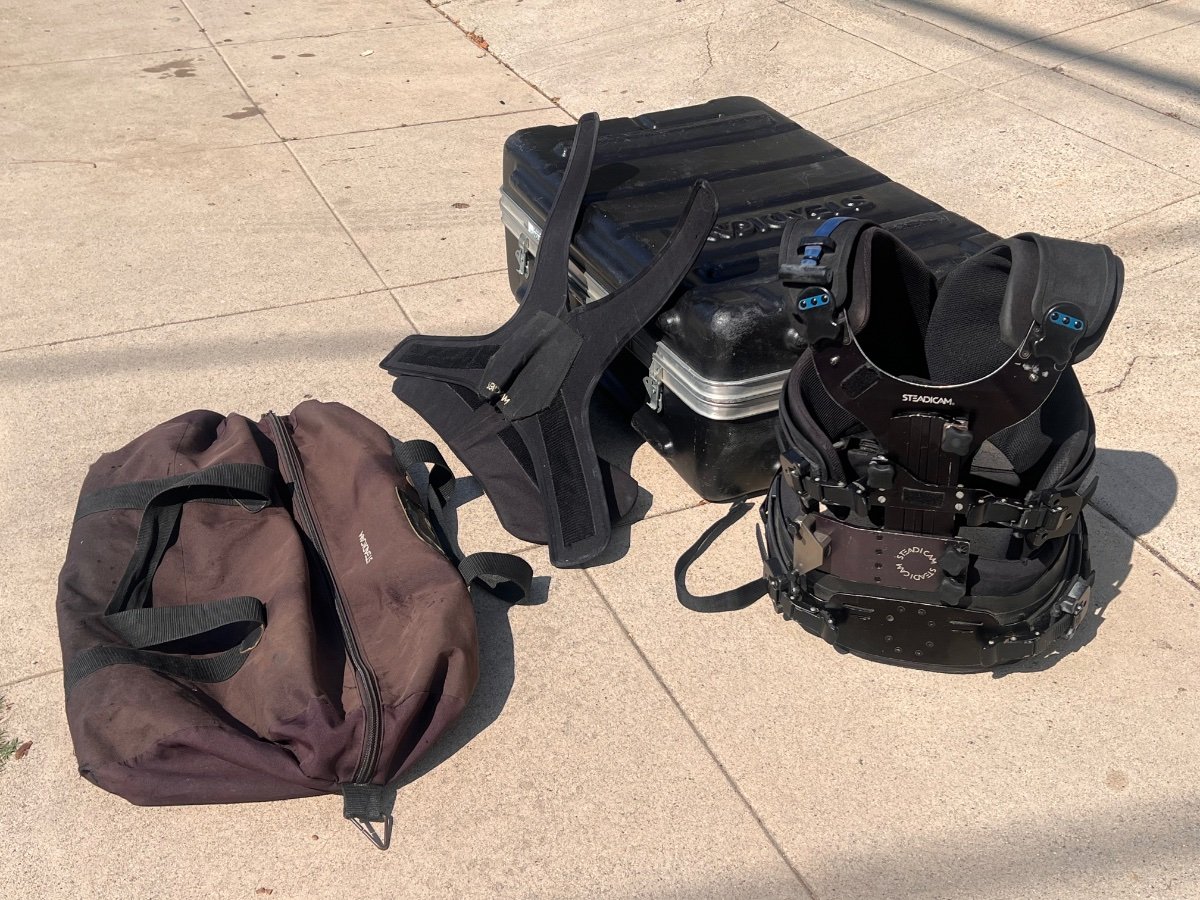
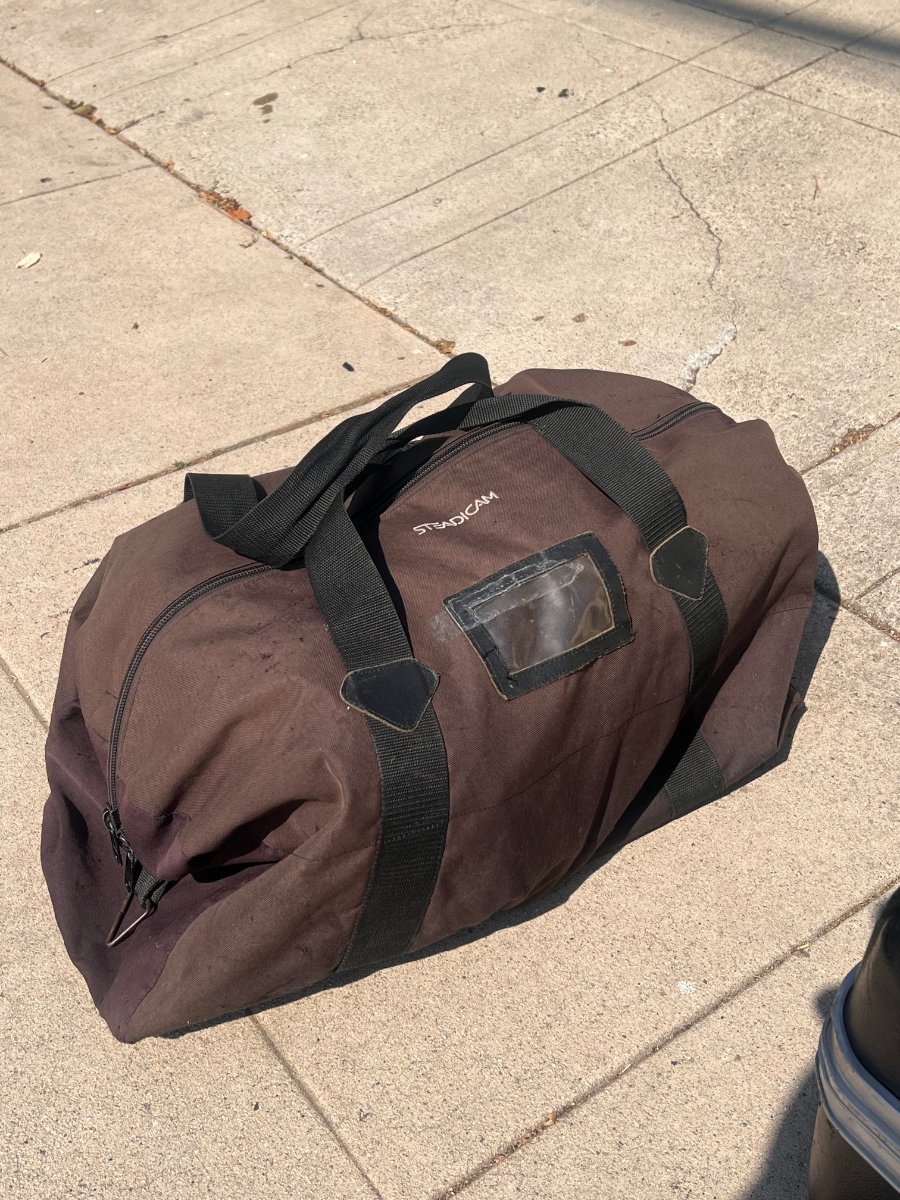
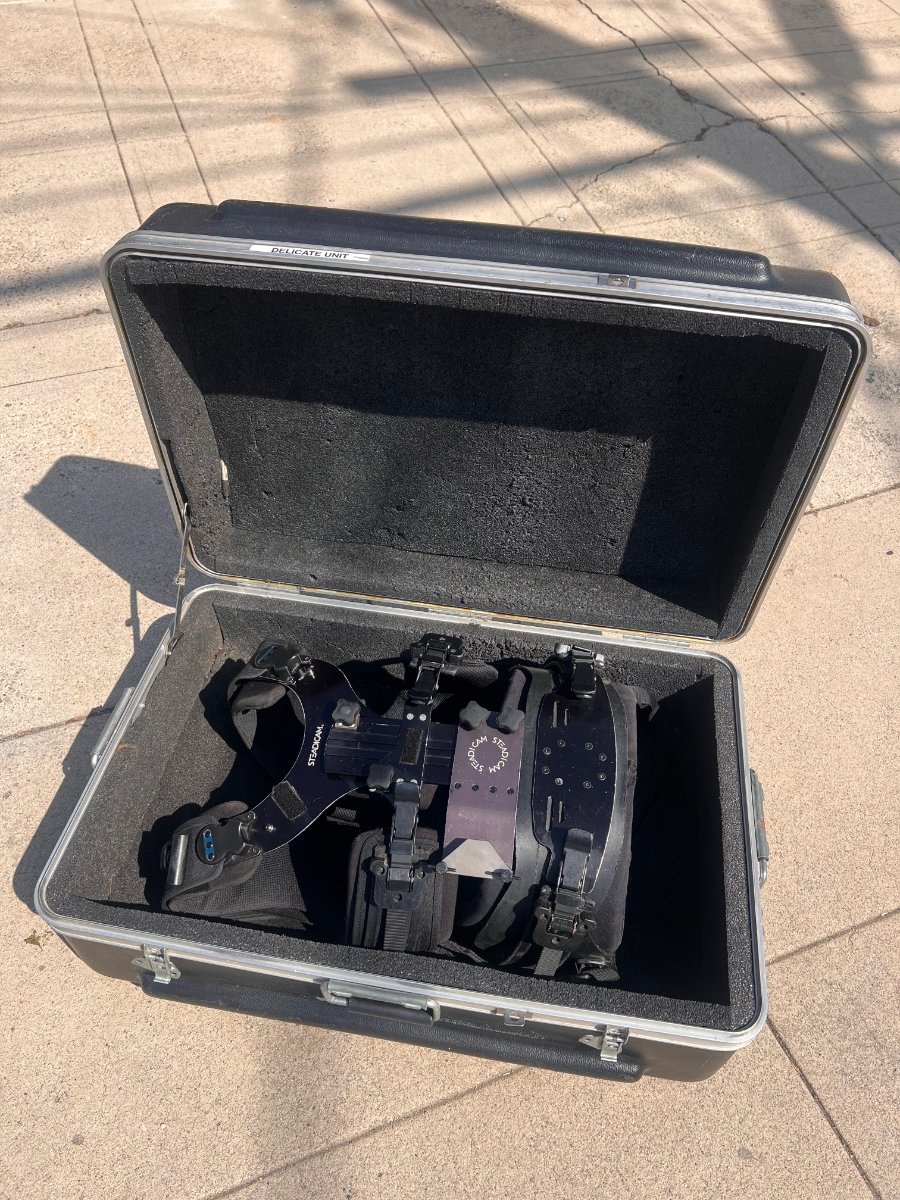
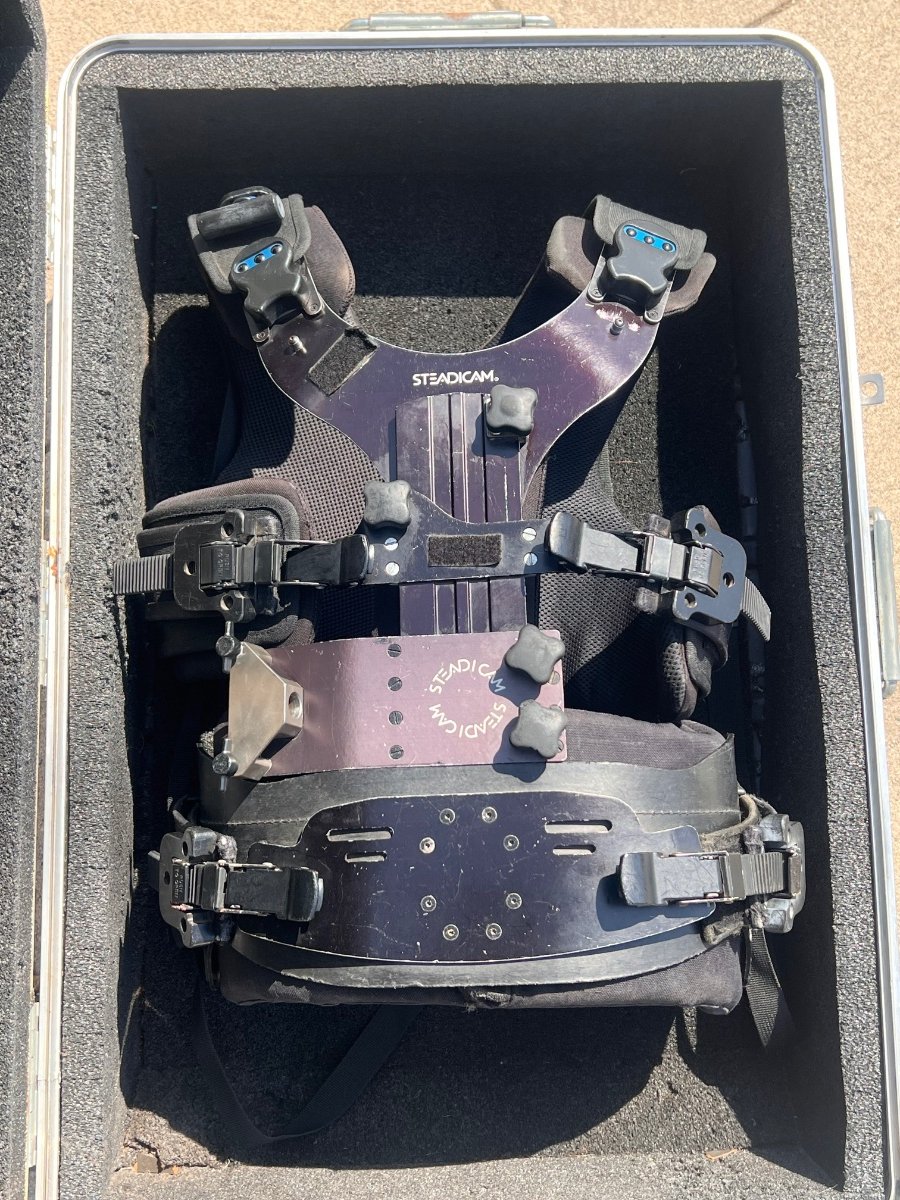
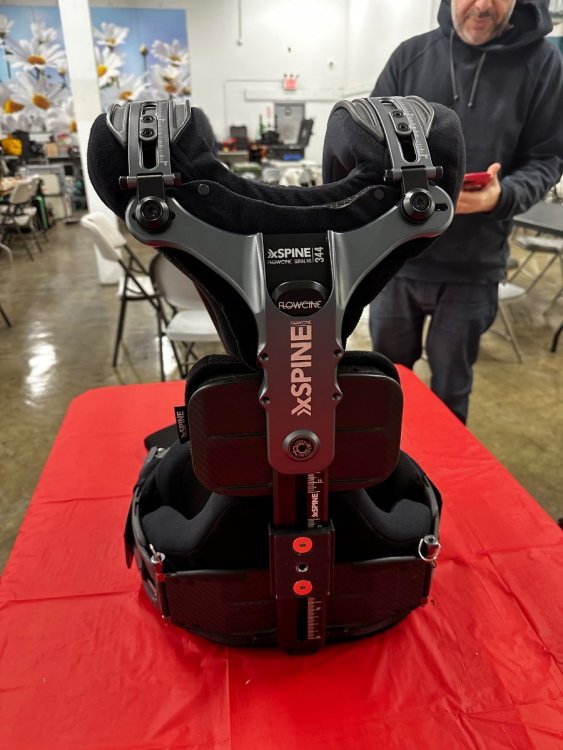
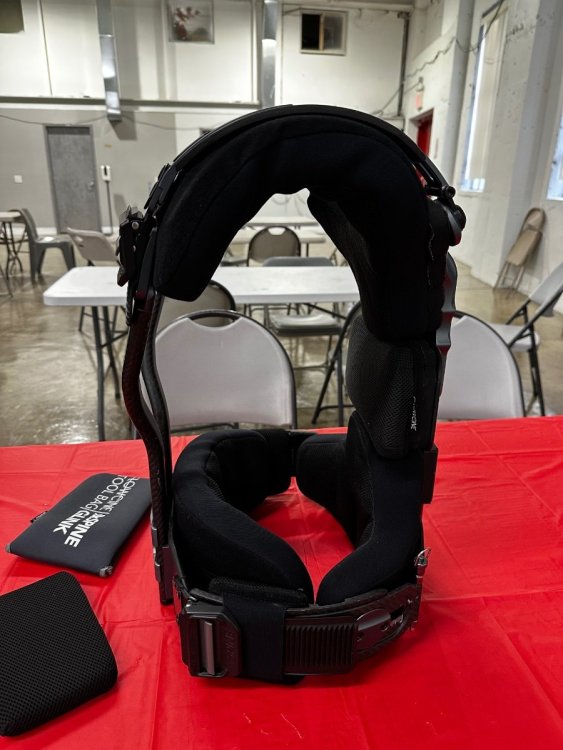
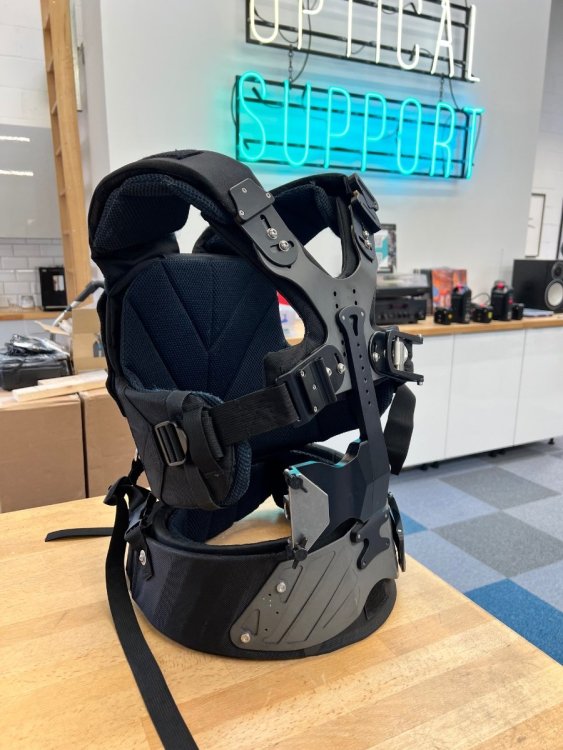
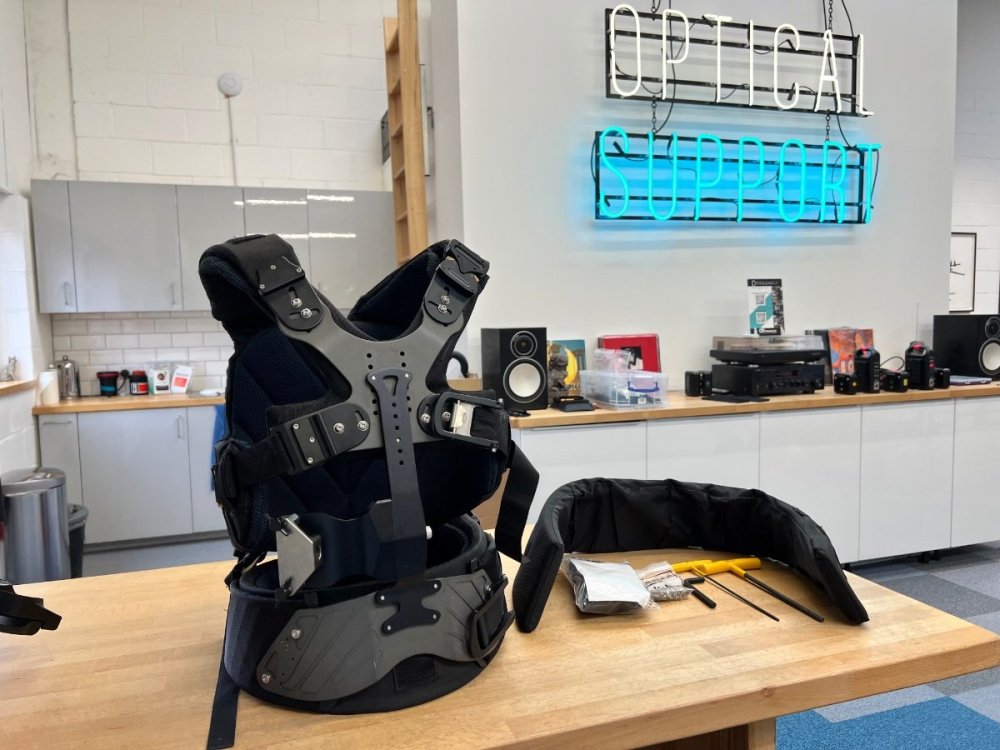
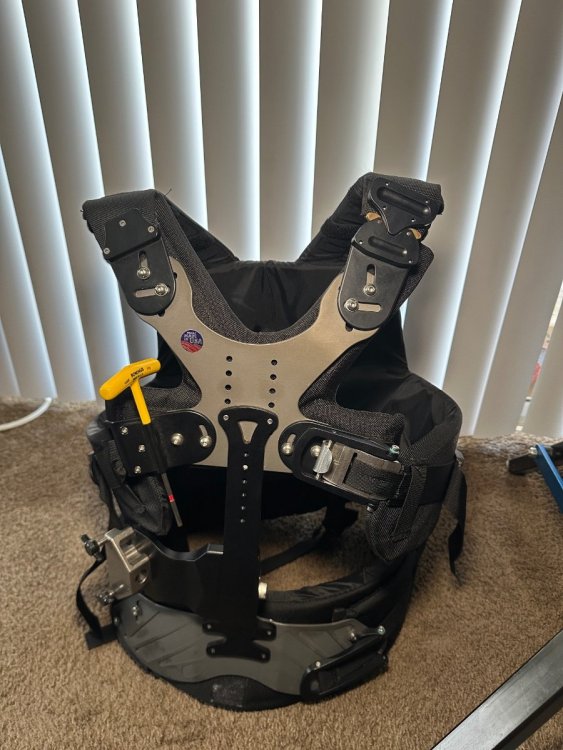
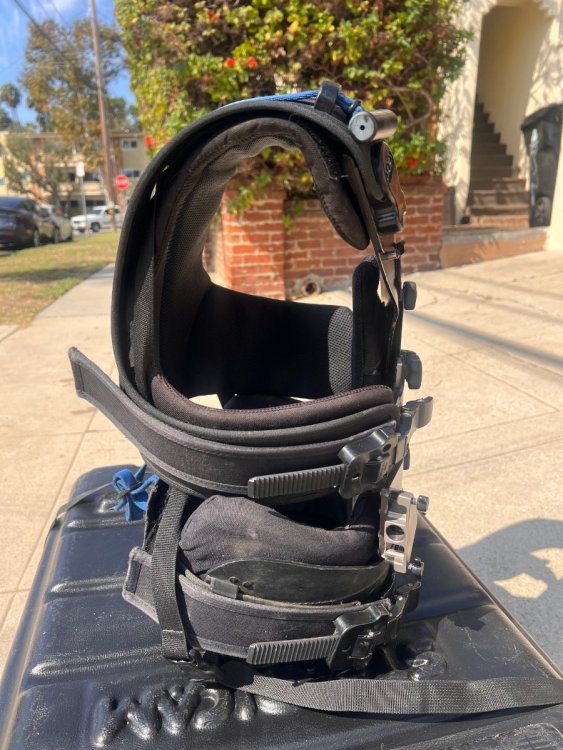
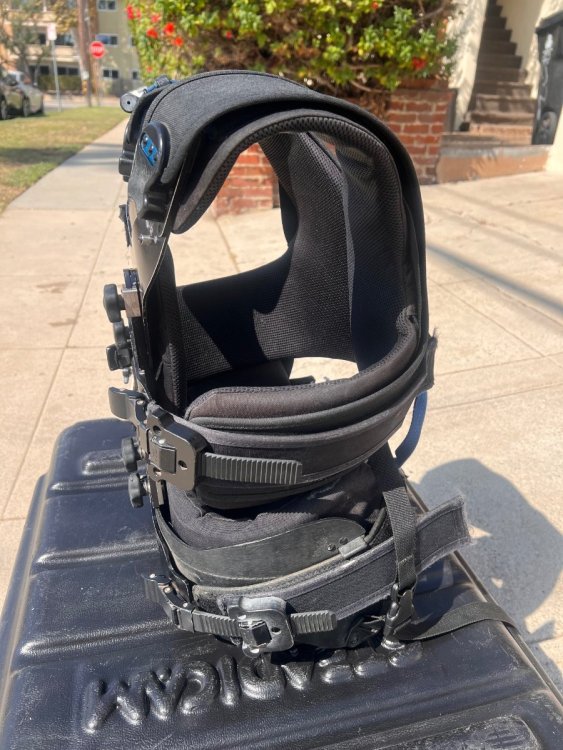
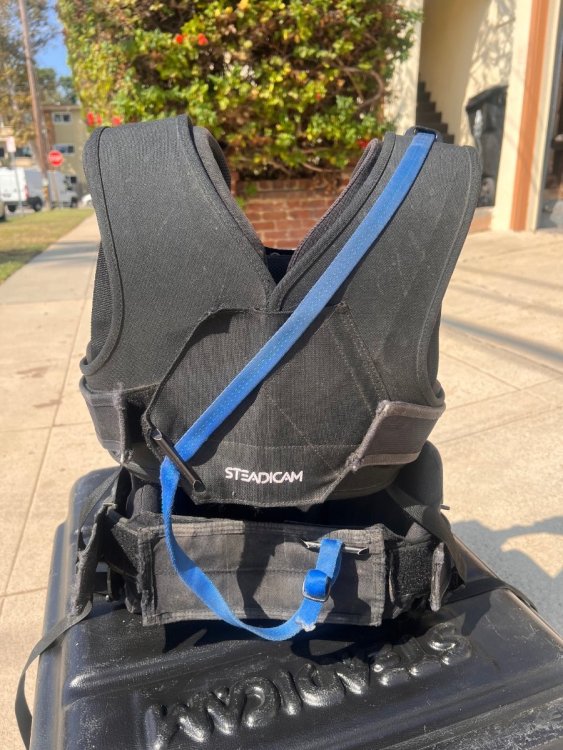
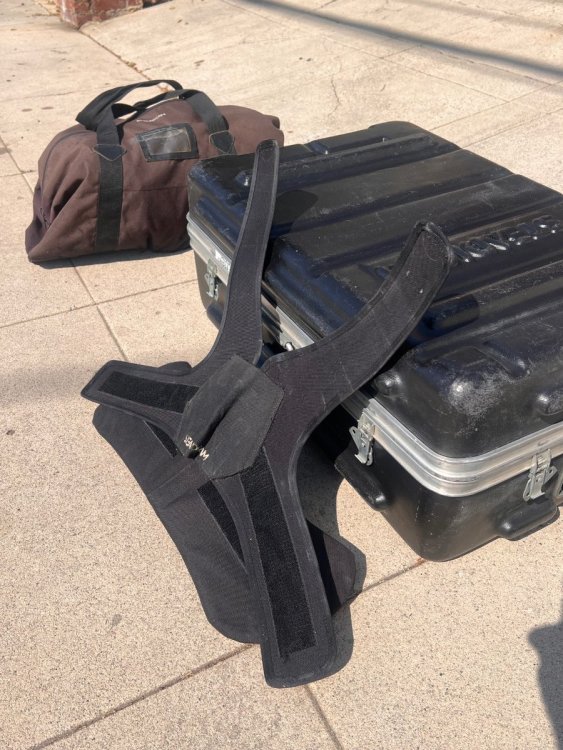
Hey Y'all! Camera assistant here in NYC, helping a friend and camera operator sell his X Spine Vest. It was only used a handful of times, setup for a Klasson Slingshot, not a steadicam arm. $4000 + Shipping from NYC (or pickup in Brooklyn) Pictures Below.


 2 points
 -
Hi Marc, same goes for vertical and lateral. Sorry for being not clear with my statement. What you can do to practice keeping the camera at a precise hight and on a precise path (straight line or arc) is a variation of the line dance. Instead of sticking a crosshair on a wall as a target you put it on a window or use a stand with a tennis ball on top of it. You need to see the back ground as well. Try to move in arcs or diagonal lines towards, away or around the target. Make the movement slow. Be close to the target as well. You will instantly see on what you have to work on. Hope this makes sense.2 points
-
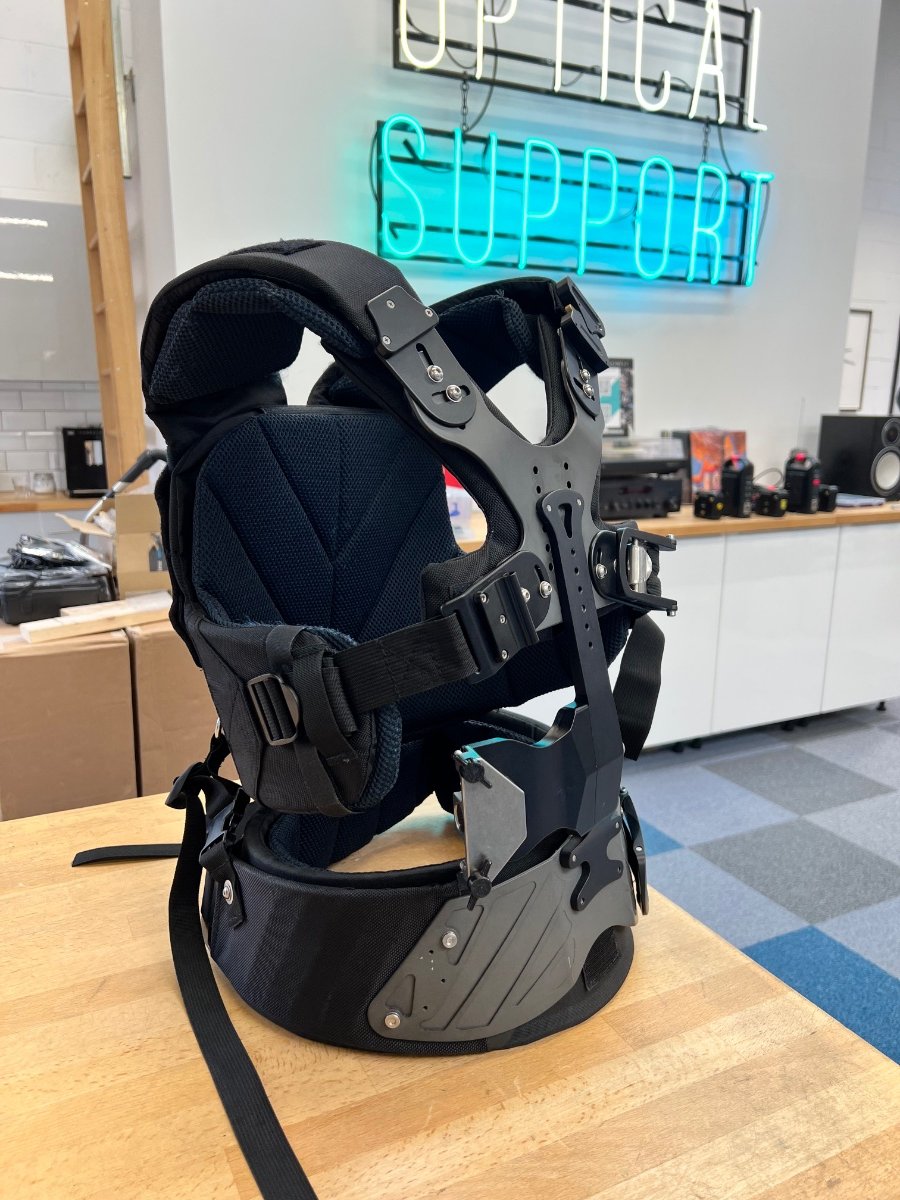
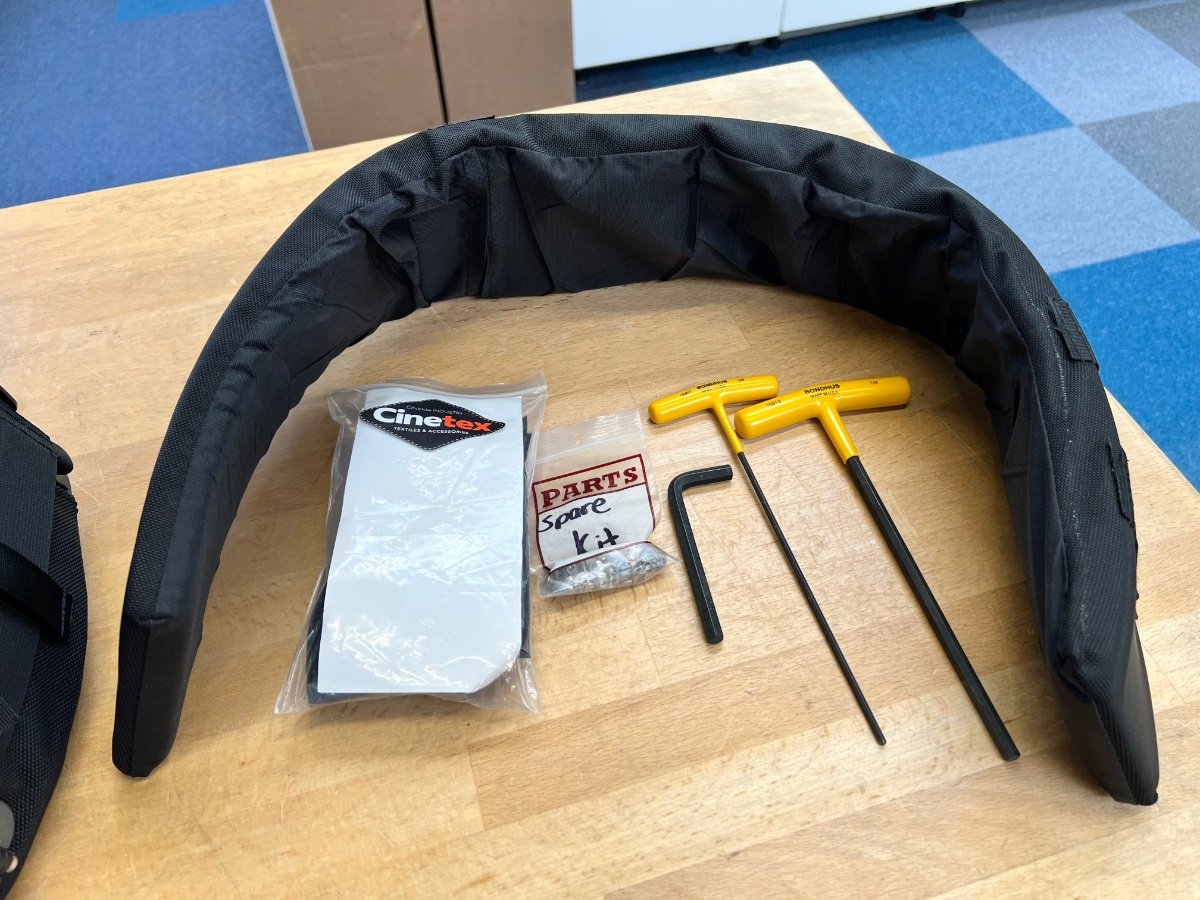
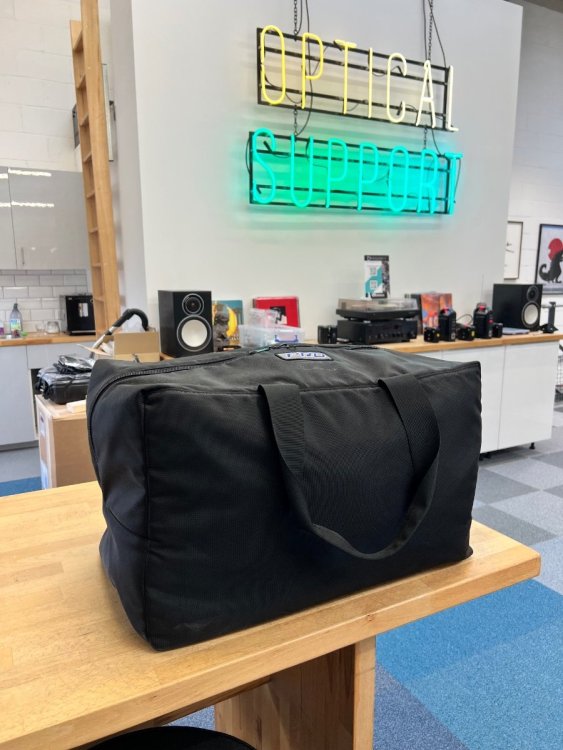
Re upload ! GPI PRO Vest with Cinetex padding and anti-slip waistband. Comes with soft travel bag and spares and Allen T wrenches. Located in London. Bumped to £3,800+VAT Buyer pays shipping.


 2 points
 -
I’ve been starting up a small maintenance shop in my workshop in New Jersey, doing maintenance and mods for quite a few operators. Obviously I can’t do warranty service, but for out of warranty repairs and maintenance and especially modifications, I’m happy to throw my hat in the ring if it makes sense geographically. If you’re on the west coast, I might check with the folks at Apex Cinema Gear, since I know they are working with Robert Luna who is an incredible resource for rig mechanicals (As well as both Justin and Stephen at Apex who do great work). There may be other resources (especially elsewhere in the world), and lead times may vary, but at least there are options!2 points
-
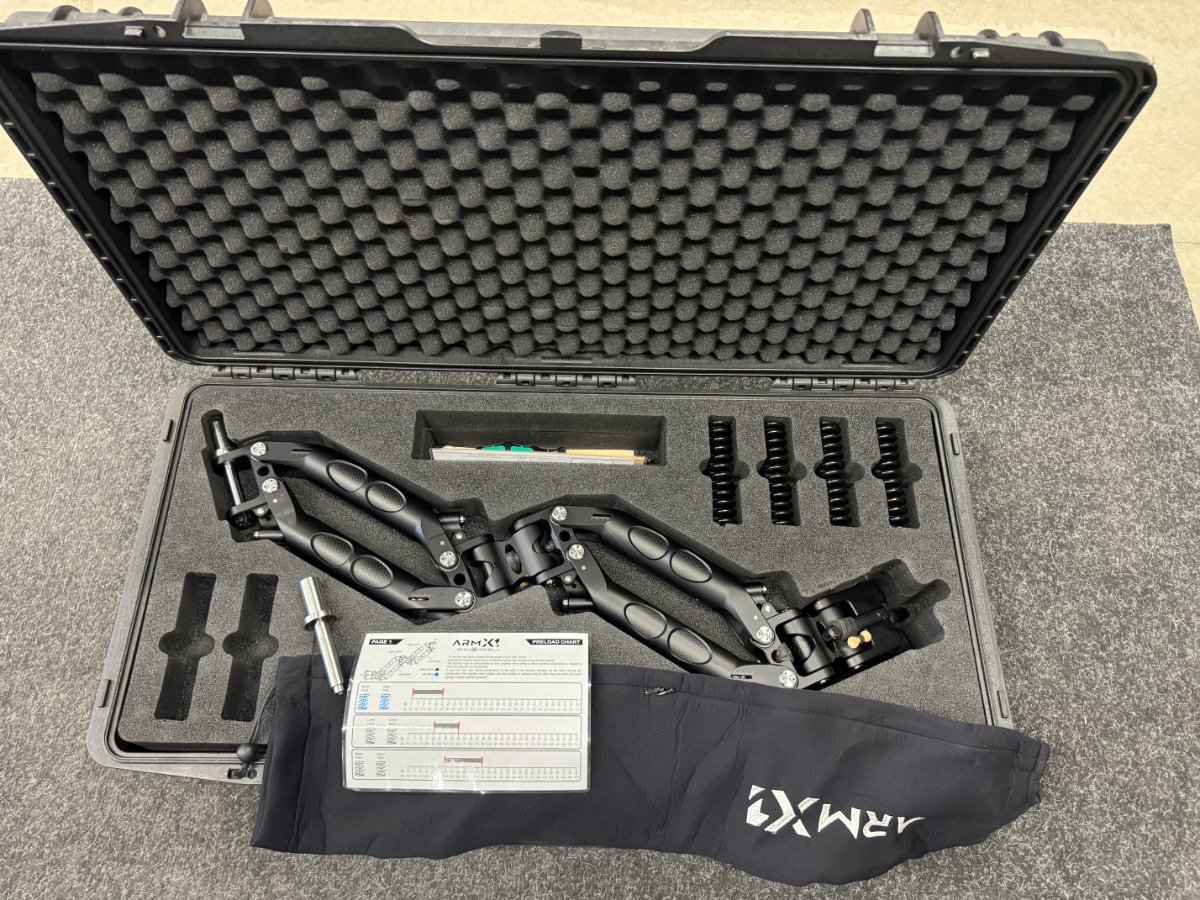
Hello Selling my Smartsystem arm. It's upgraded and very good condition. Had it as backup. Does not find enough use. Asking 6500€ shipping worldwide on buyers expense. Located in EU. Fastest way to contact me, is to write siim@fookuspookus.ee Thank you


 2 points
 -
With today’s Lithium batteries you have you two basic cell types, Polymer and Ion. Both deliver the high current you need for the HD and film cameras we run. They both have similar performance and temperature curves. I have owned, tested and used Lithium packs for over 12 years and both cell types have just kept improving and work well. Extreme hot and cold you should be a bit more cautious. Engineers may say by the numbers that Ion cells can deliver a higher current at startup due to lower internal cell impendence, but with the current capability of both types of cells I find it’s indistinguishable between battery packs with the wattage we run and the amount of current batteries can provide. 90, 120, 160, 190, 235 watt hr battery pack being the most common standard sizes. Using a larger watt hr pack will extend the life of that battery pack under similar current loads since they deplete at the same rate. So if you are buying a 90 watt battery pack Vs. a 150 watt pack and putting an 8 amp constant load on it for example, the 90 watt pack will of course reach the end of its useful battery life sooner over the life of the battery Vs. 150 watt hr pack that may cost $40. more and weight additionally 4 ounces more but may give you 6 months longer run time over its battery life in addition to its initial longer run times. I have gone from three 90’s watt packs 10+ years ago, to two- 160’s 5 years ago, and to two 235watt packs today. Buy the way two 235 watt packs weight 1-2 ounces less than three A/B 90 watt hr packs with a total increase in capacity of about 74%. Additionally you will notice that some resellers are selling 14.4 Vs. 14.8 nominal voltage packs that allows them to give you a 10-15 watt higher output rating which is negligible (a numbers game) to steadicam, ONLY if you equipment can handle the higher voltage output of these packs. It only gives you an appearance of higher capacity which operators may think they are getting a longer run times, they are not. Because the camera will run below the batteries low voltage rating. Listed are some well known performance factors by battery manufactures but I feel sometimes misunderstood by the end user. 1) First both types of Lithium cells and will deplete at a very similar rate when used similarly. 2) Both cell types will lose performance and deplete over time whether or not they are used. 3) Both cell types will typically lose 20-30% of the current load capacity after 18-20 months or 100 cycles when high current loading a battery pack, slightly more cycles when not. High current loads are considered power draws that are greater than 60% of the battery wattage rating. Or just about every battery we use on a sled under 150 watts if you run two batteries and power the camera. 4) Different battery wattages have different thermal fuse ratings. Typically between 10.25- 15 amps. This is important as you draw down the battery voltage when using it and your battery ages. The lower the voltage output of the battery the high the current (Amp) draw it has on your battery pack. So as your battery ages it pulls more current (amperage) at lower voltages to run that camera, you will reach that thermal fuse limit sooner. 5) That most all reputable battery suppliers in our market are using reputable cell manufacturers of equal quality. So that name brand pack when opened up might have that same Samsung, Sanyo, Saft cell and you can expect similar performance. These companies are all completing for the same market. 2/3 of the packs I take apart from different resellers are using the exact same cell. And the price varies from each company. I have tested a few off brands and find they perform as well or better then the two major brands on the market. 6) We all have different tolerance to battery packs at the end of their useful life. I can only speak for myself here. When my batteries are only lasting 20 minutes before I have to change them it’s time for new batteries. Others may change sooner, some may allow even shorter runtimes. So battery end of life is very subjective. What is missing out of this equation of battery runtimes and performance (ability to deliver power) on a sled is the most important, least talked about and least understood subject. Power delivery though the sled. This is where two identical battery packs under the same current load using the same camera can have two different run times, power outputs and cycle life. This comes down to three things. Proper power wire gauging through your sled including power cables to camera. Connector sizes in your sled, and is there an active battery management system, or is it just you managing/monitoring the packs yourself. Wire : The length of the power wire run through the sled system is or should be an important consideration for all. Most who know me understand I could go into great detail on these points but ones needs only to visit a web page with a DC voltage loss calculator and input the few basic parameters to get the big picture on power loss over a give wire length. It will ask a few basics you, fill in the blanks. A) AC or DC current B) Nominal voltage- input the lowest voltage you run your batteries down to. 12.5, 13.0, 13.5 C) Wire length. Remember this is a loop. Voltage travels from battery to camera, back to battery. A standard XCS/Pro sled wire run would be around 10 feet for a god estimate of length. 3 and 4 stage posts add the additional length of the post stages, times 2 D) Wire type copper or tinned copper I would guess most are using with standard strand count. E) Wire gauge most makers are using 22 Awg wire and one or two in a multi conductor scenario running parallel. Using two 22 Awg wire doesn’t equal 19 Awg. In a perfect world in the lab with no current draw or minimal, not true in operation. One only needs to Ohm out each conductor to see that difference. These on line calculators will tell you the voltage loss in your system due to the wire gauge/length you have. I would say that on average you will see a 1.5 volt loss from top to bottom on many systems, but not all. So that may be 20% of your battery life gone due to poor wiring/connector standards when your sled is under load. Lastly battery management. This as well is critical to battery performance and cycle life. In all current sled designs except for one manufacturer, they combine two or three battery packs in parallel or series and sometimes both with no monitoring of the individual capability of each battery pack. I am not talking about reading battery voltages, rather an active battery capacity monitoring system. When battery packs are linked together in 12 or 24 Vdc mode they are only as good as the weakest battery pack or cell in any single pack or a wire that has a higher resistance, it all comes into play. There is far more intelligent full proof method. Using this old hard wired method which is still a standard way to handle batteries is why one should not run old and new battery packs together at the same time. You’re depleting the performance of the overall battery system and runtimes. Not even considering the increased resistance in the sled wiring due to heat buildup due to a weaker battery pack. If you what the best performance out of your packs and don’t have proper battery management electronics use packs of the same cycles or age, don’t mix one old with one new. I am not advocating any specific battery supplier just keep an open mind on what is available. Sorry for the long post. Heavily edited to keep it this short. GregWith today’s Lithium batteries you have you two basic cell types, Polymer and Ion. Both deliver the high current you need for the HD and film cameras we run. They both have similar performance and temperature curves. I have owned, tested and used Lithium packs for over 12 years and both cell types have just kept improving and work well. Extreme hot and cold you should be a bit more cautious. Engineers may say by the numbers that Ion cells can deliver a higher current at startup due to lower internal cell impendence, but with the current capability of both types of cells I find it’s indistinguishable between battery packs with the wattage we run and the amount of current batteries can provide. 90, 120, 160, 190, 235 watt hr battery pack being the most common standard sizes. Using a larger watt hr pack will extend the life of that battery pack under similar current loads since they deplete at the same rate. So if you are buying a 90 watt battery pack Vs. a 150 watt pack and putting an 8 amp constant load on it for example, the 90 watt pack will of course reach the end of its useful battery life sooner over the life of the battery Vs. 150 watt hr pack that may cost $40. more and weight additionally 4 ounces more but may give you 6 months longer run time over its battery life in addition to its initial longer run times. I have gone from three 90’s watt packs 10+ years ago, to two- 160’s 5 years ago, and to two 235watt packs today. Buy the way two 235 watt packs weight 1-2 ounces less than three A/B 90 watt hr packs with a total increase in capacity of about 74% Additionally you will notice that some resellers are selling 14.4 Vs. 14.8 nominal voltage packs that allows them to give you a 10-15 watt higher output rating which is negligible (a numbers game) to steadicam, ONLY if you equipment can handle the higher voltage output of these packs. It only gives you an appearance of higher capacity which operators may think they are getting a longer run times, they are not. Because the camera will run below the batteries low voltage rating. Listed are some well known performance factors by battery manufactures but I feel sometimes misunderstood by the end user. 1) First both types of Lithium cells and will deplete at a very similar rate when used similarly. 2) Both cell types will lose performance and deplete over time whether or not they are used. 3) Both cell types will typically lose 20-30% of the current load capacity after 18-20 months or 100 cycles when high current loading a battery pack, slightly more cycles when not. High current loads are considered power draws that are greater than 60% of the battery wattage rating. Or just about every battery we use on a sled under 150 watts if you run two batteries and power the camera. 4) Different battery wattages have different thermal fuse ratings. Typically between 10.25- 15 amps. This is important as you draw down the battery voltage when using it and your battery ages. The lower the voltage output of the battery the high the current (Amp) draw it has on your battery pack. So as your battery ages it pulls more current (amperage) at lower voltages to run that camera, you will reach that thermal fuse limit sooner. 5) That most all reputable battery suppliers in our market are using reputable cell manufacturers of equal quality. So that name brand pack when opened up might have that same Samsung, Sanyo, Saft cell and you can expect similar performance. These companies are all completing for the same market. 2/3 of the packs I take apart from different resellers are using the exact same cell. And the price varies from each company. I have tested a few off brands and find they perform as well or better then the two major brands on the market. 6) We all have different tolerance to battery packs at the end of their useful life. I can only speak for myself here. When my batteries are only lasting 20 minutes before I have to change them it’s time for new batteries. Others may change sooner, some may allow even shorter runtimes. So battery end of life is very subjective. What is missing out of this equation of battery runtimes and performance (ability to deliver power) on a sled is the most important, least talked about and least understood subject. Power delivery though the sled. This is where two identical battery packs under the same current load using the same camera can have two different run times, power outputs and cycle life. This comes down to three things. Proper power wire gauging through your sled including power cables to camera. Connector sizes in your sled, and is there an active battery management system, or is it just you managing/monitoring the packs yourself. Wire : The length of the power wire run through the sled system is or should be an important consideration for all. Most who know me understand I could go into great detail on these points but ones needs only to visit a web page with a DC voltage loss calculator and input the few basic parameters to get the big picture on power loss over a give wire length. It will ask a few basics you fill in the blanks. A) AC or DC current B) Nominal voltage- input the lowest voltage you run your batteries down to. 12.5, 13.0, 13.5 C) Wire length. Remember this is a loop. Voltage travels from battery to camera, back to battery. A standard XCS/Pro sled wire run would be around 10 feet for a god estimate of length. 3 and 4 stage posts add the additional length of the post stages, times 2 D) Wire type copper or tinned copper I would guess most are using with standard strand count. E) Wire gauge most makers are using 22 Awg wire and one or two in a multi conductor scenario running parallel. Using two 22 Awg wire doesn’t equal 19 Awg. In a perfect world in the lab with no current draw or minimal, not true in operation. One only needs to Ohm out each conductor to see that difference. These on line calculators will tell you the voltage loss in your system due to the wire gauge/length you have. I would say that on average you will see a 1.5 volt loss from top to bottom on many systems, but not all. So that may be 20% of your battery life gone due to poor wiring/connector standards when your sled is under load. Lastly battery management. This as well is critical to battery performance and cycle life. In all current sled designs except for one manufacturer, they combine two or three battery packs in parallel or series and sometimes both with no monitoring of the individual capability of each battery pack. I am not talking about reading battery voltages, rather an active battery capacity monitoring system. When battery packs are linked together in 12 or 24 Vdc mode they are only as good as the weakest battery pack or cell in any single pack or a wire that has a higher resistance, it all comes into play. There is far more intelligent full proof method. Using this old hard wired method which is still a standard way to handle batteries is why one should not run old and new battery packs together at the same time. You’re depleting the performance of the overall battery system and runtimes. Not even considering the increased resistance in the sled wiring due to heat buildup due to a weaker battery pack. If you what the best performance out of your packs and don’t have proper battery management electronics use packs of the same cycles or age, don’t mix one old with one new. I am not advocating any specific battery supplier just keep an open mind on what is available. Sorry for the long post. Heavily edited to keep it this short. Greg2 points
-
Bump! extra topstage has been sold, still a complete package. New price: 27.000 € OBO for more details pls contact: sascha.el.gendi@gmail.com1 point
-
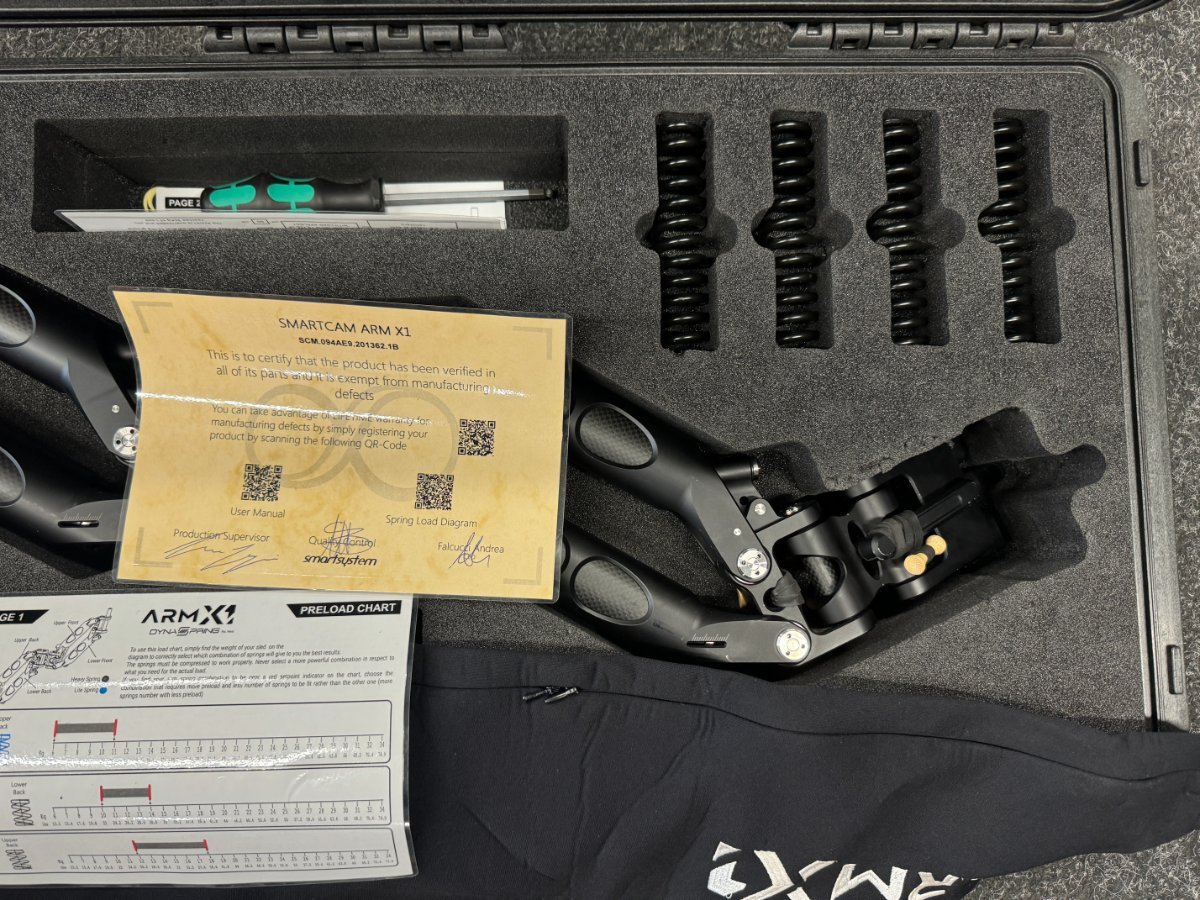
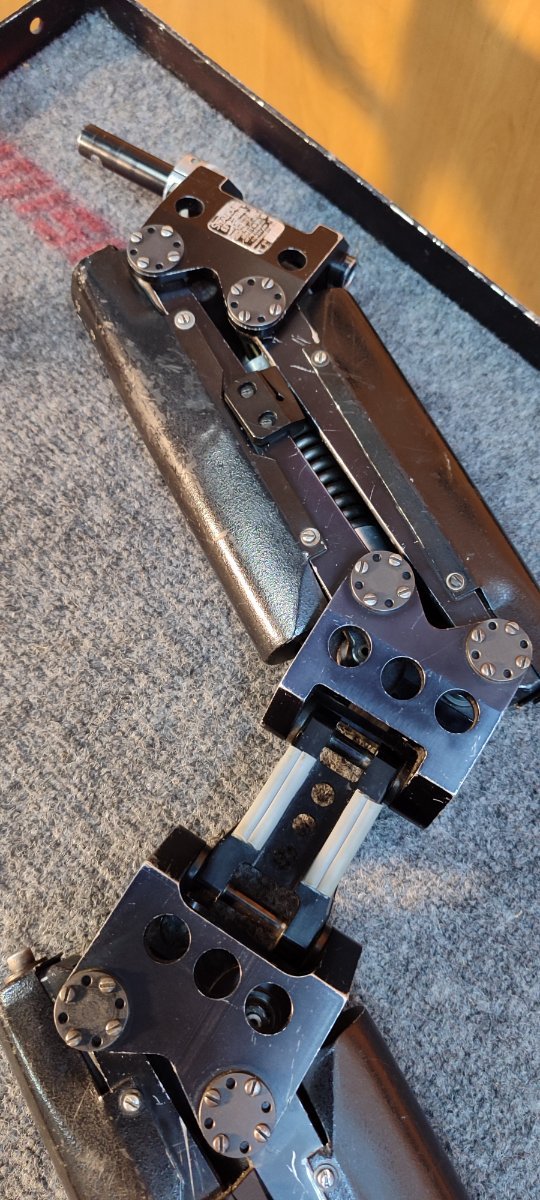
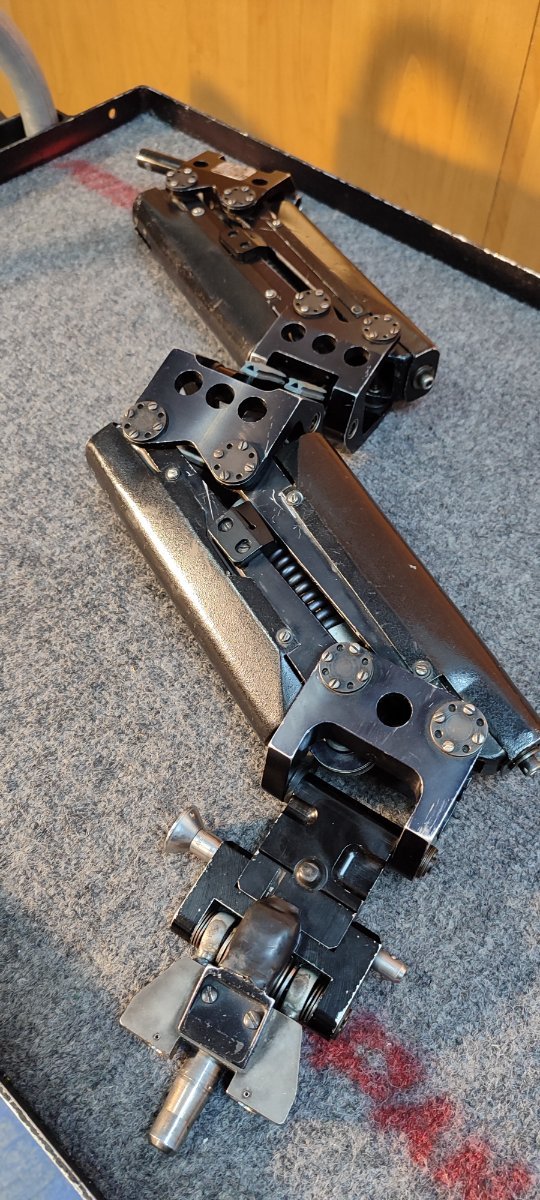
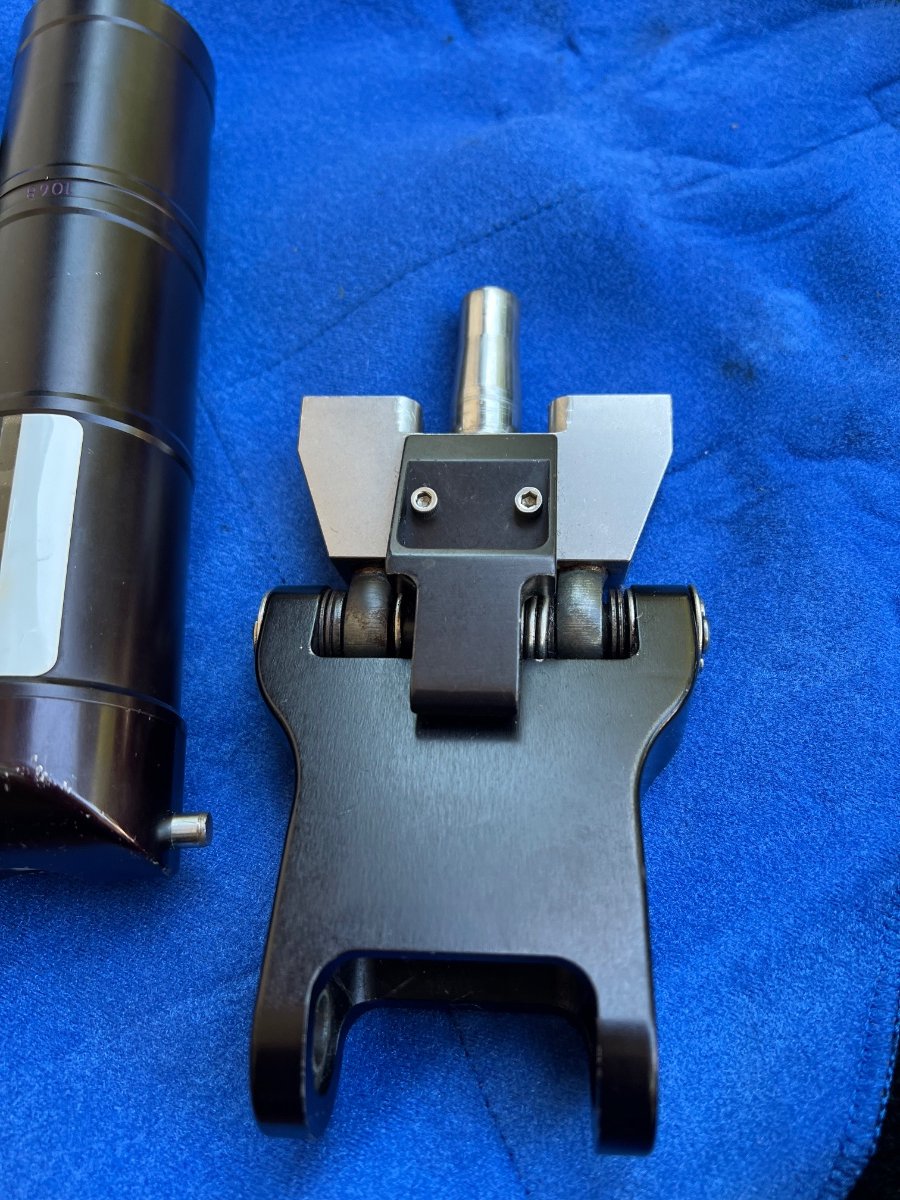
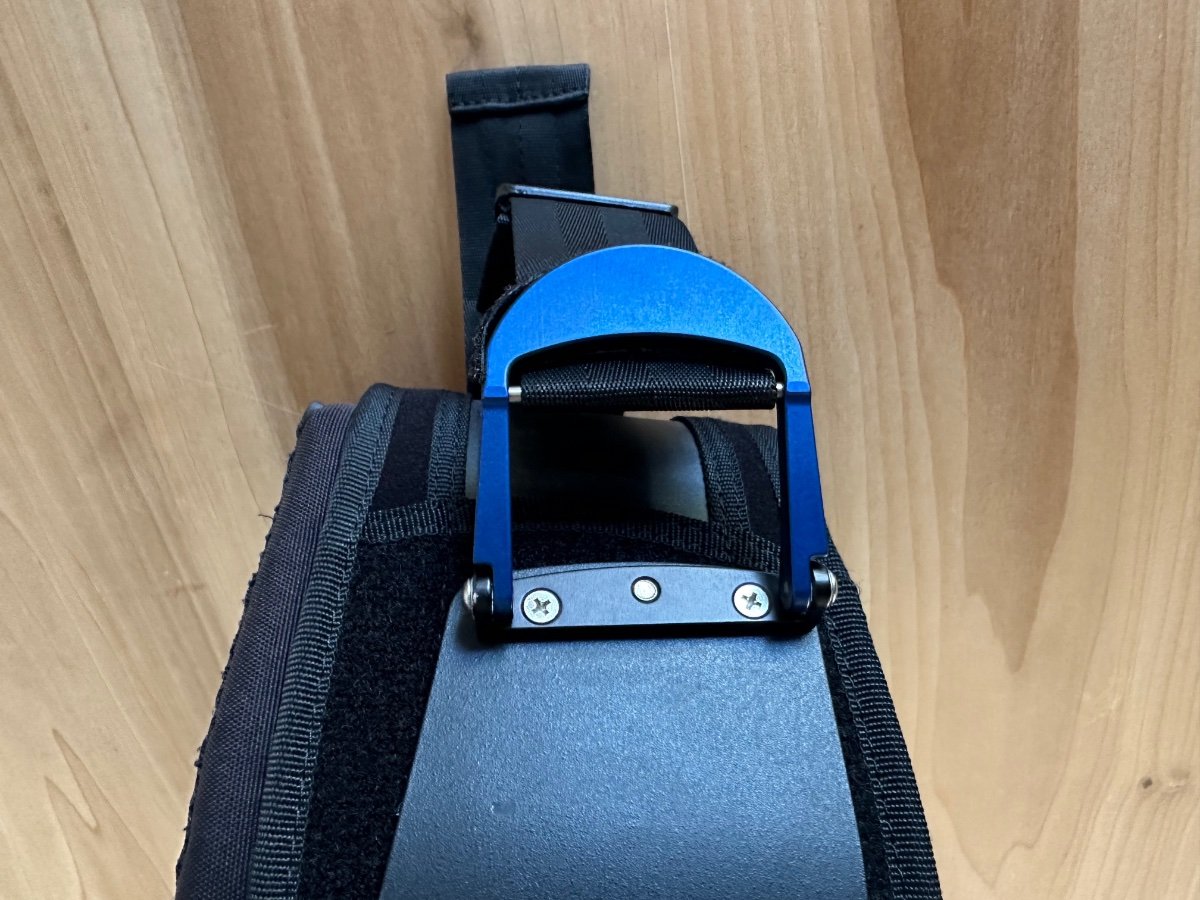
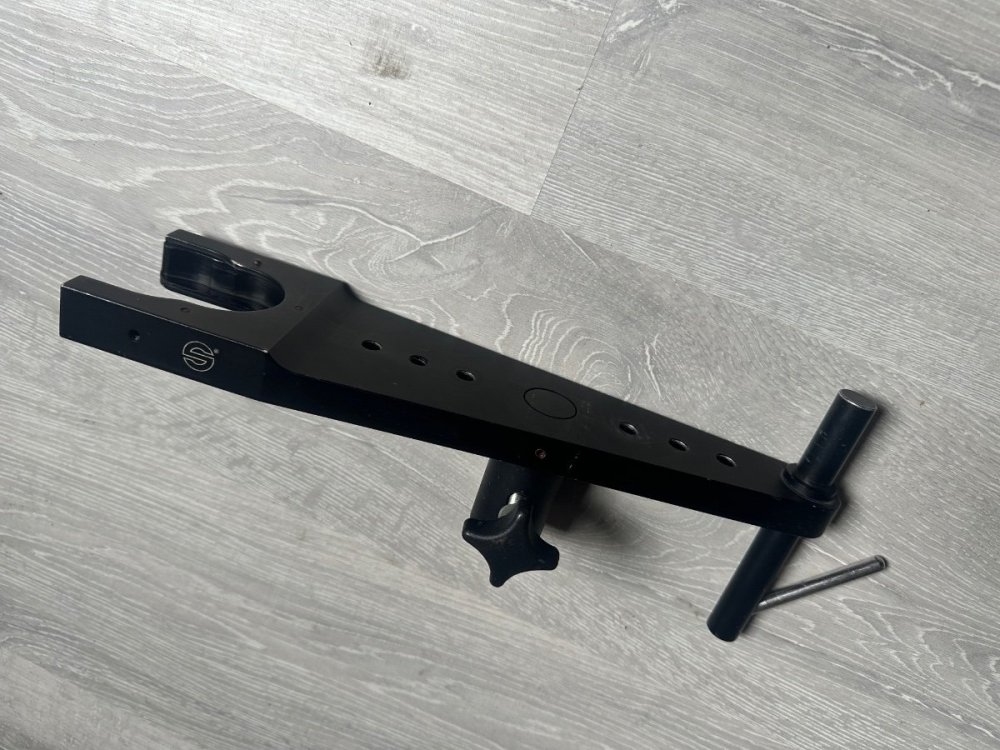
Arm x1 also upgraded to steel socket this image shows the pin hole that fell off does not affect arm1 point
-
PRICE DOWN to 1750euro

 1 point
 -
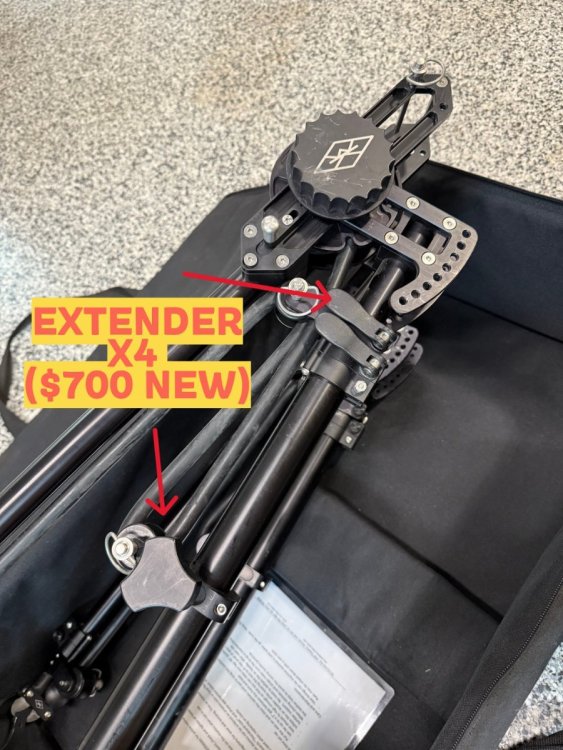
PRICED IN USD. wk slingshot 2.0 + wk Steadicam Hardmount + slingshot hardmount wk craddle in picture is NOT included (could be added for ADDITIONAL $1200 USD) slingshot 2.0 ($4555 USD brand new) handheld extender x 4 ($700 USD) WK STEADICAM hardmount no case ($1300 USD brand new) Possum solutions WK hardmount ($200USD new) asking $4000 USD. (or $3000 without hardmount). shipping from vancouver canada, thru UPS/DHL/FEDEX buyer pays shipping, could Bill at your account.


 1 point
 -
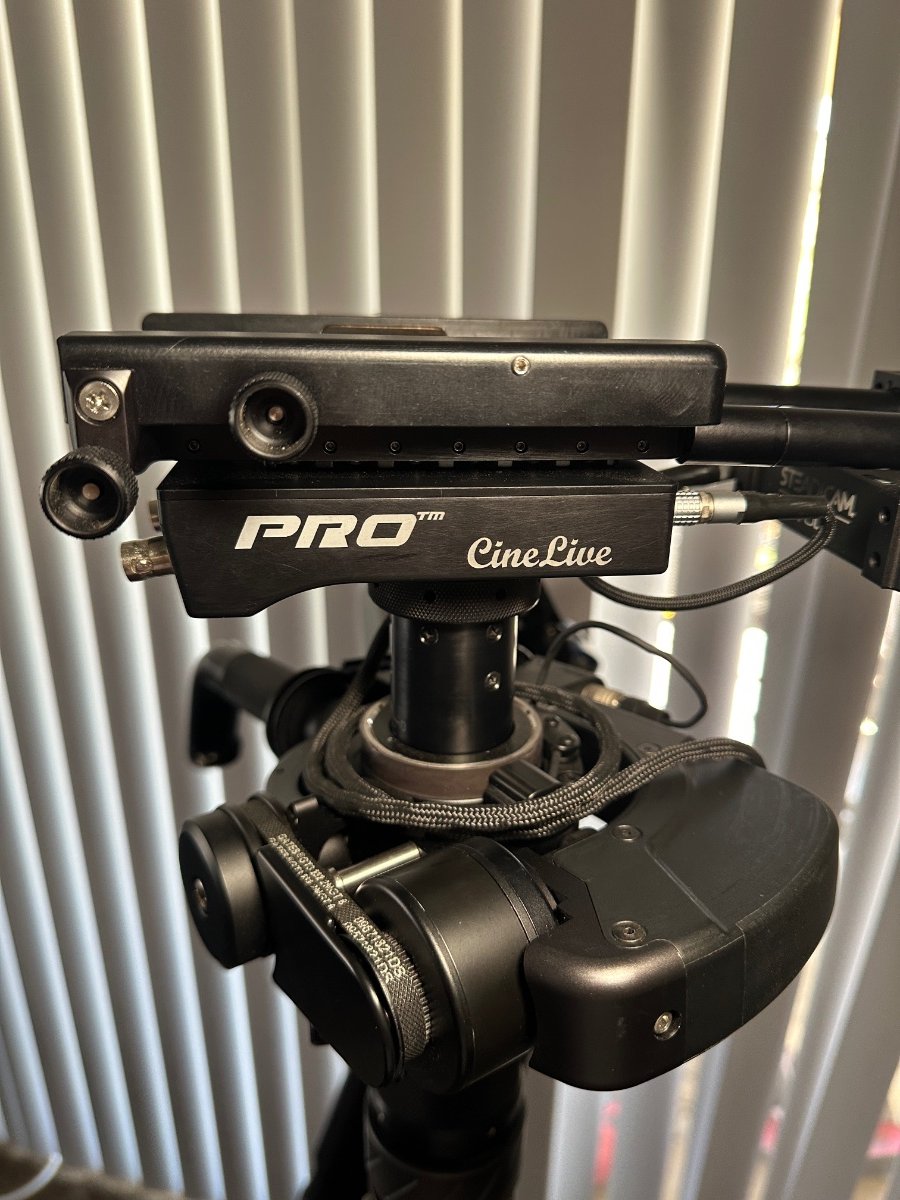
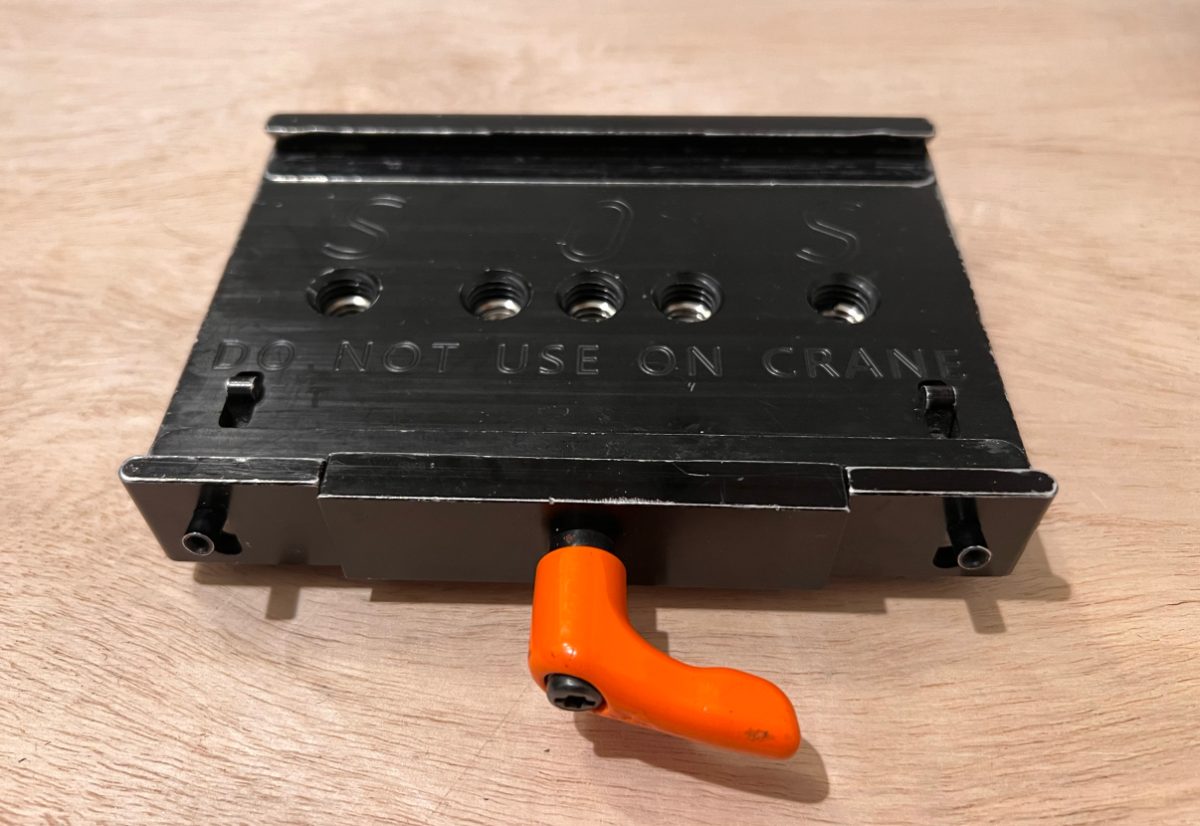
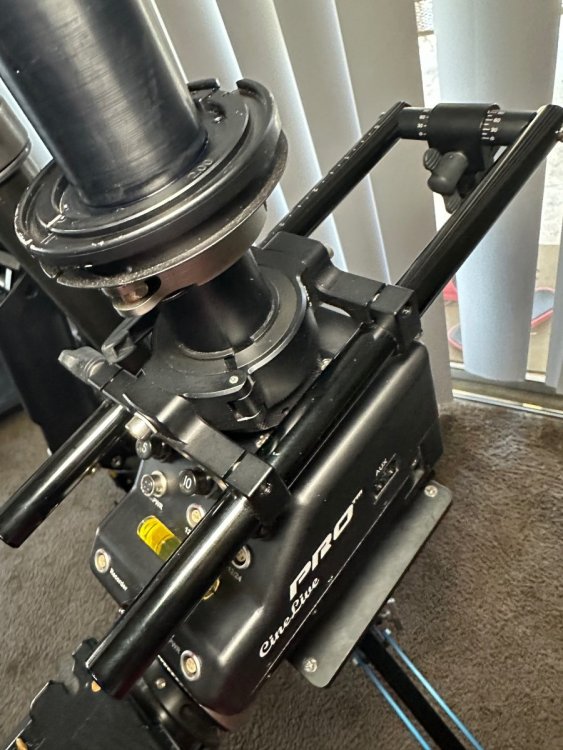
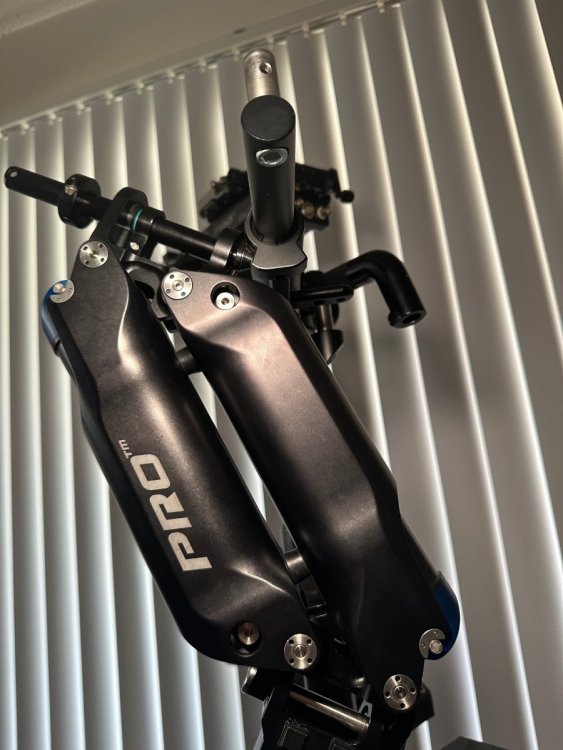
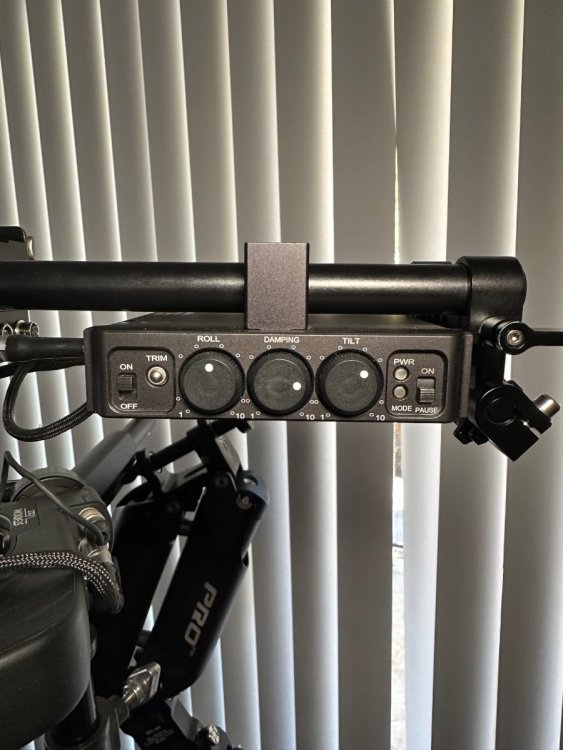
FOR SALE: PRO CineLive Volt Steadicam Kit – Titan Arm, XT90 Batts, 703 UltraBright – LA – Mint Selling my fully loaded GPI PRO CineLive Steadicam Volt kit—barely used, meticulously maintained, and in like-new condition. This is a top-tier system with all pro-level upgrades. Purchased new from GPI PRO in 2022 and lightly used on select commercial and narrative projects. This is a serious kit for serious operators. Perfect for union and indie work alike, or as a high-end rental package. INCLUDES: SLED: GPI PRO CineLive Sled DB3 Top Stage VZ Gimbal Grip Gen 3 Battery Rack Tiffen Volt System (factory installed – $10K value) Pelican case + soft bag ARM & VEST: Titan Arm (4 blue, 2 black canisters – wide payload range) PRO Vest (soft bag) Walter Klassen Hard Mount Kit MONITORING: SmallHD 703 UltraBright Cam-Jam Monitor Mount Transvideo Mount POWER: 8x Anton Bauer XT90 Batteries Anton Bauer LP4 Quad Charger EXTRAS: SOS Plate Power cables from (Terry West), extra PRO cables, tools, spares American Stand Yeagar Pro Senior Steadicam Cart CONDITION: Everything in mint condition Purchased new in 2022 directly from PRO Low hours, light studio/commercial use All original packaging included PRICE: $55,000 OBO Willing to entertain serious offers, especially for local buyers. Prefer to sell as a complete package, but may part out for strong offers on individual pieces. Location: Los Angeles Shipping: Available, buyer pays shipping + insurance Contact: DM or email opticstudiosla@gmail.com or on IG @opticstudiosla More photos and serial numbers available upon request.

 1 point
 -
Hi all, I won't be using my rig for the next 12-24 months and am looking to rent/lease it long term to someone, preferably in Los Angeles but open to somewhere else for the right person. We can work out details and price over the phone/email, but the price & terms would be very fair, ideally a 3 to 12 month term. Perfect for someone who wants to upgrade their current rig or starting out in Steadicam & doesn't have the funds to buy a new rig. Entire kit is like new. Kit consists of: - PRO Atlas Arm (2 black & 2 grey canisters) - PRO Sled (Cine Live Upper & Lower Box, PRO gimbal, Gen IV battery rack) - Volt Stabilizer - PRO Vest - TV Logic F7H Ultra Bright 3600nits Monitor - Power cables for RED, Arri, Sony, etc - Soft cases for all the above Send me a message for more details, thanks.1 point
-
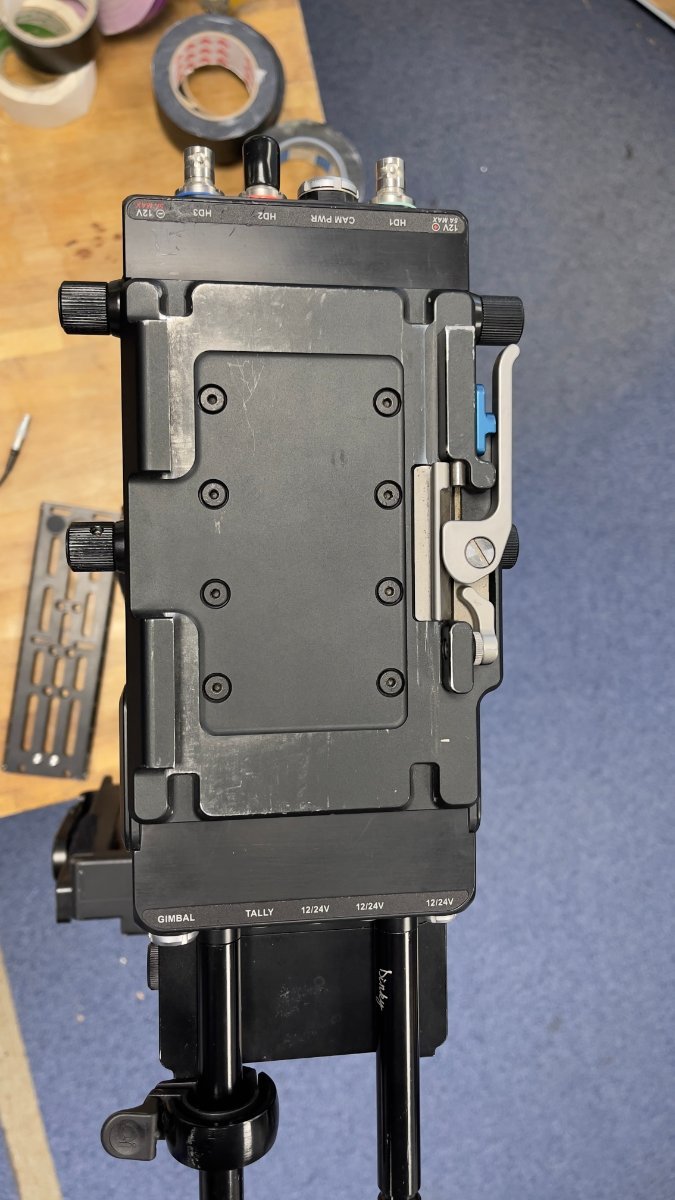
SELLING: TIFFEN VOLT KIT WITH M2 GIMBAL AND BRAIN WITH PADDED DOCK. In excellent condition with usual signs of wear. This has always been my back up gimbal and therefore has seen less use. Purchased new through OS 2023 for £9,860 + VAT Selling for: £7.5k + VAT UK BASED
 1 point
 -
New Price £12,5001 point
-
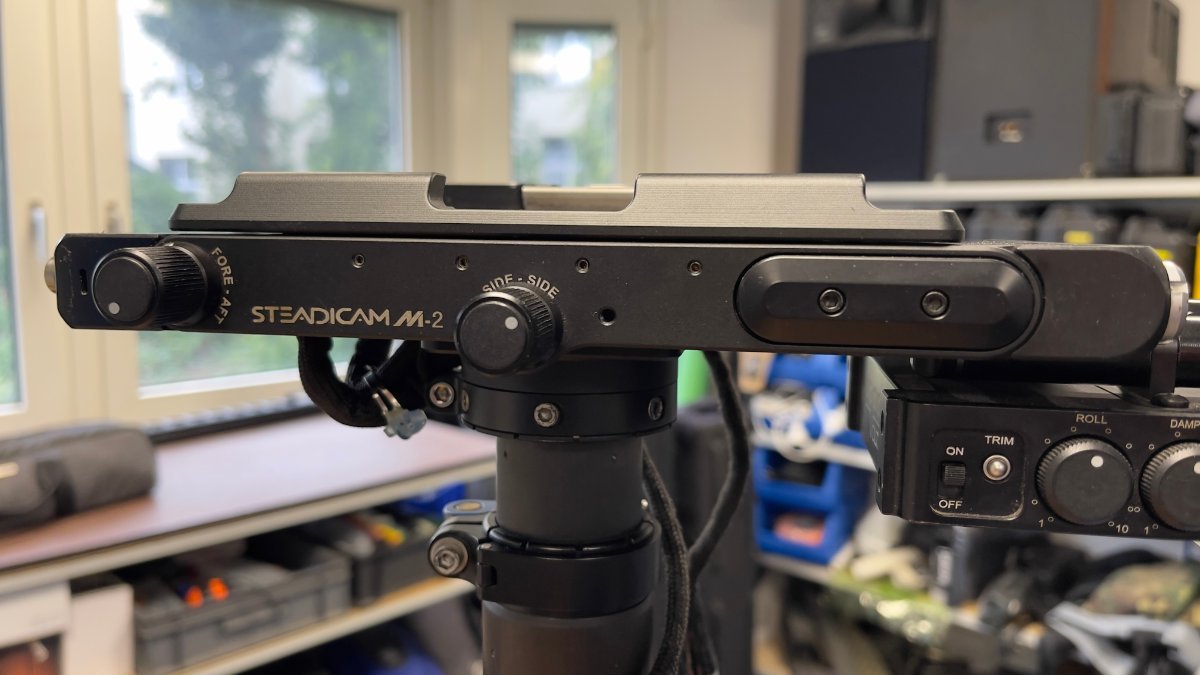
Selling an m1 tilting top stage. Only selling because I swapped to an m2. Great used condition. List price is $6,625USD-will sell for $4,000 USD plus shipping matt@steadimoves.com.au


 1 point
 -
boom 1.000.-€1 point
-
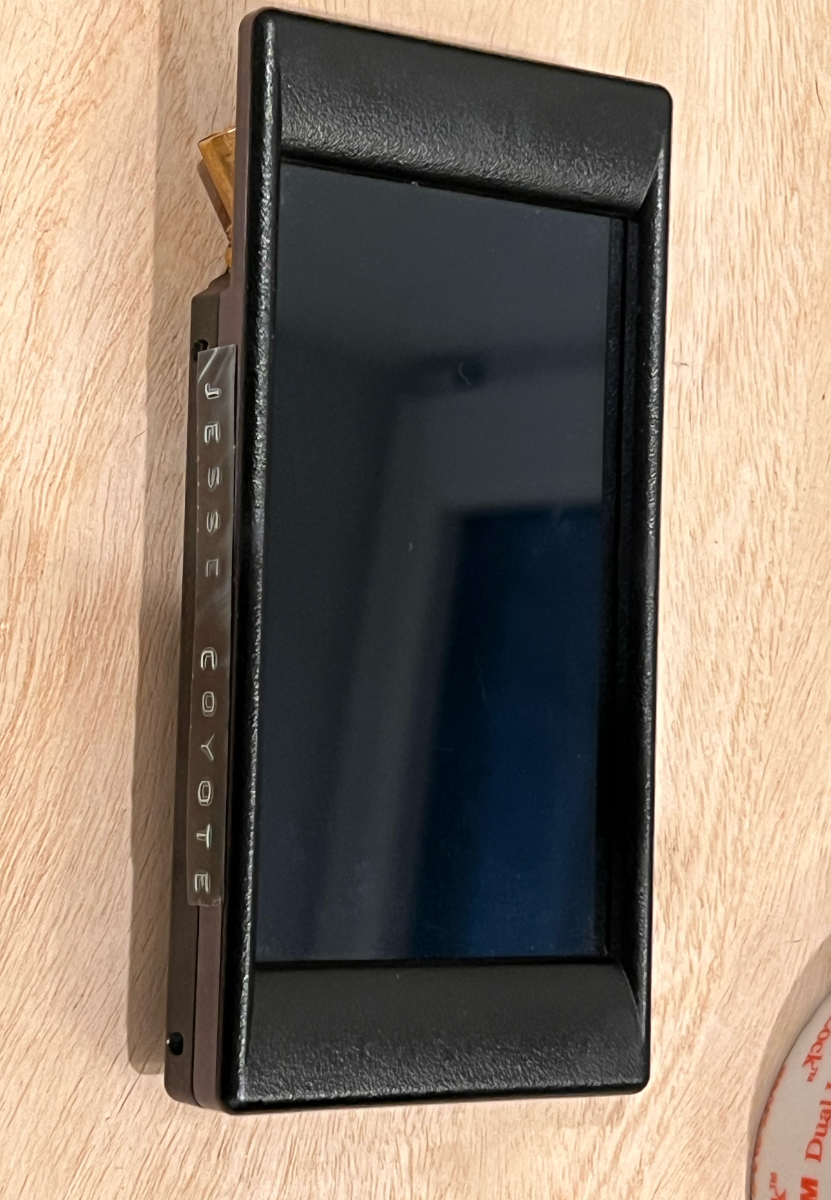
Recently bought a new rig so I'm selling my trusty M1! This rig is in great condition and was recently serviced. Theres normal cosmetic wear but nothing serious. Aside from and arm and a vest you'll have everything you need to get oping. Included: - Tilt stage - 2 section post - Transvideo 8'' X-SBL - 8- 150whr Core Batteries - Core Quad charger - 10+ BNCs - Camera Power Cables - Starlite 5'' low mode Monitor with 2 power cables - Hill Dock and Mag dock - 3rd battery plate - SOS plate - MDR plate - Full set of back up screws from SJS - Low mode collar - Steadicam Dovetail - Betz Dovetail - Thermodyne rolling case - Gimbal tool Originally everything was around $35,000 asking $22,000 Located in NYC, pickup preferred! Email jessecoyote14@gmail.com if interested


 1 point
 -
PRO ARM 4xblue 2xblack Solid socket block ( mkv made) Master/tiffen arm adapter J-bracket 6” arm post 4”arm post Spares Pelicase Softbag Located London Feel free to WhatsApp me +447599465514 £12000


 1 point
 -
While it is definitely possible to remove the Archer 2 stage (Tiffen is able to put Volt gimbals on it, after all!) it is not absolutely necessary to remove the gimbal from the post to clean the pan bearing. You can in fact remove the top cap of the gimbal and remove the pan bearing housing off of the gimbal grip, then wrap the top and bottom stages of the post in plastic trash bags and paper towels and spray out the bearing without having to remove anything. It will require a considerable amount more work since you’re working around the gimbal grip, and you will have to use more cleaner since you’re not going to be as readily able to spin the bearing, but it can absolutely be done. I did this procedure to fix a sticky pan bearing on Larry McConkey’s Ultra2 sled as well, which we didn’t want to fully disassemble.1 point
-
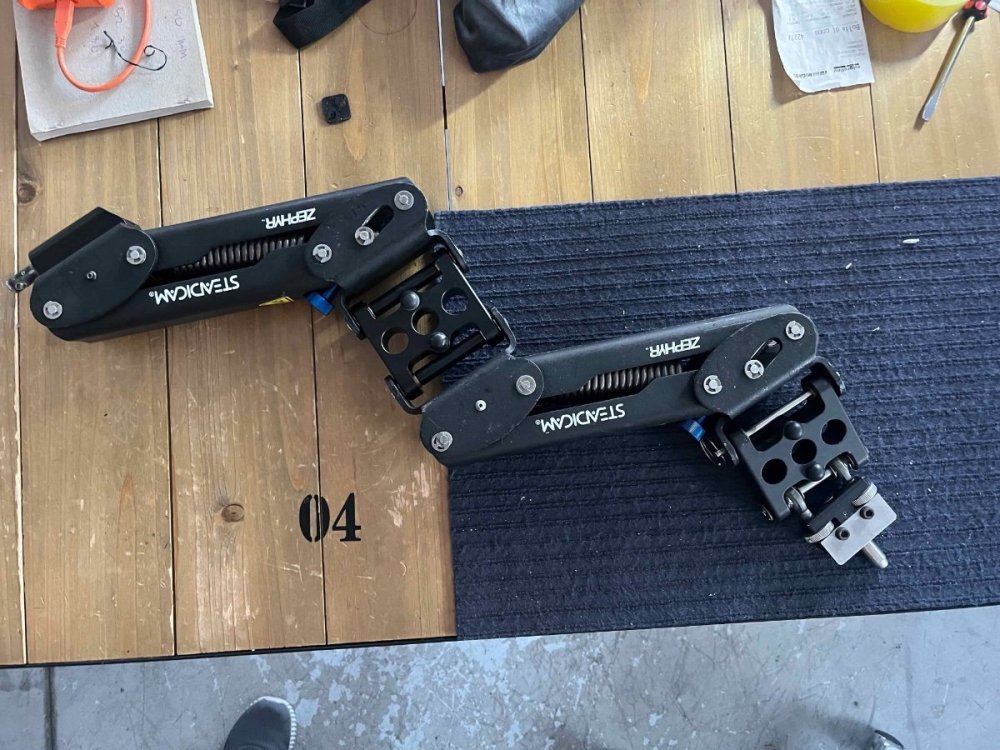
selling zephyr kit head is a calicocam italy custom made no vibrations at all arm is recently overhauled by robert luna vest tiffen monitor tiffen HD tiffen second battery Low mode bracket soft case 4500 Euro OBO located in switzerland email arielsalati@hotmail.com


 1 point
 -
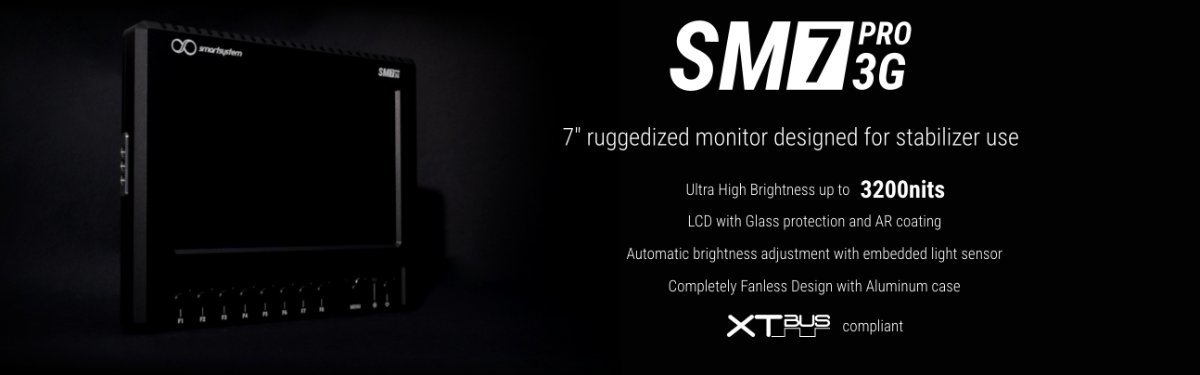
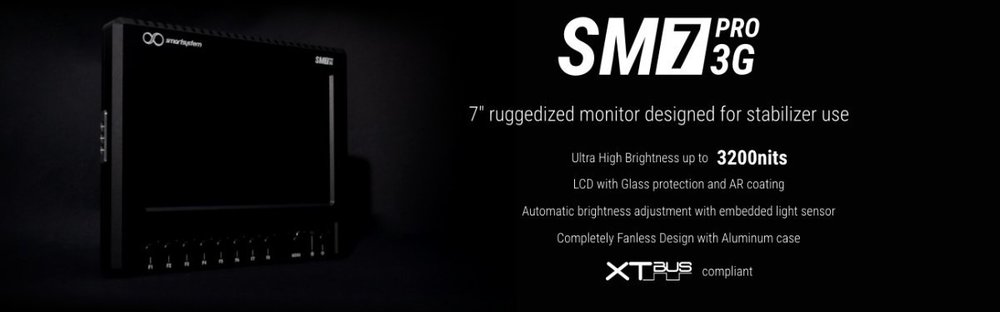
Hello all... Anyone have or seen this new monitor from Smart Systems ? Looks very interesting + being water resistant... ?! https://www.smartsystem.com/product/smartcam-monitor-sm7-pro-3g/ regards AJ.
 1 point
 -
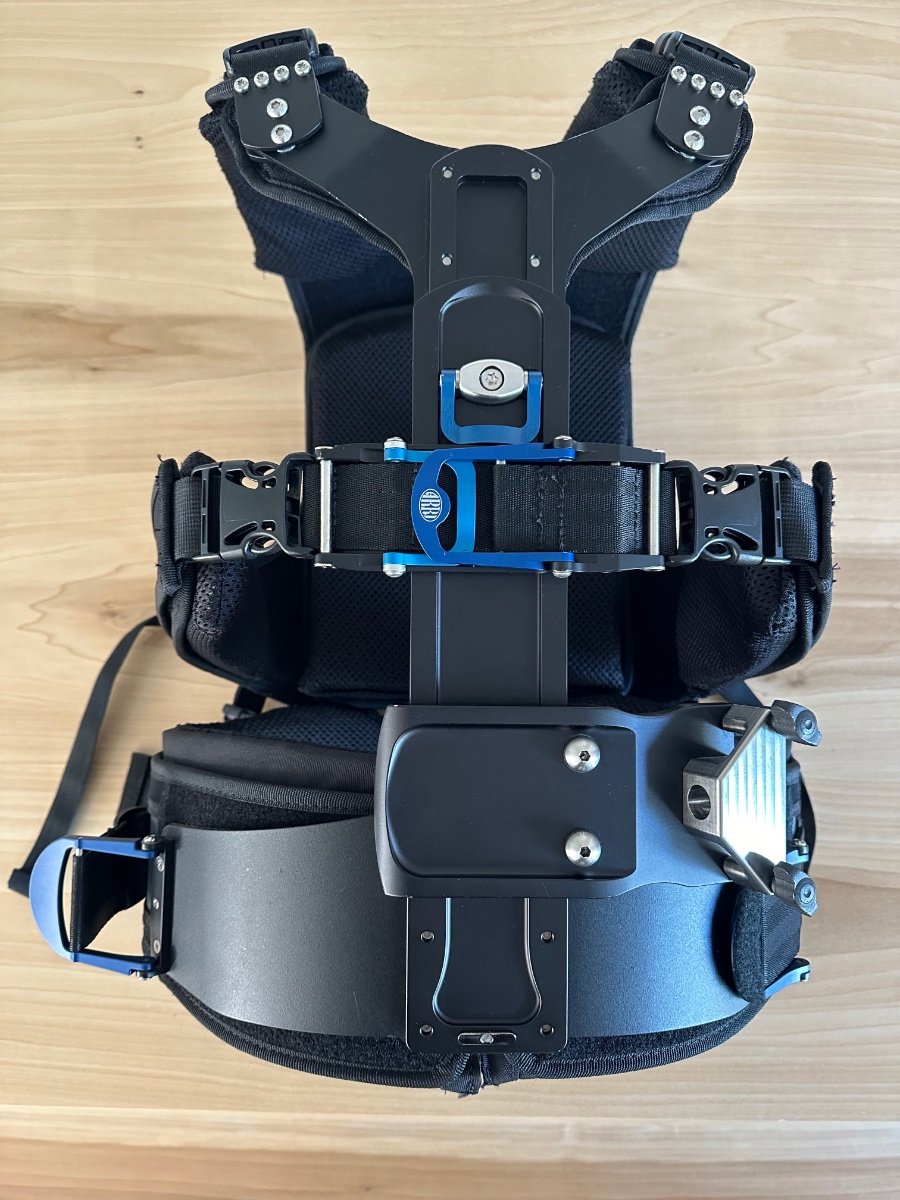
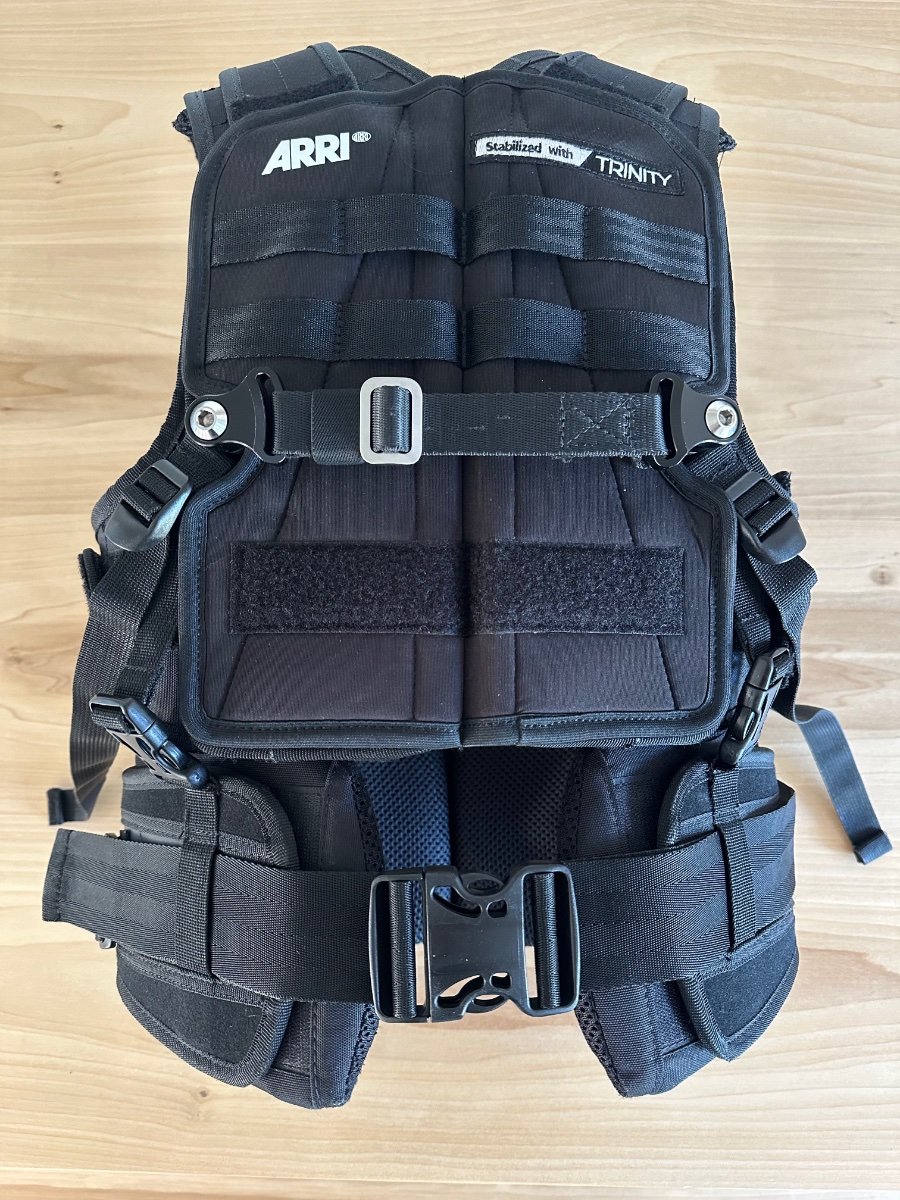
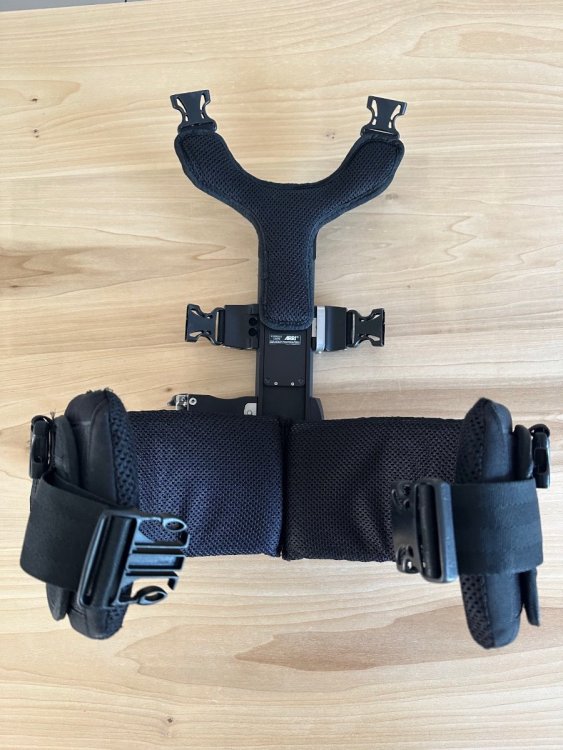
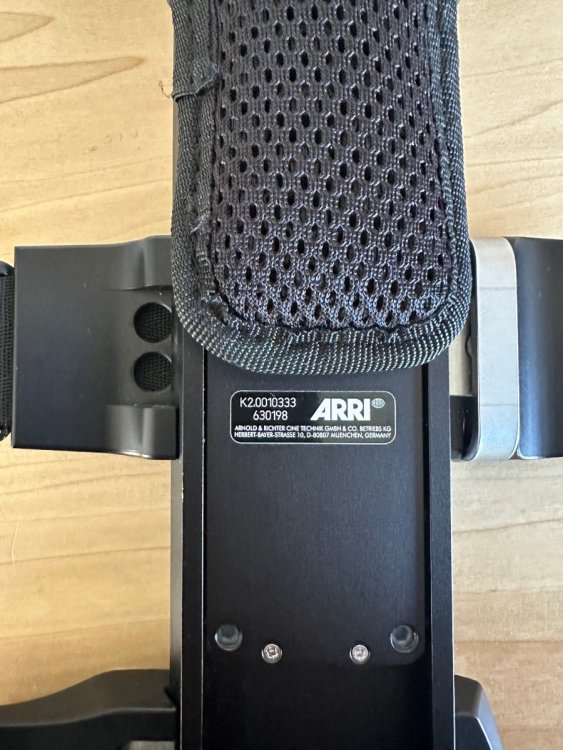
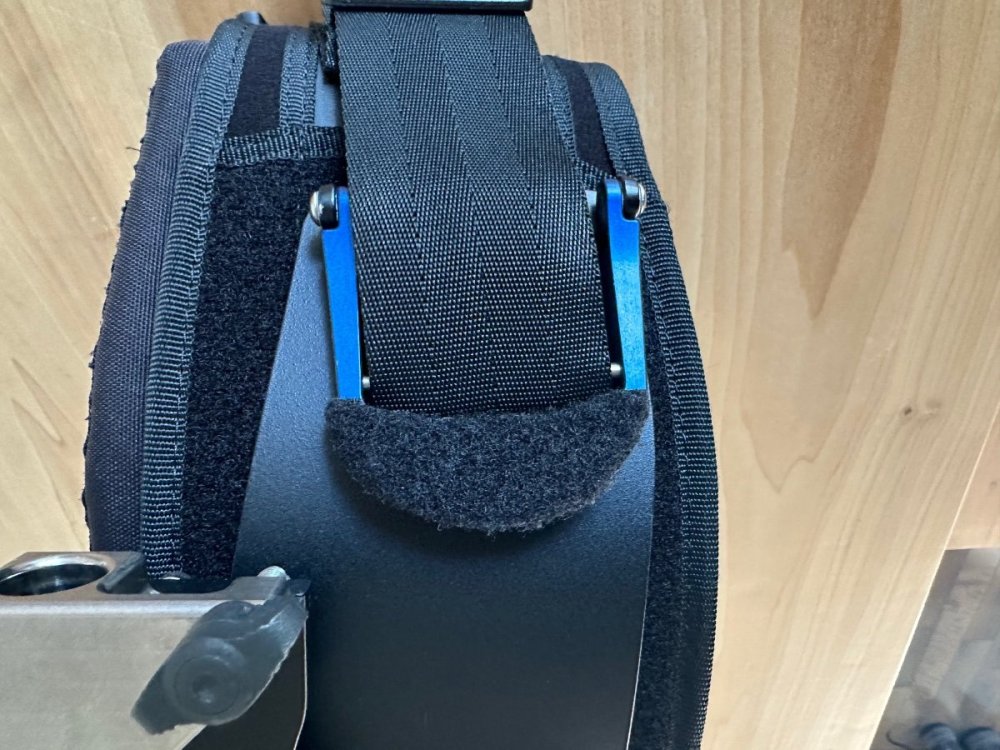
I'm selling my backup Arri Artemis Vest with a solide custom-made handle in excellent condition; overall looks clean but may have minor signs of use/surface marks for sale. (The left clamp has some marks on the surface.) There's a velcro for attaching patches and a custom-made patch (stabilized with TRINITY) but it can be easily removed. Retails at $4390 before taxes. Selling $3800 US Bought this for a feature and used it a total of 45 days. Buyer pays shipping and fees otherwise. INFO FROM ARRI: Highly adjustable and modular vest. Only the most comfortable and modern fabrics are used for the ARTEMIS vest. Fits any operator with a height from 1.5 m up to 2.1 m/4.9' up to 6.56'. Weight: 4.5 kg/9.9 lb with standard industrial vest-to-arm connector.


 1 point
 -
If these are for a Tiffen M1/M2’s sled rods, I would use Zacuto rods. Tiffen standardized on the 1/2”x13 thread standard, which Zacuto is one of only a few companies to use, unlike most companies which seem to use the M12 thread standard. I source mine from B&H as I’m in the NY area, and they are findable as “Zacuto extension rods”1 point
-
I would doubt that - the Flyer LE handle is a much thicker aluminum part with approximately 1/8” thick walls of aluminum, whereas the Pilot’s gimbal is a very thin bent aluminum tube, and seems like it would easily break under extended loads. The Pilot really was built down in weight so that the sled could be as light as possible. It’s actually quite impressive! But it does make sense that to save cost Tiffen would use the same bearings - they are a commodity part and only come in certain sizes anyways.1 point
-
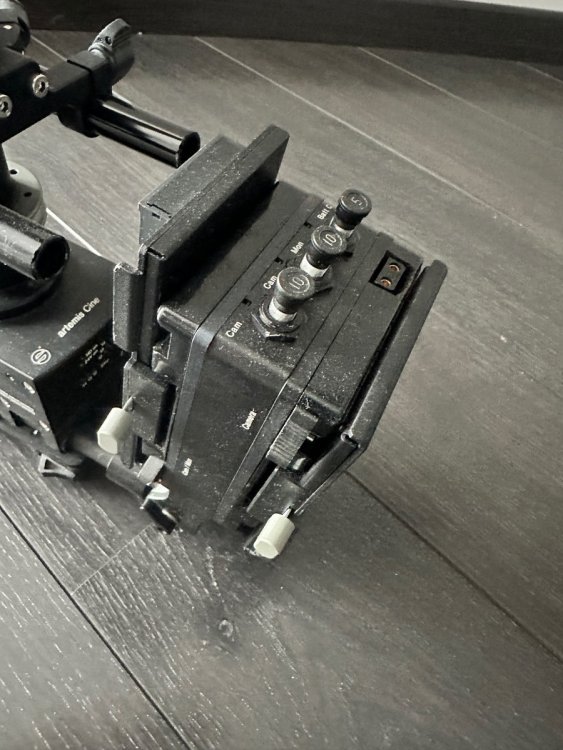
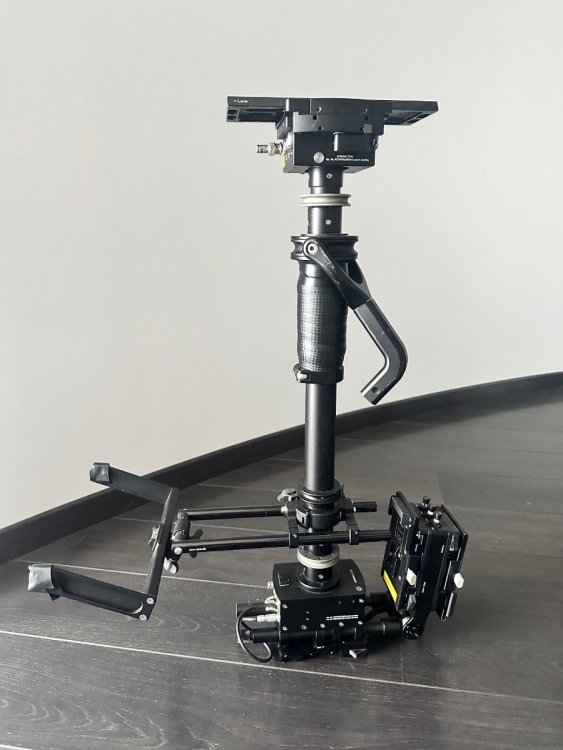
I sell my back up post an Artemis Cine HD made by Sachtler now Arri, excellent as your first rig. Post is compatible for Volt gimbal. Included is : Post with AB batterijmount for 3 batteries and monitor mount from Cam-Jam (Quattro). Rig works in 12V an 24V. Original camera plate 2x adaptor plates AB mount to V-mount Docking plate Asking 8000€ located in Belgium can be shipped, buyer pay transport cost and customs clearance when out of EU.


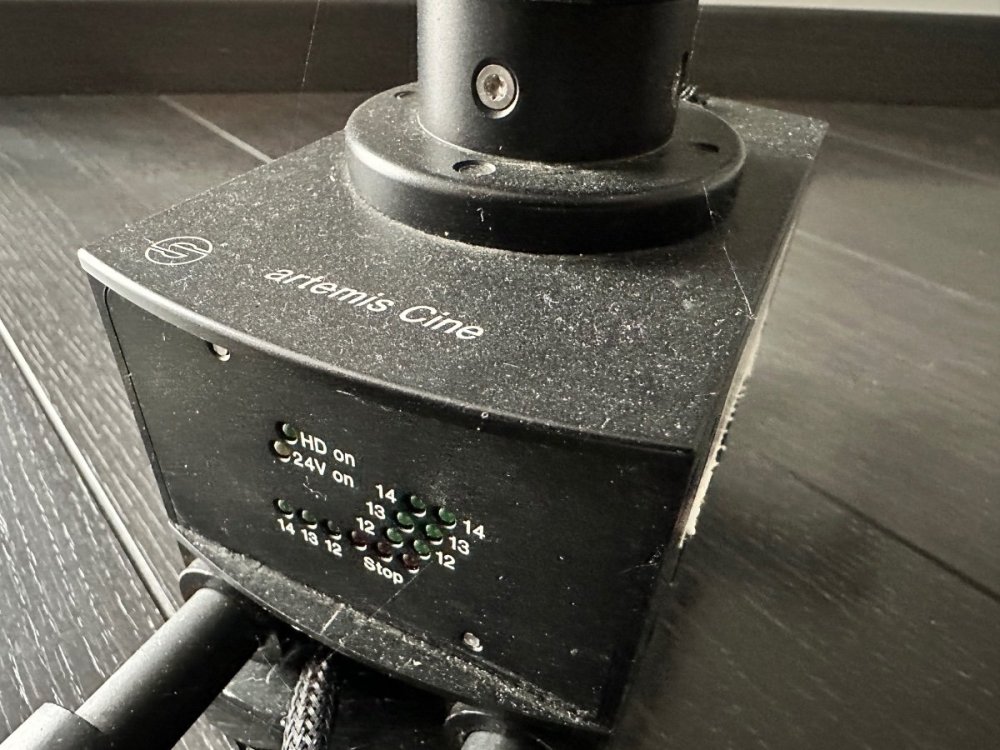
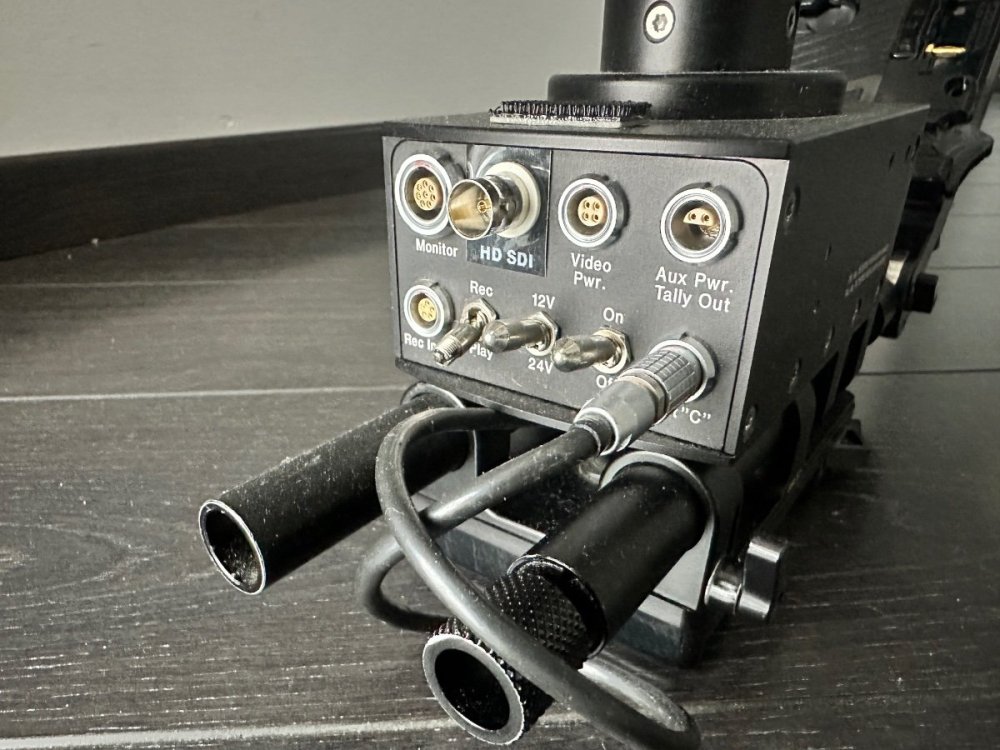
 1 point
 -
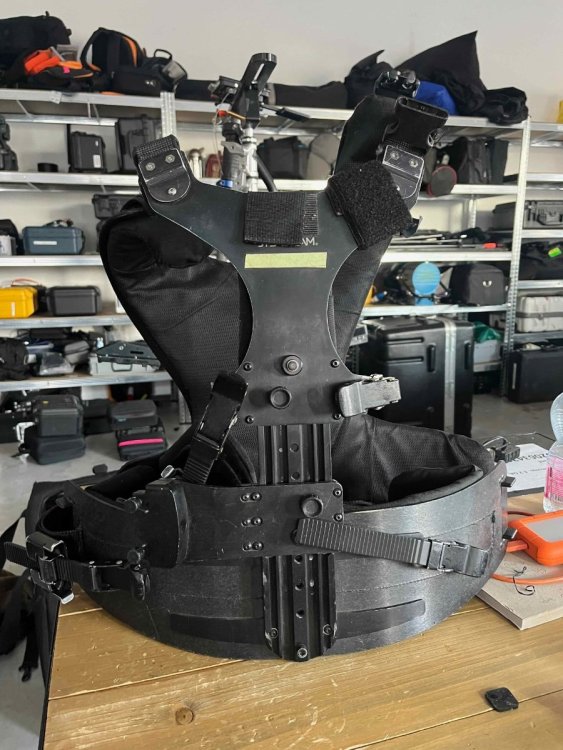
Wanted a 2nd vest as a Backup and then Thought Better of it. Wonderfully designed and very comfy. I have never used it on set but for a few hours of fitting and trying it out. Definitely haven't sweat in it. Comes with the optional back pad and the hanging bracket and pin. Gotta make some room for incoming gear. Located in New England/New York Pictures to Follow... Don't hesitate to call. 917-208-5644 Tom Schnaidt1 point
-
Looking for arm x11 point
-
Hey! Why are you letting go of your PRO arm? Could possibly be interested in the black canisters if you're parting out though!1 point
-
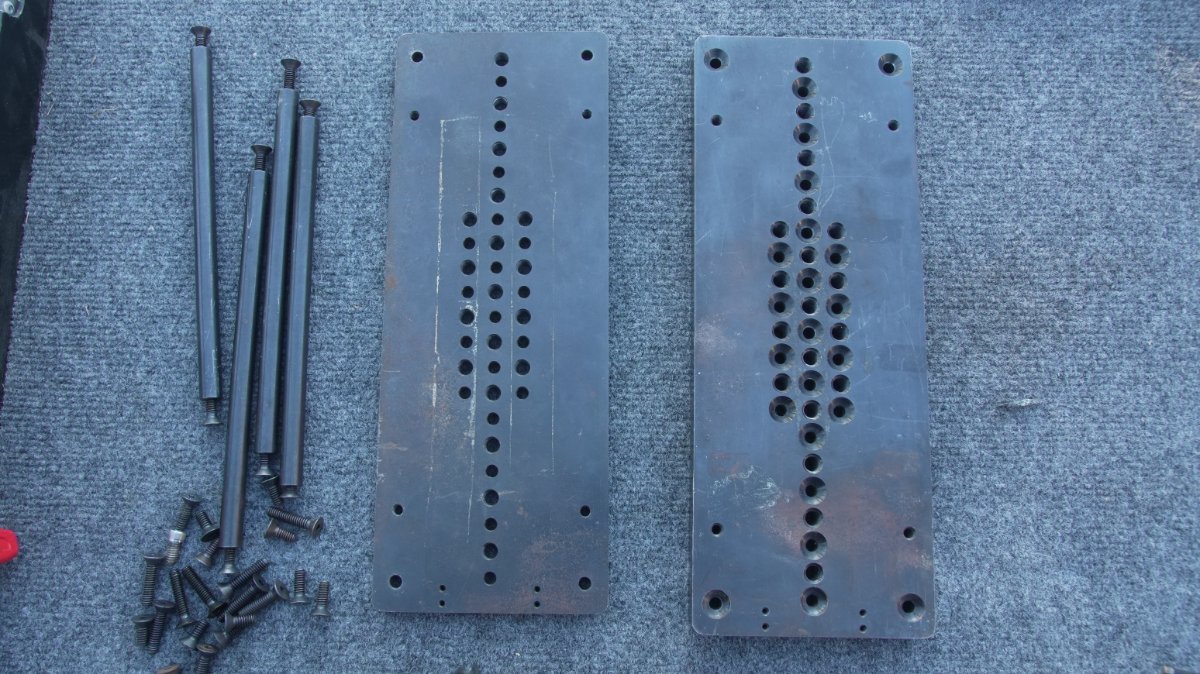
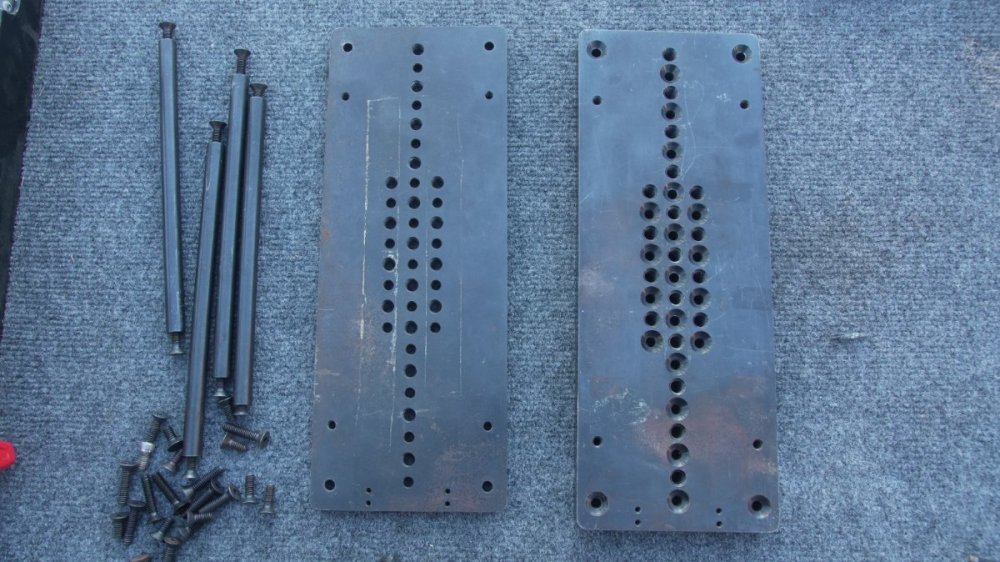
Weight plate / cage for sale $200 One plate is 6.5lbs the other is 15lbs. Comes with a bunch of extra screws. Has some rust but the tape/velcro residue will be cleaned off. Located in Metro Detroit, MI, Buyer pays shipping
 1 point
 -
Located in France. 2500€


 1 point
 -
Hey Tim, Just sent the $50 via pay pal. Thanks, Brett1 point
-
Steadicam Ultra vest for sale, in great condition. It comes with extra back pads, soft bag and hard case. All pads were just cleaned, and some have new foam. This is the perfect vest for someone who is just starting out and looking to put together their first big rig. Local pickup in Los Angeles, or shipping in CONUS at buyers expense. Asking $2500 or best offer.


 1 point
 -
Selling two 4x6 Windkillers with Softcase. Heavily used but no tears. $400 OBO JB SOS Plate. An older model but rock solid. $375 Pick up in Brooklyn NY preferred. Vemno and Paypal welcomed. Buyer pays shipping and app fees.
 1 point
 -
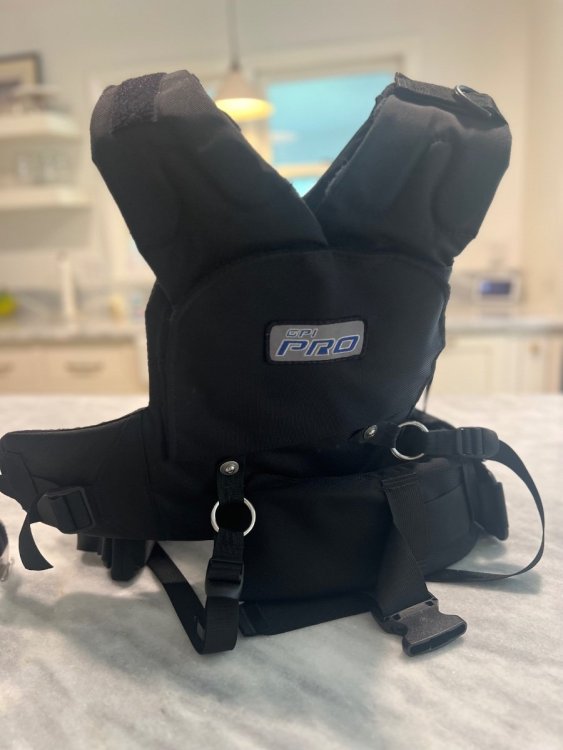
Selling my GPI PRO VEST, $3800, purchased in 2018. In good working condition, minor wear and tear in the form of some scuffs and scratches from use. I’m no longer in the stesdicam game so looking to offload my last piece of gear steadicam gear. 6’2” operator, 36” chest and waist measurements. 190-205lbs operating weight over the years. Priced to sell! $3800 Buyer pays shipping, based in Charlotte, NC.
 1 point
 -
Hi all; I've got a new vendor and all stocked up again with plates. I've even got a couple of new holes in the edges so that you can configure the posts in many ways, rather than just the four corners. I've got some good pricing, probably a bit better deal. Pictures to follow. Janice Have a wonderful 2024 after an horrendous 2023.1 point
-
Now asking $17k1 point
-
XCS gimbal in great shape, smooth as buttah. Hasn't been used a lot, mainly keeping it as a backup. Purchased it new from Greg, never abused it. Got a couple small cosmetic scratches but besides that, it's in perfect shape. Gimbal can be used on either a 1.5" post or a 2" post by simply swapping the sleeve. Comes with 2 hand tools. Buyer pays all shipping charges. Asking US$3800.00 Francois.
 1 point
 -
Hey Remi, I bought a Volt the end of last year. Knowing Tiffen has (admittedly) had some problems with the Volt, I think you're on the right track to continue to carry a spare. I went a different route, purchasing the new Volt 1 3/4" gimbal, and the new XCS 1 3/4" carbon fiber post with PRO connectors. I had a XCS 2" carbon fiber post with PRO connectors before, with a XCS gimbal, and I keep that as my backup post / gimbal. I also am holding onto my Wave for now. With all the above, including a MDR4 (I still had an MDR2 on my sled), cases, cables, etc... it was close to $30K, but I have a solid system and am basically state of the art from an equipment standpoint. People are starting to ask for a Volt, but that's not why I bought it. It was really Garret's and Geoff Haley's comments on the Walking Backwards podcast that convinced me the Volt was more than a crutch for guys with bad horizons. Flying neutral balanced and removing all pendulum effect is very nice. I've also lightened up my sled quite a bit. Where I used to add weight to cameras for stability, now the Volt provides that stability in a lightweight setup. Aside from the operating advantages, I think the Volt will extend my career, much like I feel my Klassen harness did. The downside is that the Volt is not as robust as PRO or XCS gear. You will have issues, and it's frustrating. I've had more equipment issues in the last 4 months than 30 years of operating. Some of the issues were my lack of familiarity with the best way to setup and dial in the Volt. Tyson at Tiffen has been very responsive about working with me on this. But some of the issues were straight hardware failures (I had a motor go bad in the first month) and issues related to design flaws (like an assymetrical gimbal). When it works, I really am coming to like the Volt features, particularly changing headroom via the push of the button. Larry McKonkey's button extender is a must. I'm sorry I don't have any experience with modifying a PRO gimbal for the Volt. I would suggest sending both post and gimbal to Tiffen for fitting, which I did. If you decide to pull the trigger, give me a call and I'll point out a few deal points. Best, Mark1 point
-
A 10 minute reel of shots I made with and without the Volt for Hulu’s “Dollface”. Most of the video is accompanied by descriptions of how I tune my Volt for different shots, along with why. This tool has fundamentally made my days at work better, allowing me to make bolder choices, with more precise results!1 point
-
Patrick, Please please do NOT become dependent on the Volt. If you have as much passion as you seem to have (referring to your first post on this thread) you should learn to be a good Steadicam Operator without it. You seem to have great respect for Garrett and Jerry and the entire world of Steadicam, to learn without using the volt (as they had and most of us had to) would be a great way to express that respect, IMHO. Your fellow op, - Kat1 point
-
Paddocks Radical Options or "The GPI Story..." George Paddock was an engineer in the Navy, later became a Steadicam operator/owner when buying his EFP in 1990. Imidiately he started to modify it and that became his first brush with Steadicam modification/manufacturing. He was the person behind the modification that made Dynamic balance with the EFP possible/easier possible. The construction of a for and aft to the bottom of the sled. It was so successful that his upgrade was even sold trough CP directly. Paddocks Radical Options (PRO) came about as an upgrade for the stagnated Steadicam Model 3/3A that was not majorly upgraded in 12 years (Most of the parts and technology, like the Arm, electronics, etc. was basically the same since 1976). The PRO basically incorporated design aspects from Bob DeRose, using his "tele-post" later the GPI Center Post, as well as his DA-1 (the upper Junction box), the lower for and aft and all the little and big brackets and widgets that he had made for the 3A for years. Chris Haarhoff added his Donkey Box to it and George Paddock came up with the Monitor, Housing, the Power Supply, Batteries. (They were sold in parts as the Steadicam patents were still very much power. Many Steadicam hardliner believed that that was in direct violation and competition with Steadicam... It was a well deserved Option.) The interesting part about that was that for years many Workshops were conducted by CP and PRO with CP/DCE/PRO hybrids until that day when the war/break came about... And No I don't know exactly what happend... You will notice that many parts from the 3A will fit the PRO and vice versa... as the PRO design was initially meant as an upgrade and not as a replacement for the 3/3A. The Master Series was the answer to the PRO or at least got pushed quicker in production, which came with different diameter Post, Gimbal and Arm Post which were not interchangable with the PRO. A try from CP to dry out the supply of Arms and Gimbals for the PRO system. Which eventually turned out to be a shot in there own foot. (As we know CP went down... GPI is still here.) All customers of the first PRO were disappointed or fed up 3A owners that needed something more reliable. (Remember? Everytime you flipped the switch for the Monitor with anticipation... will it glow or blow up...) You still needed the 3A Vest, Arm and Gimbal to compleat the set up as Cinema Products did not sell single parts, actually they decidet what they sold you at the time. Later the PRO Gimbal got introduced as well as much later the Arm and the Vest which compleated the PRO set up and marked the departuer from all parts Steadicam. And the second compleat System (Sled, Arm and Vest) as an alternative to the original Steadicam. GPI was the first to introduce an interchangable Super Post as a standard item as well as the Gyro Module, Stand-alone Monitor, quickly disconnectable center post, drop in Camera plateform, true 24 Volt system (okay second as the Panaglide was first) and many more things not available to the Steadicam Community until the Master Series Steadicam. Besides George Paddock, Chris Haarhoff and Bob DeRose, Mark O'Kane, David Emmerichs and Ted Churchill were named additional Designers. (As Ted is not named on any patents, he was closely involved with the development of the monitor, and some technical aspects.) "Guineapigs", Testers and first Costumers were Chris Haarhoff, Mark O'Kane, David Emmerichs, Ted Churchill, Jimmy Muro, Andrew Rowlands, Colin Anderson, Steve St.John, Randy Nolan, Bob Ulland, Greg Lundsgaard, Scott Sakamoto, Mark Van Loon, Rusty Geller, Ian Jones, Jim McConkey, Mark Emery Moore, Rick Raphael, Bob Gorelick, Dave Knox, Guy Bee, Dan Kneece, Dave Luckenbach and a couple of others that I can't remember off hand... And again please feel free to correct me or add anything that I missed or compleatly screwed up... please... Here a 1993 picture (from an old GPI add), showing Mark O'Kane's PRO. With: 3A Gimbal, Donkey Box 1, Scissor Monitor Arm, 3 cable Center Post, Preston UHF and the original Leightweight Panaflex. I believe the rig is Serial #002. (Chris Haarhoff used to own #001, which went to Kurt Jones and now is owned by Brian Hart.)
 1 point
 -
Hi Guys, saw this on youtube.... The steadicam operator name is "Low Wai Kung" can't find the full behind the scene stuff.... but it is really slow one take shoot... good stuff.... check it out...1 point
-
There are multiple issues that I think are being discussed here. Both of which I am very familiar with. Pro manufactured two different height knurled locking rings. The first locking rings are shorter in height by about .040" than the current knurled locking ring. These rings were on all sleds they made for about the first 6-7 years. These are the two rings that hold the center post to the upper camera platform and lower aluminum housing. About eight or nine years ago, Pro increased that height which prevented original XCS posts with Pro mounts to fit firmly together. I then immediately redesigned the mount so that is no longer an issue and will never be an issue. When Pro went to the thicker mount, they completely stopped making the older mount for all their owners and only provide the newer version. There are really three options for a permanent fix if you damage your older knurled rings. The best option for resale is obviously to change the post ends in the 2" carbon fiber post. The second option would be to take your knurled ring to a machinist and shave off .040". I would take .020" per side -0/+.005. The last option is a .050" spacer that you can actually stick inside the knurled ring which allows a tight fit. I think the second issue is one that I have seen more than a few dozen times and can only assume Pro is aware of it. What a few other operators here are thinking may be related to the first issue. It sounds like James is speaking of this very thing. For those who are unaware, when you mate a Pro post to the upper and lower housing the aluminum post doesn't actually touch the aluminum housing of the mating component. The conical pins actually are designed to carry the load, and there is approximately a .010" gap between the two aluminum components. What I have seen and measured is an occurrence that happens when one or two stainless steel pins in the upper camera platform (most likely the culprit), or lower aluminum housing gets pressed into its own housing causing a scenario like a three legged barstool with one short leg. The end result of this will cause the camera platform to shift under weight resulting not only in movement, but your sled will not maintain balance. This movement most of the time cannot be seen. It is moving in thousandths of an inch and is almost impossible to see, but it can be measured. This small amount one may think is insignificant, but when you are talking 20 and 30 lb. plus cameras it will have your sled sitting at a 45 degree angle or more. Here is a quick test to show how little a few thousandths of an inch will throw off a sled. Left to right balance adjustment is a 10-32 threaded shaft. One full revolution moves the camera platform .031". If you balanced your sled and moved your inching knob 45 degrees, you just moved it .0077". If you move it only 22.5 degrees, that is .0038". You can see how your sled reacts to balance when you turn your inching knob 22.5 degrees after it is perfectly balanced. It very difficult to see .004" movement, other things are flexing that much already with a 30 pound camera. Stay level. Greg1 point
-
Leave it upright. When needed use a "J" bracket to get a little lower (as you would with low-high mode). Found this pic in my archives:
 1 point