Tom Wills
-
Posts
472 -
Joined
-
Last visited
-
Days Won
55
Everything posted by Tom Wills
-
Absolutely, sorry if my post added into any of the confusion.
-
I just looked at that cable, and it's not an HDMI connection on the end at all. In fact, it plugs into the "AV Multi" port on the back of the PS3. Check out the 2nd picture on Amazon, you can pretty clearly see that the connection has a "U" shape, not the shape of an HDMI connection. And, as far as I know (having just strung a few hundred feet of HDMI cables through walls this summer), HDMI is a digital-only interface, where component over RCAs is an analog-only communication. If only it was always as simple as a cable. I work a ton with the 5D and the 7D doing handheld (shooting a local reality TV show, and a few commercials), and I'd kill for having the old 3 RCAs for component - HDMI is just such a bad interface for production work.
-
Thanks everybody for all the responses. Glad I didn't make a bad choice early on that would require re-wiring the sled entirely later down the road!
-
Good point Alfeo. It is something to consider - what if a job came to town with a 24v camera? Rob, I'm already using a whole host of Anton Bauer ProFormers, which (I believe) are 14.4v. I'm probably going to pick up some Dionics in the future. Would I be incorrect in thinking that most professional gear could use the 16+ volts that a battery can be off the charger? So far, I've never had a problem running any of my accessories, or accessories I've rented straight off of the battery, except for one really cheap video transmitter a DP loaned to me. Would it be worth it to do voltage regulation at this point? Getting the kind of amperage on a voltage regulator needed to drive all of the electricals of a sled seems like overkill to me - but then again, XCS does it! This is why I love this forum - with every question I ask, it seems I end up getting tons of other answers I never would have thought to ask about.
-
I've begun work on piecing together a sled (it'll be a bit of a Franken-rig 3A, but it's a big upgrade from what I have now). However, the starting point of a sled I am looking to purchase does not include any electronics, and the wiring was all done by the previous owner. I'm planning on re-doing it all from scratch, and hopefully with some professional help. In beginning to work up some designs, and it's made me really curious as to whether I need 12v or 24v power for the sled. As more and more work moves to digital cameras, most of which are usable on 12v, would it make any sense to focus on having a really good 12v system, or would it be better to just go 24v from the start. Right now, the market I'm in doesn't even have any film cameras, let alone anything higher-end than a RED. And, while I'm sure I'd love to operate some film jobs, I think that the level that I am (and probably will be) at for some time will keep me planted in the video world. I also anticipate that this sled will eventually be replaced, once I do move up in skill and funds. So, what do people think? Is a 12v only sled viable? I really appreciate the help!
-
The vest is still for sale, and I'm open to offers! Could anyone use it?
-
If the lack of a price has scared anyone off, perhaps this will help: I'd love to get $450 for it, but feel free to send an offer! As I said, this isn't doing anything for me right now, and I'd much rather sell it for a low price than have it sit in my apartment unused for another 3 months.
-
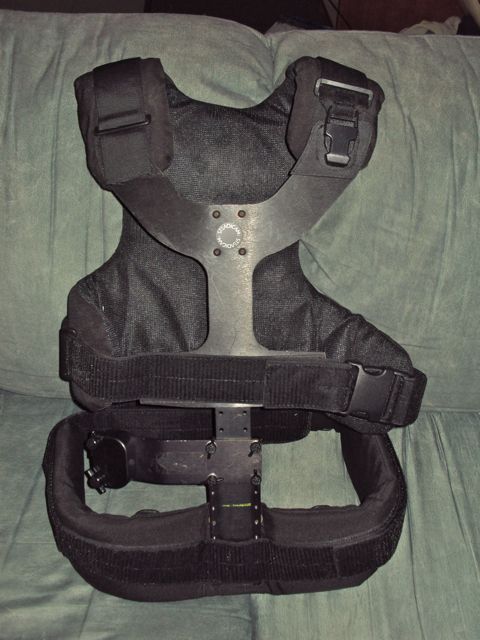
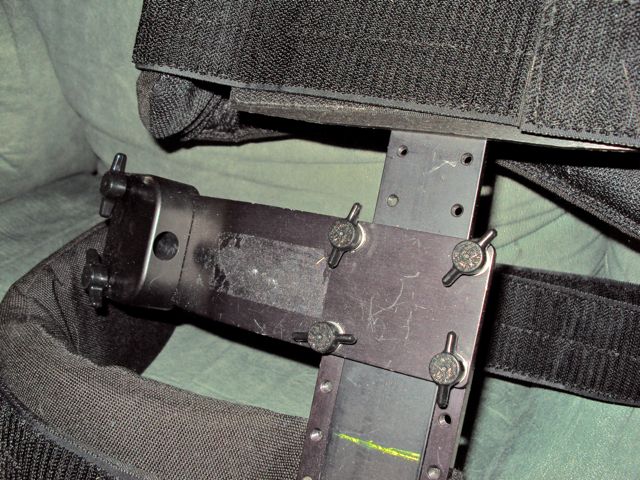
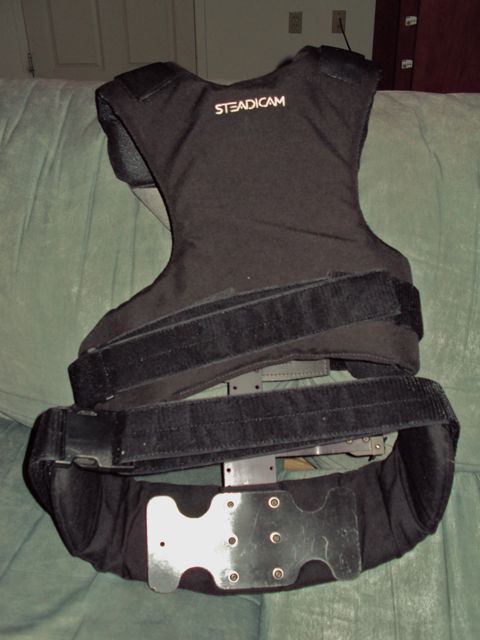
I'm looking to sell the original vest that came with my Merlin Am and Vest kit. This vest is the same style used for the Pilot rigs, and is completely interchangeable with them. It includes the newest "Buckle Mod", straight from Tiffen, that allows you to put the vest on and take it off without changing the vest's fit, or making the annoying Velcro ripping sounds. The Buckle Mod was only used for 2 jobs before I upgraded to a new vest. The socket block and lower waist strap on this vest are brand new, just ordered a few weeks ago. The only condition problem is a few scratches, which are pretty minor considering the 3+ years of use this has seen, some grease pencil on the main spar, and a bit of sticky residue left over from an ID tag of mine, right next to the socket block. I'm just putting this out there, since I know that as a buyer, I like to know what I'm getting before I buy it too (you can also see most of this in the pictures). Other than that, the vest is still in beautiful shape. In terms of price, I'm open to offers. A kit of this vest plus the Merlin Arm runs for $1500, if that gives you any idea. I'm more than willing to negotiate - I'd rather get something for this vest than have it sit in my apartment and gather more dust! Thanks for looking!


-
Hey Joe, The video looked great. Really inspiring that you did this with just a 5D and a Pilot - makes me want to get off my rear and get out there and shoot some stuff with my 7D on my rig now! The operating was very solid. It must have been fantastic to work in such an elaborate set. It really didn't look like 5D footage to me (and I usually can know it when I see it - I shoot tons of it!). I think the really deep DOF helped with that. The Slow-Mo also looked fantastic for being done in post. All in all, a great clip. Kudos!
-
Recell Anton Bauer ProPac 14 in Europe
Tom Wills replied to Sebastian Geret's topic in Batteries/Power
I was actually going to recommend John. I just got a battery recelled with him, he was incredibly fast, and the battery works better than it ever did new. Assuming you're willing to ship it to the US, he's certainly good! -
I was outbid with about 5 seconds left on the thing... somebody really wanted that. It went from $2500 to $4550 in about 20 seconds of bidding. Shame too, since I really need a new rig. PS - anyone got an old rig in their basement they want to sell for cheap cheap cheap to me? :P (mostly kidding, since I could barely afford the eBay EFP right now!)
-
Brian, I don't think he (or anyone else) should be doing the kind of student gigs where there are "student rates" and budgets to support that for free, but there are a lot of student films out there that I'm sure couldn't pay for an operator at any rate, but that might be a good reel-footage source for a new operator. I should know - I work on plenty of films like that! That's a better solution than selling yourself short, is it not?
-
I doubt this is a fake ad. I've seen this guy's work. He doesn't seem like a bad operator either! It's just really sad to see someone in New York City, with a lot more gear than me, working for less than what my rig rents for, in Buffalo, NY. Honestly, he'd probably be better off doing a few student gigs for free - at least that way he won't be ruining anybody's rates, and he won't be losing the respect of both his fellow operators, and whoever he works for. Those who pay $200 a day for operator+kit are the kind who generally expect the operator to work all day, hold frames like a human tripod, and then complain when it isn't perfect. And, at least if you work for free, you can then for later gigs actually charge for your work - but if you try to raise the rate for a client who you've been working for a real low amount, it's more easily seen as "trying to gouge/raise rates on us".
-
Blair, I think Sydney is referring to the fact that the Varizoom rig is, in fact, a BFD. (or at least a rebranded one) Check Jim Bartell's post here: http://www.steadicamforum.com/index.php?showtopic=7410&view=findpost&p=33272 The Hocus Focus is a nice rig, but I don't know the legalities of using it in Canada. I know that it's not FCC certified for use in the USA yet. The BFD (at least to my eyes) is a step above that - much more in line with the HoFoPro, which runs about the same as a Bartech rig. The other advantage for those in North America with the BFD is that Jim Bartell is on the same continent for service. I can't really discuss true differences, as I've never tried a Hocus Focus, but the time I have spent with a Bartech has assured me that it's what I want to buy.
-
It was a Lilliput sales guy. Thanks for letting me know that the picture isn't even representative of the correct model. Strange, considering I've been consistently referring to the 668. I was less concerned about how the top one looked than how the bottom one looked, though honestly, the top one is pretty much what my current monitor looks like in sunlight. I think that if their return policy is good, I'll pick one up just to try it out. At the least, at $400, it's a not terribly expensive HD director's monitor. At best, it's a livable upgrade for the next few years until I can afford a "real" sled. And Sam, sorry if I'm filling up your thread with discussion about a monitor you're not interested in!
-
Their sales guy sent me this picture comparing the regular version with the sun-bright version. The regular version seems to have some kind of film on it, which might contribute to some of why it looks so awful, but the sun-bright version is faring pretty well, considering that according to the EXIF data on the pic, it was pretty damn bright outside! (ISO 100, F 6.3, 1/160 shutter) As I said, no Transvideo, but it looks like it's actually doing what a transreflective monitor should. http://tom.willsmediagroup.com/lilliput.jpg
-
I also doubt that it's going to be anywhere close to any of the high-end monitors out there, but it might be an upgrade from something like the Pilot monitor, depending on how they make it "sunlight readable". (note that I put it in quotes!) And considering that my current monitor washes out on overcast days, anything would be an upgrade. I know that there was a company that was making other small and inexpensive LCDs transreflective for about $600 including the monitor, so that's a possibility for what Lilliput is doing. Lilliput's charging $160 for the mod alone. Again, I doubt it'd be a Transvideo or even a competitor to the 7" 700NIT Steadicam monitor at the price it's at, but it might be on-par or better than the original 500 NIT Flyer one, and cheaper too.
-
I'm looking into a new monitor I saw someone discuss on here a bit ago, made by a company called Lilliput. The model I'm looking at is the 668GL. It runs off of standard composite video, component HD video, or HDMI. It's a pretty generic Chinese monitor, but it's got some interesting features. It's got BNC inputs on the back (rather than a strange breakout cable), it's got an internal battery, and it's got a hard plastic sunhood that you can put on it, which is only a few inches deep (better than some of the huge 6" deep ones for what we do). The most interesting thing though is that they say they offer a "sunlight readable" version. I think I'm going to take the plunge, since it's only $375 for the sunlight-readable version.
-
Charles, The link you posted just sent us to the search page. I think what you were looking to link to was http://www.nebtek.com/proddetail.php?prod=730-ST_MNT . Right?
-
I've played with the Varizoom controllers, and rent a BFD for my rig. Varizoom does sell a rebranded BFD, but the "TOC" system is different - their take on an FIZ system. http://varizoom.com/products/controls/vztoc.html The controller feels nice in the hand - though the zoom control is somewhat strange in its placement. The motors seemed responsive (though this was on a showroom floor, so your mileage may vary), and the rig seemed decent. However, it is nowhere near the price range of a BFD! A wireless kit with one motor, receiver, and the hand unit is over $10,000. The hand unit alone is almost $3000 (and I don't know if that's the wireless or wired version). I'd go for the BFD. It's solid as a rock and easy to use for you and for your 1st AC.
-
Hey Charles, Love the rig! Much better than what I cobbled together with velcro for a shoot I did on the 5D. One question though - is the top rod necessary? For this last shoot, the DP had a build-up that he liked for his camera (offset shoulder plate, monitor, handgrips, etc...), and so when we went to Steadicam I just pulled the camera (which was mounted to the rods) off of the rods and put it on my rig. With a top rod in place, that would have taken a lot longer. Also, I know it's not final, but what would be the weight of just the plate with front and back rods? It's easy enough to add on a bunch of weight to make it fly well on a heavier-duty rig, but I think there could be a market for this kind of kit on rigs like the Pilot too - not enough inertia with a bare SLR, but most buildups making it a little too heavy.
-
Canon 5D HDMI connection to Pilot
Tom Wills replied to Timothy Palmer-Benson's topic in Steadi-Newbies
The 5D should have come with a cable that connects to a headphone-looking jack, with 4 connectors instead of 3. It then splits it out into the usual Red, White, and Yellow RCAs. Just hook up the yellow RCA to the Pilot's RCA input, and you're good to go. Since the 5D can't output HD while recording, and the Steadicam's monitor isn't HD, there's no point in using HDMI anyways. If you're missing that cable, you could probably find one at an electronics store. -
Hey Nick, Vortex Media makes a power cable that goes from the EX power connector to a 4 pin XLR. You could use it as is or chop it up to make your own one with a Lemo. http://www.warmcards.com/DC1.html Hope this helps!
-
All set with a lovely Model 2 suit! Thanks!
-
I'm looking for an old vest, to start piecing a rig together. It doesn't have to be pretty, and I don't even mind if it needs a little bit of work. Anything front-mounted will do - EFP, Model 2, Model 3, etc. My budget is pretty low, but if you've got an old backup vest you could use to get rid of, let me know what you'd want for it. Thanks!