Frederic Sturm
-
Posts
105 -
Joined
-
Last visited
-
Days Won
3
Everything posted by Frederic Sturm
-
In the next 3 days I'll have the joy of working with an imaging solutions nx7, a highspeed camera capable of getting 5000fps at full HD resolution. (Not steadicam work, but still...) After I'll receive a quick intro from the manufacturer, of course I will need to do some more testing to get familiar with it =) I do have many ideas, but thought it might be fun asking you guys. So, what would you like to see in 5000 fps (that can be pulled off in a hotel room at night)? Looking forward to your suggestions! I'll try to get what I can and post results when I get a chance =)
-
 Sale pending
 -
BTTT
-
2013 Steadicam Pilot - Like new
Frederic Sturm replied to Frederic Sturm's topic in Steadicam Marketplace - For Sale
Also, as always, please feel free to make reasonable offers :) I will happily ship worldwide! -
Package For Sale
Frederic Sturm replied to james goldman's topic in Steadicam Marketplace - For Sale
Hi James, I'm very interested in the weight cage parts, are you willing to sell them seperately? -
Hey Alan, thanks =) My question would be, how do I find the right tension? (I did not change the tension yet, because I moved both screws equally)
-
After practising a year with a friends rig, I bought this Pilot new in March 2013 to do more training. Now after taking a workshop and a lot of further practice, some actual work is starting to coming along and I needed a bigger rig, so my almost brand new Pilot needs to go. In the little time I've had it, I have taken perfect care of it, so its in like new shape. Please look at the pictures, there are no scratches, marks, or even real signs of use on it. You'd be forgiven to think it's brand new. A stand for the docking bracket is included in addition to the pilot kit. Included (as you see in the pictures): Pilot Sled w/ monitor and AA battery pack Arm Vest Merlin Weights Docking Bracket Stand Some other stuff like cables, allen keys, ... Pictures: Sled: http://s1348.photobucket.com/user/Sky-Magic/media/photo_zps4251ecb4.jpg.html http://s1348.photobucket.com/user/Sky-Magic/media/photo43_zpsb70a6f3a.jpg.html http://s1348.photobucket.com/user/Sky-Magic/media/photo24_zps9a83da21.jpg.html Arm: http://s1348.photobucket.com/user/Sky-Magic/media/photo42_zpse162fe2f.jpg.html http://s1348.photobucket.com/user/Sky-Magic/media/photo23_zps2f2aec56.jpg.html http://s1348.photobucket.com/user/Sky-Magic/media/photo32_zps81c6e3b4.jpg.html http://s1348.photobucket.com/user/Sky-Magic/media/photo52_zpsb571c7d7.jpg.html Vest: http://s1348.photobucket.com/user/Sky-Magic/media/photo13_zps723ce249.jpg.html System: http://s1348.photobucket.com/user/Sky-Magic/media/photo22_zps05f01a79.jpg.html http://s1348.photobucket.com/user/Sky-Magic/media/photo1_zps46d0a9b2.jpg.html http://s1348.photobucket.com/user/Sky-Magic/media/photo2_zps51084358.jpg.html http://s1348.photobucket.com/user/Sky-Magic/media/photo4_zpscc2504b5.jpg.html This Pilot is located in Munich, Germany (so no customs fees for EU buyers!) and for EUR 3100 (plus shipping) its yours. (Price for a new one is EUR 4000 + stand and you won't know the difference).
-
Just a quick update, this is sold, it has arrived, and a big thanks to Stew, he's a fantastic guy to do business with! =)
-
Its here, and its like new! And a price drop to € 270 plus VAT
-
Yes its consitently less than 1 degree, so thats what I thought in the end, thanks =)
-
Hi Alan, Hi Victor, Thanks for your quick replies! Of course I balanced perfectly over the non-adjustable axis first, as the manual states. And for sure I'm very, very careful to move the screws the same amount not to change the tension. But whats really weird, is now, a few hours later, it works. Then I take the rig off the pin, dock it, put it up again, and it doesn't. But you know what? I think I found the problem just now: letting it settle from one side it has a different error than when moved over and let settle from the other. I think my drop-time is too low to overcome the tiny amount of friction that is left in the gimbal, and the error is always below one degree, actually now more like a 1/3rd degree. So I might have been overly sensitive with this - do you think that makes sense?
-
Hi, Yesterday I received my "new" actually 1-year old used Zephyr from a nice gentlemen from this forum. Its in nice shape, and its a nice rig, I'm pretty sure it was the right decision to upgrade to, and I'm looking forward to putting it to work. Now, on my first tests I discovered it didn't hold the horizon so well when turned 180° and remembered the gimbal centering document I had read some time ago. Thanks for that link Victor! And thanks Alan, the #6 spanner was a great hint =) So I received my #6 spanner driver today and adjusted as described. With a 4-second drop time before it went off some 4-5 degrees, and it is now centered perfectly (the Wagner Horizon I got for it is a nice toy and the 2 degree scale over the whole width of the LED panel helps a lot with getting this accurate). BUT: I had some initial confusion because I trimmed perfectly 90° to the adjustable axis, just as desribed, but weirdly enough the angle it went out of center in the adjustable axis wasn't equal - although logic dictates it should. I figured it out anyway, but this way I discovered that in the Axis 90° to the one that is adjustable - the gimbal is NOT centered :unsure: It's not badly out of center but still with a 4-second drop time it goes off by 1 degree. Has this happened to anyone else? Is there a way to adjust it in this axis, too, maybe inside the gimbal? (I certainly won't open it to check without proper instruction...) If not, could it even mean the gimbal is damaged or is this just normal manufacturing tolerance? Thanks for your input!
-
Update: this kit will arrive in Munich on Monday and is still for sale. Also, feel free to make offers!
-
Victor was quicker than me, and his option is the perfect one if you find out you need it, but as I said, it is very likely to work without external power - at least mine does =)
-
Hey Andrew, this is exactly how I used my D800 with my Pilot. This little box is actually very reliable (which I didn't expect) and a great little tool (and look at the price, its ridiculous...) And whats more: I discovered that the current version of it has the 5V DC input, yet you DONT even need to power it, at least with the D800 it will run from the HDMI-Power alone :) So before you worry about getting a 12V to 5V cable or a battery box etc for this, just try it, it should work! Be aware though, that you will need to switch the D800 to live-view 2-3 times before it stays on, whenever you first connect it or power up the sled / camera - either the D800 or this box are not too great about finding a "HDMI handshake", but through tests I suspect the D800. Also, I first got some weird Issues with 4:3 conversion etc. and searched for the problem for about 3 hours and was about to throw this box straight into the trash - just to find out it was a defective HDMI-Mini HDMi cable. A couple of helpful things with the very, very, extremely strange format handling of the D800 :blink: : Live-View output is ALWAYS 1080/25p (or 24 or 30p I guess when you select those frame-rates). It will ALWAYS switch to 720/50p (or 60p... see above) while you RECORD (thats why your little box will need about 2 seconds for readjustment and your screen will flicker whenever you start / stop recording.) The HDMI resolution selection in the menu only affects PLAYBACK of recorded videos and photos. You'll get a full screen image on the monitor when you de-select live-view information overlay in the HDMI menu, if you want you can of course have the info on the pilot screen by enabling this option, but the frame will be much smaller. Hope this helps =)
-
Robin lately said that the Wagner BG should be shipping alteady, or at least very soon, but maybe there some new info? As far as apps go: gyrostabilized level apps on the iphone are pretty cool for steadicam - at least as a fun gadget. I tried them all - literally - and liked "Sailboat" the most of those currently available. It is pretty solid in acceleration compensation. The free version (less cluttered than the pro), can be made to show a +- 12 deg scale by using the 3-finger tap zoom from iphones accessbility options. That way it'll kind of work with peripheral vision - although nowhere near perfect. That said, I tried to contact the developer a while ago on the subject of making a steadicam interface for his code (which he already has like 10 purpose-made interfaces for) - but havent heard back yet. Putting my phone on the steadicam with this app and a ram mount went a long way in helping me to develop the "level-feeling" of my operating hand at any possible point - so at the vers least its a great and cheap training aid! some may use it as some kind of backup - although I guess I wouldnt regularly show up on set with a phone-toy-level on my steadicam.
-
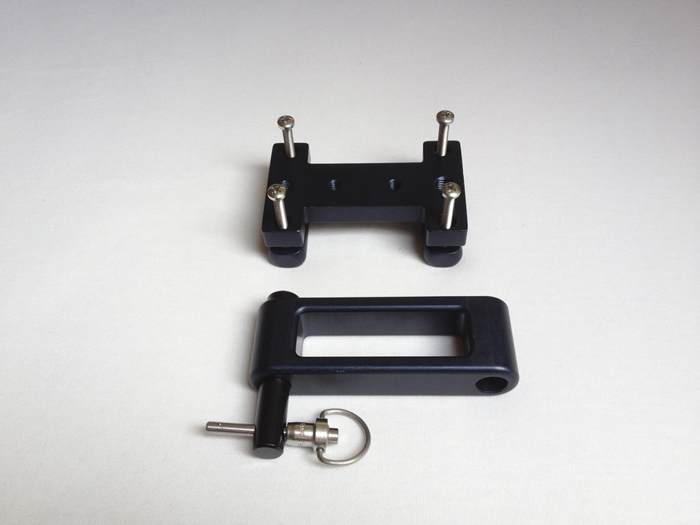
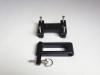
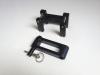
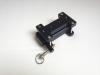
Just bought a used Zephyr from a fine gentlemen here on the forum and since I already have an F-Bracket from my Pilot, the one that comes with it is for sale now. The F-Bracket was new one year ago, and fits Archer, Zephyr, Flyer, Scout, Pilot and ProVid. Condition is like new. Photo will be added once I've got it in my hands. Its this kit: http://www.bhphotovideo.com/c/product/192878-REG/Steadicam_078_7393_01_Mini_low_mode_kit.html It will be in Germany in a few days, and although I'll happily ship worldwide, this is a great chance for EU buyers to save on customs and shipping. Price is EUR 290 plus VAT and shipping (it retails for a stunning EUR 385 plus vat new over here)
-
Sorry for introducing some off-topic here but I guess it's in the spirit of showing how to benefit from multiple instructors =) Chris showed us the mentioned technique and Larry immediately disagreed - again, I love that different people have different ways which suit them best. Larry showed us his technique where he slows everything waaaaaay down, bends his knees, puts his feet in one line in front of each other, rolling heel to toe smoothly (sometimes when required also touching down toes first), never "falling down" on one foot (thus also eliminating any heel strike that Alex mentioned) and at ANY point being able to stop and decide to go the other way. Thereby, total slow motion, he moves his upper body and therefore the socket block through space in one continuous movement, no back-and-forth speed change, no side-to-side-shift, no up- and- down. While at more speed the arm can feather out a lot of back-and-forth, up-and-down, and side-to-side movement, at such slow speeds the friction in any arm will be higher than the tendency of the steadicam to stay in playe, making perfect socket-block movement necessary. Then again when shots get faster, and the arm can do its full job perfectly, just walk as usual (with well thought-out footwork anyway of course...). Andrew Ansnick posted a pretty great description of it in the slow-walking thread: http://www.steadicamforum.com/index.php?showtopic=16171&p=77175 where Larry seconded his explanation: http://www.steadicamforum.com/index.php?showtopic=16171&p=81197 I did take a video of Larry showing it to us, and when I have time I might post it. Another key to this -as I have been told by Larry, and could definitely notice during the last 2 weeks, where I practiced my ** off pretty much on this very technique- are thin-sole shoes or even minimal shoes. It really makes all of the difference when you need to balance on one foot with a huge load attached to your body, that your feet get natural feedback of their position on the ground. Larry uses vivobarefoot shoes for his operating, when it comes to this technique. I discovered that for me, this technique, while requiring some in-depth training, works better than anything I've tried before - that does not mean it's the right one for you ;)
-
Hi all! This is my first post here but I've been reading quite a bit the last few years. After starting out with a quick intro from an Operator and tons of practising with a pilot for the last two years, and lately some actual (B-camera) application of this cute tiny rig on our projects, I have been lucky enough to have this workshop take place basically in front of my door (I live and work in Munich). Of course I wouldnt have missed this for the world, given I was looking to take a workshop before now moving to a bigger rig and more serious work anyway. It was an awesome experience alltogether, perfectly organized by Isabell and Christian from Betz Tools (thanks!). All the instructors were extremely helpful, and especially talking to and learning from people who aren't just instructors, but who are at the very top of this business gives a very practical allround experience that I think goes a long way in preparing you for real work. The organisation was well matched to this fact, since we spent the better part of the time working on actual shots designed by said instructors. I certainly love to find what works for me by learning from different people (regardless what I learn), and hey - here they were, some of the best all in one place. Needless to say, having Larry there was incredible. It turns out he's not just a perfect operator, but a Rock-Star instructor, too. Hes great at explaining every detail, spots the tiniest nuances in the very basics and mechanics of operating and gives just the right assistance to find out what works best yourself. Also of course, on the details of how to best work out specific things from extremely slow walks to step-offs etc, who's better to trust than him. But personally I benefitted most from him taking us along on designing and working out a long shot, seeing his enthusiasm and perfectionism live at work is enormous, and I hope I'll remember and apply as much as I can from it! The giant snail, Victor, is actually a siberian Dragon-Snail. Its still very young and not always under control. It does like chocolate, though =) Does somebody remember its name? All in all, it was great fun to meet all of the participants and instructors, and I would do it again in a heartbeat! -Frederic
-
Garfield mount w/mitchell base
Frederic Sturm replied to Jon Beattie's topic in Steadicam Marketplace - For Sale
Oh noooo... Missed it =( But if by any chance something shouldn't work out, I'll happily take it if Jay doesn't. -
F Bracket / Low Mode Bracket
Frederic Sturm replied to Charles Cowper's topic in Steadicam Marketplace - For Sale
Hi Charles, I sent you a PM a few days ago :)