Sam Law
-
Posts
32 -
Joined
-
Last visited
-
Days Won
1
Everything posted by Sam Law
-
Rey at tiffen was nice enough to let me demo one. I had a 5 min jogging oner, through a park over all sorts of terrain. Of course the actress would have been faster then me before adding 70 lbs of camera/steadicam, so I really wasn't sure how the shot was going to be possible. I intentionally have a very heavy sled, even stripped down its not the sort of thing you want to run 1/2 a mile wearing. We looked into a lot of other solutions, (golf cart/razor mount, rickshaw, etc...) in the end nothing else would work for one reason or another without changing too much of what they were looking for in the shot. Rey and Tiffen saved my back that day, and we were able to get the shot the DP and director wanted. As someone who owns a full size rig already I would definitely consider this setup for those 14 hour days doing 10 performance takes an hour on music videos for anyone just starting out this is an incredible tool to get yourself out on student sets and lower pressure music videos/ spec commercials. Every other rig in this price range is a joke imo. A $5250 rig and a $3000 workshop will get most people a lot further in their career then an $8,500 sled. For all the cinamotogrophers out there, especially red/mini owners who want to add camera movement to their shoots on shows they can't afford to hire a professional, this is an incredible piece of kit, and imo blows the movie out of the water at a similar price point
-
Its analogue
-
If mine slips I generally take a bongo tie and put it around the motor and the oposite rail. I've also heard the mounting the motor so the gear engages the lens at the exact top, bottom, or either side prevents slipage. While i don't understand the physics behind it I beleive it does slip considerably less when mounted that way
-
i was hyped, i was about to try to sell my 9" then i realized who posted this
-
Your best bet is probably a low mode bracket, with various length arm posts. Personally I use a nexus with the 2 in 4 stage post. With the post extended I can always get it floor scraping low or ceiling scraping high, by adding a Hytron to the bottom of the already heavy base of my sled (I always fly a gen 1 cinetronic and 3 dionics). Having the luxury of the super post that is the method I prefer to use. I mainly bring it up because the mkv is obviously modular, so it is the much more expensive option, but it is an option.
-
My analogue bartech is serial number 95. I purchased it used about 2 years ago on the forum. It was from the first year bartechs were being made 1997. Not only does it still work flawlessly, but it has held its value pretty remarkably. Mr Bartell's engineering, and just as importantly customer service are incredible. Having not used the DJI, I can't speak for it personally, but based on their other products I doubt this follow focus will stand the test of time at a professional level the way a Bartech does.
-
Im noticing after a show in the desert, my arm could use a little tlc. I was planning to order some acf-50 for a few parts that are looking a little rusty, and take the shields off and wipe everything down with a paintbrush. Is there anything else you would recommend doing to upkeep the arm? I imagine some of the bearings could use some grease, but I'm not sure which ones and what type to use (white lithium?) Thanks
-
Calloused finger tips and operating...
Sam Law replied to Blaine Baker's topic in General Discussion
If I'm not mistaken part of the reason steadicam is traditionally operated on the left hand side, is because Garret Brown is a banjo player, and so the lest hand controls fine movement, while the right controls bigger movements. If thats the case I can only assume the shining was operated with rather calloused fingers, so i think you'll be fine -
New Small Steadicam Concept, made from LEGO (movie)
Sam Law replied to Johannes Hogebrink's topic in General Discussion
wether its perfect or not, its cool to see a new way to achieve a similar result. Not to mention legos were probably my favorite toy growing up. Anyway my main question about the design, is will the actual version be a smaller profile, so the camera doesn't see itself in wide angle shots? -
Flying the rack inverted makes the sled basically complainer. You have limited adjustment of the battery rack compared to flying it normal, but using shorter rails that come with the sled, it puts the batteries at a very convenient distance from the center post. Because the sled is complainer, as long as the cameras center of gravity is over the center post the sled is in both static and dynamic balance. I always fly my monitor and my batteries the same distance from the center post, that way my sled feels the same every time I fly it, and muscle memory kicks in more efficiently, that's just my preference though.
-
Thanks a ton, that seems like exactly what I was looking for
-
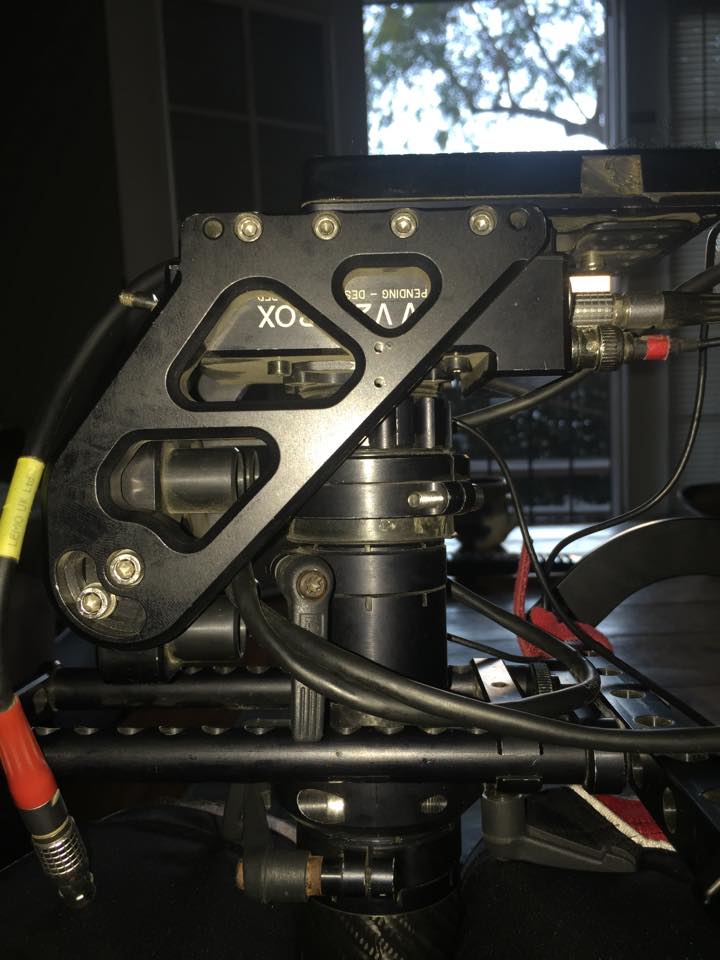
I'm the happy owner of an mk-v nexus sled. 2" 4 stage post with gen2 electronics. I fly the bottom battery rack inverted, and until recently I have been very happy with the decision to do so. I recently disassembled my sled, and since reassembling it, I cant seem to get the bottom electronics to screw on quite tight enough to the post. This has resulted in a few degrees of horizontal wiggle in my battery rack. I have yet to notice it cause vibrations in any of my shots, but i fear if left unchecked, it could lead to some. I fly a pretty fast drop time anyway and as a result it hasn't thrown off my side to side balance, but it definitely would be an issue with a slower drop. It seems like the easiest fix is to switch back to flying un-inverted, I know a lot of nexus owners fly their sleds inverted though, so Id love to hear what you do to avoid the issue. I feel like I could get a wrench of some sort in to tighten it more, but i don't want to get the screw on ring too beat up, or risk bending it. I rarely disassemble my sled, but Id like to keep the option to, so I would prefer to avoid lock tight. Thanks
-
That link didn't work for me (it might be an expired link or it might be my computer) I think found the article on Garrett's website though, in case anyone else is interested and having the same trouble I was. http://www.garrettcam.com/docs/contraptionwars.pdf some really fascinating nock offs, especially the Sri Lanka version.
-
the SK1 was the closest thing to a big rig I could get my hands on when i was first learning steadicam, so I've delt with all its little quirks, more times than I care to remember. keep in mind, most steadicams have adjustments for the camera, as well as for the monitor, and battery rack. moving the three weights around is what allows you to balance the sled. the sk1 only has adjustments for the camera stage. This limits your camera balancing capabilities, a lot, but because the monitor and battery are in similar places, and are similar weights, it is still possible to balance most cameras. if you "upgrade" to an HD monitor, you will need a monitor bracket that adjusts forward and back, as well as allows you to tilt the monitor that you choose. it will also need to be a heavy enough monitor configuration to offset the weight of the battery. I don't know for sure the sizes on the sk1 center post but film-stuff sells a monitor mount, I believe xcs does as well. I'm not positive if film stuff is still in business. http://www.film-stuff.com/telescoping-monitor-arm.html
-
consider the price of the cameras you want to put on this rig, vs the price of the rig. One of the reasons the professional rigs made to hold professional cameras cost the price they do is because they aren't prone to failure. If you want to buy it to learn steadicam, throw a t2i in a practice cage and make some shots/ do your line dances, buy the book, use it as a cheap way to decide you want to take a workshop, great. If you want it to take on a serious job with a camera and lens package costing around $100,000 I would reconsider. Not only will it likely produce sub par results, but financially you can't risk it dropping an f55 or a dragon.
-
Thanks Grayson, I appreciate the advice, unfortunately thats actually how I had the camera setup, without a low mode bracket. It was still causing problems. I made sure to dock it rights side up, and flip it right side up between takes. I think keeping the camera upside down during takes might just make it harder for hot air to escape. Hopefully it was just a fluke with that particular dragon, or the amount of time it was in low mode that day. If you've flown them in fast low mode for prolonged periods of time, without issue, thats great news, just figured I'd warn everyone incase my experience was the norm rather than the exception.
-
I can see my steps, what's causing it?
Sam Law replied to Emily St. Pierre's topic in Steadi-Newbies
if a part of your sled isn't well secured, it can make a jitter when you take a footstep. The way the cinetronic yoke mounted onto my mk-v bracket involved about 5 separate parts. Together small amounts of slippage between these parts added up to show footsteps occasionally. With some help from Tom wills, I have it mounted so the yoke now screws directly to the km-v bracket instead. it isn't as easy to assemble/dissassemble for transport, but its solid as a rock now. A good test to see if its the sled, is to hold a flashlight light so theres a specularity on your monitor while its turned off, and the rig is docked. tap various places throughout the sled, along the post, at the batteries, where your monitor mounts, etc, anywhere that makes the specularity on the monitor look like its jittering, more than tapping other areas, is a potential source of jitter in your frame. its a pretty noticeable difference, in how much the specularity moves depending on wether the area you tap is solid, or a potential risk. -
I recently op'd a music video with a dragon. Very fast paced tight shooting schedule, rolling on rehearsal, 30/31 setups were steadicam. Obviously the camera needs some time to cool down between takes, and we probably weren't giving it enough time to do so, but it had a tendency to overheat and shut itself off in low mode, rather frequently. I don't think it happened once all day in high mode, but if you know you have a lot of low shots planned, make sure to give it adequate time between takes, and don't have anything even remotely covering the fan. we even had to take the vented wooden camera plate off, as it was adding to our heat problem.
-
I purchased the majority of my rig used, and a low mode bracket wasn't the highest priority. I used them at the workshop, and on previous rigs, and while they are convenient, My gimbal has a relatively long handle, that keeps me from bumping into any part of my rig in low mode, and I have a 4 stage telescoping post on my mk-v nexus, so I don't have to worry as much about lens height. It would be convenient to get the gimbal a few inches closer to the lens at the same comfortable height some times, but cost wise, I still have a few other things I would like to buy first, as my rig pays itself off.
-
I have gen 2 electronics on my mk-v nexus, with a db2, so those are at least compatible
-
I had a similar issue using a friends pro dovetail on my db2, with his practice cage set up. My pro dovetail fits fine, for some reason his is about a millimeter different, and the plate seemed clamped in, but it was slipping slightly through my top stage when I tried to drop test it. A strip of gaff on the edge of the dovetail plate fixed it just fine. hopefully your issue is as simple as mine and Michaels was
-
I used to TA a steadicam class at Temple. I'll bring it up to the professors. We have about 12 pilots for the students to use, and a zephyr. since their all beginners/non operators this would probably help them get the feel for the rigs a lot quicker. hopefully theres room in the class budget to pick some of these up.
-
that really pumped me up. we need to drink beer soon
-
Pm'd
-
hey looking to buy a bartech wireless fallow focus, I'd need basically the whole package, hand unit, receiver, motor, motor cable. If anyone is willing to sell one for $3000, let me know. Thanks