Lisa Sene
-
Posts
121 -
Joined
-
Last visited
-
Days Won
22
Everything posted by Lisa Sene
-
Archer 2 sled with G50-X arm use in the field
Lisa Sene replied to Geoffrey Shrewsbury's topic in General Discussion
Hi Geoffrey, I recommend taking a workshop before making any purchase decisions. That will give you access to a few types of sleds, arms, and vests. While the workshop rigs are usually all under the Tiffen umbrella, other rigs (and typically other vests) do appear. You'll also meet a lot of operators who may own other brands of gear, or know operators in your area who do, and may let you try it out. Overall, try before you buy! See what works for you, and know the camera payloads that are used in your market on the jobs you want to be doing. Larger union shows might have beefier builds that is pushing it for an Archer setup, though small corporate work might have smaller cameras that are perfect for a mid-size setup. It's possible to fly larger builds on an Archer, though make sure you are not constantly overloading the sled (Archer or whatever you go for), as it can cause unseen damage over time. Happy flying! Lisa -
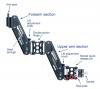
Hi Tom, The Zephyr arms usually come with a webbing loop around the aircraft pin - see the red vertical line in the attached picture. I've also seen folks attach a loop through the bottom circle, highlighted in the picture with the red circle. While I usually put my G-50x arm on my cart if it's nearby, if I'm working off my rolling stand, I hang it. I use a spare Domke lens wrap around the stand to cushion it where the arm touches so it doesn't get dinged up when it's moved. Happy flying! Lisa
-
Hi Benjamin, Depending on what condition the used Archer 1 is in, it could be an awesome sled. I was very lucky and found a great one on this forum that I was able to slowly upgrade parts of over time. Camera payload is the same on the Archer 1 and 2 - 30lbs max, which doesn't sound like much, but can be a fully built-up Alexa if you're smart about it. I have a small postal scale to make sure I'm within the range, and spec everything out beforehand if I think I'll be pushing it weight-wise. Personally I never go over 30lb with my sled because it can cause hidden damage such as the stage and yoke expanding over time. The most challenging part of an Archer 1 is the curved base, which is not as modular as some other sleds out there. All that really means is you have to have some creativity when balancing, as the monitor mount is completely fixed, and you can only move the battery so far in with the curved base. I used a system of different sized threaded weights (1/4 lb and 1 lb) on the monitor yoke and on the bottom rods. Was is ever a detriment time-wise? No. As I do with any new piece of gear, I spent some time when I first got the sled learning where I needed which weights in order to balance efficiently. All that said, I wouldn't rule out an Archer 2 (or any other brand/model of sled) if it's in your price range. If you can, test it out before you buy if you are buying used so you know about any issues up front. Good luck! Lisa
-
Hi Benjamin, Archer 1 sleds are more rare to find these days; Archer 2 sleds tend to appear more frequently. Is there a reason you're looking for an Archer 1 specifically? Lisa
-
Hey Kyle, Did you try contacting Tiffen with the serial numbers? They may know who owns it. Good luck! Lisa
-
Hi Gary, Welcome! Usually a bounce in your image is due to your footsteps being translated into the rig. In the style of vest that appears to come with the Flycam Vista 11, you will need to make sure you're walking such that your pelvis is level when you're operating. As humans, our pelvis naturally rises and falls as we walk, which will translate into your shot unless you learn to control it or have a different style of vest. That said, it could be coming from something else in technique, or the gear itself. The best way to figure it out would be to take a Bronze workshop (https://tiffen.com/flysteadicam/)to check your form, and bring your gear along to have the instructor take a look. Where are you located? You could also look up local operators in your area and see if one of them would be willing to do a quick session with you to help diagnose the cause. Another wonderful resource here: The Steadicam Operator's Handbook Happy flying!
-
Hi Justin, There is usually a Tiffen Gold Workshop in GA in the fall. The 2018 dates aren't up yet, but it will eventually be posted here: https://tiffen.com/flysteadicam/ I took a two-day workshop (the equivalent of a "Bronze" workshops on the Tiffen site now) when I was first starting out, before I had a rig. That was enough to teach me the basics and see if Steadicam was a good fit for me. A few years later, I took the week-long SOA workshop (https://www.steadicam-ops.com/) which is in PA. Worth every penny for the knowledge, and a phenomenal experience. I also got a lot of valuable advice on how and where to purchase a rig from talking to instructors and operators at the workshop, in addition to trying several types of Tiffen rigs and vests to figure out what worked best for me. The SOA workshop allowed me try out an Exovest for several days, surrounded by people who knew how to fit it properly, which is ultimately why I use one today. Tiffen gear is what is available at the workshops I mentioned, but is obviously not the only brand out there. Local operators typically show up at the week-long workshops (especially SOA) and will have experience with multiple brands of gear. It's helpful to talk to everyone you meet about what they have and why they like it (or why they want to change it!), and try the gear for yourself before forming any opinions. If you're lucky, you might connect with someone who will let you try out their gear! Before the workshop, I had been wary of buying used gear because I was new to the community and didn't know any sellers, but ended up getting a used arm and sled via this forum because Jerry and the other instructors told all the students to run names of who is selling by them; if they didn't know the operator personally, they probably knew someone else who would. If you're sure Steadicam is what you want, make the investment in yourself and go for an SOA or Gold workshop. If you're still testing the waters before investing more money, try a Bronze workshop. Both will be wonderful experiences and help you in ways you didn't even imagine. Good luck!
-
Whichever vest she buys, it would be great if she has the opportunity to test it out before she makes the purchase! That way she can make sure she has the proper fit, and it's the correct style of vest for her.
-
Hi Dominik, 1. Not sure if the stock monitor has changed, but I swapped it for a 7 in Marshall when I was using a Zephyr. Easy to change. Also a good idea to get a yoke mount for whichever monitor you end up with so it tilts on its own center of gravity. 2. A more expensive rig does not equal fantastic shots; it's all in how much you practice. 3. The Aero 15 and Aero 30 are the newer models of the Zephyr. That said, there a many used Zephyrs floating around which could save you some money up front. Again, it's not about the rig, it's about what you do with it. I haven't flown with an Optimo 30-76, so I'm not sure if the weight shifts fore-and-aft. If it does, just trim your balance to correct; you'll still be in dynamic balance so long as you don't adjust the monitor or battery on the bottom. Practice with as many different focal lengths as you can, as you will be asked to fly a wide range. There's no magic number that is easier than another. Very wide lenses are less forgiving on imperfect horizons, and very telephoto lenses can make holding a moving subject in frame tricky. Practice both! If you haven't already, look into taking a workshop. Happy flying! Lisa
-
Alexa Mini dovetail plate/baseplate?
Lisa Sene replied to Edward David's topic in General Discussion
Hi Ed, Have you determined that your baseplate is causing the vibrations? You may simply need a stiffening system. Check out that section in the handbook and pick up some vectran. If memory serves, the Zephyr does not come standard with attachment points for vectran, so you will have to get creative about how you string it around the sled. Happy flying! Lisa -
Hi Dominik, If you can fly two batteries - great! If you only need one - great! Pick up some 1lb screw-on weights from Tiffen, or some 1/4 lb Solo weights (both are 1/4-20), as well as a bracket (from Tiffen) to screw them into that can be placed on the bottom rods of the Archer 2. That will give you more flexibility when balancing. Get the monitor that's right for you in terms of specs and price and go from there. Happy flying! Lisa
-
Standard cables to own as a steadicam op
Lisa Sene replied to Joseph Hartzler's topic in Steadi-Newbies
Hi Joseph, Media Blackout and Terry West are both fantastic! Highly recommend them for hyperthin SDI and all power cables. Don't go crazy buying every cable right out of the gate; you'll have plenty of other accessories you'll find you need to spend money on. My MO has been having a good basic supply of cables (much like the ones you've already mentioned) and then purchasing specialty cables if the need arises for a job. That said, do have multiples of every cable, as you do not want to be left stranded with no backup if a cable fails. Label everything and have a good organization system so you know where to find any cable in your kit at a moment's notice. A good staple for me has been these curly SDI cables in various sizes. I find them a bit more robust than the hyperthin cables (which I also use and have lots of), and use them regularly. The built-in right angle connectors are nice too. Happy flying! Lisa -
Cannot Properly Balance My New Steadicam
Lisa Sene replied to Joe Perchard's topic in Steadi-Newbies
Hi Joe, If you have a very fast drop time, your sled is too bottom-heavy. Are you able to take some weight off of the bottom? The ideal option, as Louis mentioned, would be the ability to move your gimbal. In doing so, you'd find the center of gravity of the whole rig (where the sled stays horizontal), then move a little more weight towards the bottom of the sled so it hangs vertical naturally. You would then check your drop time and adjust the gimbal position (and thus the amount of bottom-heaviness) accordingly. Since you can't move the gimbal, you can do the same process by changing the amount of weight you have on the top and bottom of the sled; it's the same principle, though will take a bit longer than moving the gimbal position. If you can't take weight off of the bottom, try adding weight to the top, which will also change the center of gravity of the sled and thus your bottom-heaviness. As for the sled acting like a pendulum when you stop (and likely when you start, too), you must use your fingers and thumb to prevent the pendular action of the sled. It will always be somewhat bottom-heavy by definition when the post is vertical, so your job as an operator is to learn the amount of pressure to apply when stopping and starting to keep the post vertical at all times (unless the shot calls for a tilt). Explained simply, you'll have your pinky finger on the back of the post when starting (to prevent the sled from tilting down), and your ring finger on the front of the post when stopping (to prevent the sled from tilting up). If you don't already have it, The Steadicam Operator's Handbook will explain further. Hope that helps! Happy flying. Lisa -
Steadicam Stand, Wheels and Mounts question
Lisa Sene replied to Joseph Hartzler's topic in Steadi-Newbies
Hi Joseph, I have the American LS-32 stand with the 12 inch straps, and the Backstage inflatable heavy-duty wheels. I got those knowing I wouldn't have a cart for awhile (finally just got one - was saving up for an Inovativ, which works like a dream). The 14 inch straps on the same stand work better if you are using smaller wheels or no wheels, as the footprint is larger and thus it's harder for the stand to fall over when balancing (especially dynamically balancing). With the 12 inch straps and wheels, I haven't had any issues with needing additional weight on the stand for counterbalance while balancing my sled; that combination is very heavy. Me or my AC would walk my sled across rough terrain for long moves, and those wheels came in handy more than once outside. If you're working mostly inside on smooth floors, go with the smaller wheels and 14 inch straps. To answer your question about mounting the wheels, the mounts come attached to the wheels and slide right on the stand. I got my wheels from Barbizon. Backstage makes them: http://www.backstageweb.com/New%20Products.htm Make sure you let them know which straps 12 in or 14 in) you have on your stand so they can send you the mounts with the correct angle for attaching to the legs of the stand. Happy flying! Lisa -
Hi Taylor, I found the Flyer manual, and saw this note on Page 8: "Note that for all four battery types the top attachment is for active use and the bottom attachment serves to carry a spare battery to also serve as a counterweight for use with heavier accessories. (NOTE: F-24 sled has both battery holders active - switch selection - 12/24)" You may want to check with the seller about which sled he or she is selling and if both batteries holders are active. As for the Merlin weights versus batteries, they are both different ways of balancing. Some sleds, like the Scout, give you the ability to move the battery or monitor towards or away from the center post individually. From the pictures I'm seeing in the manual of the Flyer, it does not appear the monitor can move forward or back (though I'm not certain - check with the seller and/or Tiffen). The batteries can tilt up and down, which will affect the weight distribution slightly fore-and-aft, though it will also affect your drop time. As for which option is best for you, it comes down to your comfort level and how efficiently can you balance with your sled and the tools at hand. Lisa
-
Hi Taylor, Welcome! What cameras are you aiming to fly with your rig? Will you need to power them off the sled? If so, they Flyer may be the better option if it has two batteries and can run more power through the sled (check on that - I am not certain on the wiring specs). You're correct in that the Scout is counterweighted by the single battery as well as the Merlin weights. In terms of counterweight, the sled sees batteries and Merlin weights as objects that have weight; you can successfully balance with either object. Do you have the option of trying either or both sleds out before you purchase? Not only will you have a great comparison of the two systems that way, you'll also be able to find any potential hidden problems in either rig before purchasing. For example, make sure you can successfully dynamic balance, check over the rig for any obvious damage, boom the arm up and down and make sure it feels smooth throughout the whole range, make sure the vest fits you, etc. If you're able, ask for the serial numbers of both rigs and call Tiffen to see when the last time each was serviced. Happy flying! Lisa
-
Thanks Tim! Unfortunately I'm still not seeing the "attach files" option in the more reply options. There is an "Attachments" section, but not option to attach a file. Do I need to be a sustaining member in order to upload? Lisa
-
Hi Tim and Brett, I'm wondering the same thing about how to upload to My Media from my computer. Thanks! Lisa
-
Hi Gus, I haven't purchased gear from outside the USA personally, though I found this site that may help explain the tax rates: http://www.uscib.org/valueadded-taxes-vat-ud-1676/ From working in a rental house and dealing with some international shipping snafus, it may behoove you to get a customs broker who will make sure you have the proper paperwork to get from point A to point B. Happy flying! Lisa
-
You're welcome, Harry! I hope it's helpful. Please feel free to reach out if you have more questions. :)
-
Hi Harry, Welcome to the community! The Handbook will be a great resource. In the meantime, I'll do my best to explain here to get you started. To preface, this is if you are operating with the sled on your left side - do you operate on your left (regular) or right (goofy-foot)?: The two thumb (wingnut) screws are your "in and out" adjustments, which balance the sled away from or towards your body. The two knurled screws are your "side to side" adjustments, which balance the sled left or right of your body. Start by making sure your side-to-side screws are "zeroed out" by turning the bottom screw all the way in (you can tell if it's in or out by checking if you are making threads appear or disappear on the socket - you want them to disappear), then out a quarter turn so the screw doesn't bind. You want the bottom screw all the way in so the arm stays connected to the socket - if it's all the way out and doesn't have any threads to grab, it could fall off. Next, turn the top screw all the way in, then out 2 and half turns to start. A "turn" on the knurled screws is as much as you can do with your thumb; not a full rotation. You mentioned your sled is going away from you and to the right; at this point it may be doing something different side-to-side after resetting the knurled screws, and it may feel different than last time in-and-out based on how you turned the thumb screws. Make sure you are standing straight with good posture, and not leaning to compensate for the rig. In essence, you want the rig to "lean" to you via the screw settings, not you leaning to the rig. Put the rig on your centerline, and turn your pelvis at a 45 degree angle towards the sled (think camera pointing forward is one straight line, your pelvis is another straight line, turn that 45 degrees to the line of the camera). You want to keep the sled as close to your body is as comfortable without hitting the sled on your knee (or your face - ouch!) This is the position you will aim to keep while operating as much as possible. Also make sure you have a good fit with your vest - you want it sitting snug on your shoulders, sitting on you straight (make sure you have your velcro even on both sides - having one side tighter than another will make the vest tilt under load), and the waist portion should be centered vertically on your pelvic bones. While in that position, let go of the sled slightly by opening your hands - don't move your arms away so you can catch the sled if it violently moves away from you. Take note of what the sled is doing when you let go: falling into you, falling away from you, moving left, or moving right. If it's falling into you or away from you, you'll need to adjust your in-and-out settings, which are the thumb screws. Take a look at the arm in the vest without wearing it and turn the screws to better understand how turning the screws affects the balance. If you turn the top screw in and the bottom screw out, it will make the rig lean into you - what you want to do if the rig is falling away. If you turn the top screw out and the bottom screw in, it will make the rig fall away from you - what you want to do if the rig is falling into you. These screws don't need to be wrenched down tightly; finger-tight works. Similarly, it will help to look at the side-to-side screws without wearing the vest to understand how they operate too. My vest doesn't have the knurled screws, but is altered via a T handle wrench, so I'm not positive which way (up or down) you'll want to turn the screws for the desired effect, though you'll be able to tell quickly by looking at it. You'll only deal with the top screw here as you want to leave the bottom one in as much as possible for more connection strength. If the sled is falling to your left, you'll want to turn the screw so more threads appear, which will pull the sled to the right. If it's falling to the right, you'll want threads to disappear, which will pull the sled to the left. Do both the in-and-out and side-to-side adjustments until the sled sits in the aforementioned sweet spot without touching it, while maintaining good posture. Hopefully that all made sense; there are pictures in the book that will explain better! Happy flying. Lisa
-
Adapting arm with 1/2" post to 5/8" sled
Lisa Sene replied to John Williams's topic in Steadi-Newbies
Hi John, Do you have an arm post with a removable pin? My G-50x standard arm post (1/2in) can swap for a 5/8in size with an adapter from Tiffen. Happy flying! Lisa -
Hi Harry, Do you have The Steadicam Operator's Handbook? There is a section that explains how to balance the rig to your body via the screws you mention. Beyond the vest settings, it is a phenomenal guide to all things Steadicam, from how to build and balance to navigating the political waters of production. Happy flying! Lisa
-
Hi Felix, Personally I like to start, stop, and hold lock-offs with all my weight on the foot that's on the same side as the sled - for me, my left foot. I feel more stable that way because my own center of gravity is close to the sled, and I will always endeavor to land in that position. When going backwards it's the same - start with the weight on my left foot. If I have to stop with my weight on my right foot, I always feel the common center of gravity between me and the rig pulling me forward. It's not impossible to hold, but feels different. That said, you have to be able to do everything with your weight on your other foot, as you will inevitably end up in that position (actor could miss their mark and you will have to compensate, director tells you to stop in a slightly different spot each take, etc.). Put your rig on and hold a lock off with your weight all on one foot, then the other, and you will feel and learn the difference. Happy flying!
-
Hi Chad, Welcome! A vest is the most personal piece of a Steadicam you will have as it has the most direct contact with you. Sounds like you've tried both types on before - have you tried them on for shoots or in a workshop environment, or at a trade show? When I was deciding between an LX vest and an Exovest, I was able to try both at the SOA workshop for a week which really let me feel the differences. Ultimately I went with the Exovest, though I recommend you fully test out both the Ultra Vest and the Exovest and decide for yourself. If you haven't taken a weeklong workshop (SOA or Tiffen Gold), that is a great place to try out the different vests since you'll be operating shots rather than simply trying the vest on with a rig and walking around for a few minutes. That was critical for me because it showed me what each vest was like while operating; I felt the differences in weight placement in different positions, and noticed how my body felt in terms of being in balance with the rig in both vests. Another advantage of trying the vests at a workshop is there are plenty of instructors around to make sure the vests are fitted to you properly, and that you are standing and moving correctly. When I first tried the Exovest, I was still walking as if I were in a normal vest, which is counterproductive to using an Exovest. Chris was there and helped me, and I noticed a difference right away. Happy flying!