AndreasKielb
-
Posts
65 -
Joined
-
Last visited
Everything posted by AndreasKielb
-
There is a video on youtube which describes the balancing process of brushless gimbals and it also shows some of the physics behind it an why it actually works. Most of the stabilization comes through gravity and inertia with some help of IMU and motors. You might skip the fist part and start watching towards the end. The device is silent with PWM frequencies over 20 kHz. The open source version has 32 kHz.
-
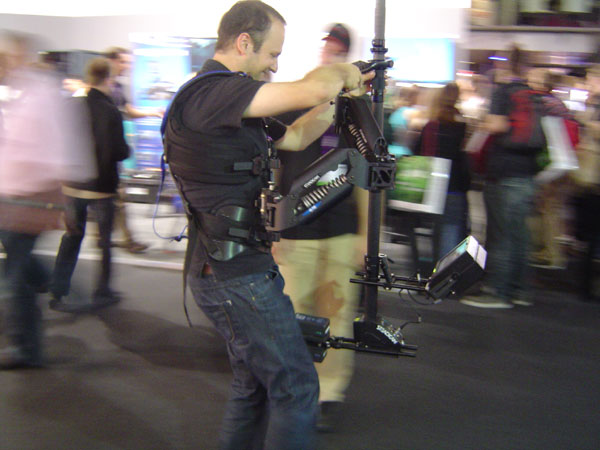
I'm working on a jib solution for my steadicam with a brushless remote head. The tubes will be 2 meter in length so it'll be possible to go from ground level to about 3 meters in height. Pretty much a cross between the Portocam and Tango. Don't have much to show for now unless a video off the motor for a bigger head I'm working on and a few mirror tests of my first DSLR Brushless Gimbal. A lot of these mirror videos can be watched on youtube if you search for "brushless gimbal" so I don't want to bother you with just another one. Unfortunately we didn't have time to dry some mikrokopter flying with the smaller brushless gimbal before my partner left for NAB (I'm only the camera operator when we go out to fly). But this is the video of my first rewound motor, the gyro sensor is just taped to the outer ring keeping it level: There will be a 3 axis version of the controller I use soon and then a handheld rig like the MöVI will be possible as well. The jib will be only 2 axis stabilized for the moment with a normal gearmotor at the third axis but I'm sure inertia on the long system will help against undesired pan moves. Can't tell much about the possible weight but I guess it might allow for an Epic with larger lens and remote focus as well. Best regards, Andreas Kielb
-
Thanks again! Best, Andreas
-
Thanks a lot, will try it next time I have access to the camera. Do you know which type of 10 pol connector the Sony 1500 is using? Might be good to make a similar cable for Sony cameras. Andreas
-
Hi, I already have a tally light system using a photo cell which works well so far if I tape it on the cameras tally lamp. It might be easier to use the tally connector some cameras provide. According to the manual the Grass Valley LDK 8000, which is quite common here, provides a tally output using the tracker or the DC output sockets. http://www.grassvalley.com/docs/Manuals/cameras/ldk8000/3922-496-30571.v03.b501.pdf This is the pinout of the DC Output connector (Hirose 4-pole): pin 1: Ground pin 2: On air pin 3: No connection pin 4: +12 Vdc (max. 18W) But what does this mean? Is there going to be voltage between pins 2 and 1 if the camera is on air that can be used to power an LED stripe on the monitor directly or do I need a transistor cirquit of some kind in a small box? Thanks a lot in advance and best regards. Andreas Kielb
-
I use a transflective Monitor from CarTFT (CTF700-SH) for Steadicam. It might be quite similar to the Liliput transflective monitor and is also SD. It works pretty well outside and also in direct sunlight. As it is partly reflective the picture doesn't seem unbelievable bright but it's always there and readable. I didn't have the chance to compare my monitor directly to other Steadicam usable LCD's but I saw a few special highbright models in the sun at the workshop or from other operators and I don't think my CarTFT is any less readable. Standard monitors with low intensity backlights are of course a different story as they wash out completely. Cheers, Andreas
-
I also got one from last years IBC playing with the Ultra2.
-
Would be great if you could send the article to me as well: andreaskielb'at'web.de :) Thanks a lot in advance, Andreas
-
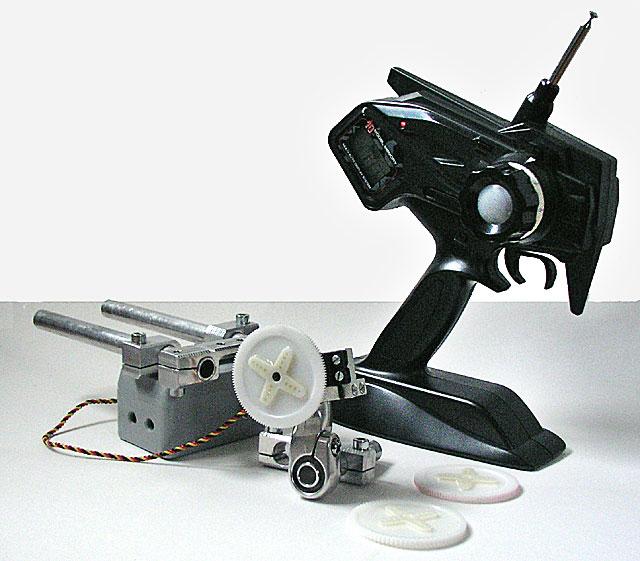
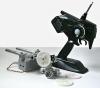
Thanks a lot for the link, Rob. I might give it a try. It's a petty that the drawings for the Heden driver got lost but I already curios to try it without :) . I found the pinouts of the 5 pol. Lemo (1B 305) connector in the BFD manual: 1: MOTOR - 2: POT CCW (-) END 3: POT WIPER 4: POT CW (+) END 5: MOTOR + Now I think I understand what I need to do. It's basically to integrate the electronics of an RC servo into the receiver and build a amplifier to bring the motor signals up to 12 volts. If somebody knows the resistance of the pot in a motor like Heden that would be great though... Thanks again, Andreas
-
Funny enough I use a very similar setup for the same reason (...lack of money). It's an older picture and in the meantime I upgraded to a stronger servo (HITEC HS-5745-MG). It is strong enough to be precise with stiff 35mm lensens as it has a torque of 190 Ncm but it also has the 120 degrees turing radius originelly. I modified both servos to make a 180 degree turn by adding two resistors to the pot (http://mypage.yhti.net/~dmcdnld/s148retract.htm). Had no luck to modify the servo to a proportional turning radius over 180 degrees. When I tried to add higher resistors the servo began to move continously. This setup together with the big gears can move a standard video lens through it's hole range. It's also OK for 35mm lenses up to 25mm but with a 50mm lens the problem comes again... So all draw backs Rob mentioned are my all day reality but he forgot to add the slide noise RC servos make. I use the DIY setup sometimes on low budget student movies but I always recommend to rent a real remote focus for the day. For paid jobs I always rent the remote focus but I carry the DIY as backup :P . However, would you mind sharing the model number of that 360 degrees winch-type servo, Rob? It wouldn't hurt to add this one if it's fully proportional and strong enough to be precise with stiff lenses. "I opted to use a Heden motor that i already had, which has 5-7 turn capability, is smaller and more powerful." Do you mean that a 3pin RC receiver is actually signal compatible and can be modified to drive a professional 5pin Servo like a Heden? That would bring me a big step further... I know it's all about impulses between 1 and 2 milliseconds but not enough to dry such a modification... "Still i think that this kind of DIY is important for the future career, i encourage it!" I'm still in my beginners shoes but without DIY nothing would have happened at all. Please check out my new 12V/24V sled if you like :): www.andreaskielb.de/new_sled.htm cheers, Andreas Kielb
-
Hi all, I'm looking for a 3A, EFP or multi component sled at a reasonable price or components to upgrade my current SK2 sled. As my budget is quite low I'ld also be happy if somebody can offer something like a used - 3A or EFP gimbal, - extendable 1,5" post, (camera stages, junction boxes, Anton Bauer battery modules or just support 1,5" clamps are also interesting... :) ) Another thing I'm searching for is a spare standard socket block to upgrade my custum built arm: http://www.andreaskielb.de/new_arm.jpg and maybe a vest at a good price. Thanks, Andreas Kielb
-
That sounds very interesting to me as well. I use a SK2 post which isn't extendable and already thought of upgrading it. Regardless if the posts are adequate finally, thanks a lot for the info... :). Andreas (..always looking for something better)
-
Homemade Arm...For all who said it couldn't be done...
AndreasKielb replied to Charles King's topic in Arms
Thank you very much for the kind comments! In the meantime I finished and tested the stronger springs. With them the arm can handle an overall weight of 19kg very smooth and without any signs of deflection. If I use my sled with two batteries it'll possible to fly cameras up to 13 kg which is definitely enough for me :). cheers, Andreas (... who continues walking the line now :D ) -
Homemade Arm...For all who said it couldn't be done...
AndreasKielb replied to Charles King's topic in Arms
Actually there are four bearings per axle. Two needle roller bearings for radial and two axial bearings especially for torque forces. AFAIK this is the common solution for arms which have the hinges inside the spring elements like GPI, Baer-Bel or ProGear. The arm weights 6 kg but doesn't feel too heavy using it. Since it is finished I practice as often as I can with my small DV-Cam and a 7kg steel plate to increase inertia. I can try to make a small clip the next days :). Thanks, Andreas -
Homemade Arm...For all who said it couldn't be done...
AndreasKielb replied to Charles King's topic in Arms
Hi Rob, I think I know what you are referring to. The shape of my bones' squared-off ends are not as triangle-like as for example the Baer-bel arm. Baer-bel arm picture on steadicenter Compared with this arm my end parts seem quite short - somehow compressed. For my feeling this compact structure is especially well prepared for high torsion forces because the lever is lower. Of course that might be wrong but at least the walls are thick as hell and the axial bearings are very strong. They have dyn. load capacity of 3,32 kN. However, I ain't gonna fly a 35mm camera. My sled is a used SK2 so I'll stick around lightweight video or 16mm cameras like I would do with a provid. Andreas -
Homemade Arm...For all who said it couldn't be done...
AndreasKielb replied to Charles King's topic in Arms
I spent almost 1500 Euros on material and labour, of course without calculating my own time, but I think it was worth the investment. Andreas -
Homemade Arm...For all who said it couldn't be done...
AndreasKielb replied to Charles King's topic in Arms
Thanks Rob, all the parts are machined from scratch and for little money by a CNC workshop. But I've a desktop mill and lathe at home that helped very well to reduce the costs additionally. The materials (titanium and 7075 alloy) where quite expensive though. The weight range of the arm is supposed to be in the provid or efp area but I need to make plugs for the stronger spring set before I know exactly. Andreas -
Homemade Arm...For all who said it couldn't be done...
AndreasKielb replied to Charles King's topic in Arms
Thanks for the the nice words about my arm but most of all for putting the HBS site up :) ! The forum is a bunch of information and there are damn fine contributors with very nice rigs and ideas. Definitely worth a look in my humble opinion. What makes homebuilding (or better custom building) difficult is that some high-tech materials are hard to find, especially in odd lots. That's why I'm using steel springs at the moment. But if anybody here has a set of titanium beta-c springs in the garage or knows a good place to buy them that would be great :D . cheers, Andreas Kielb -
Hi Jason, First of all congrats on your purchase! I have a Steadicam SK (..at least the post) but I think the stage is similar to the Provid. The two pin power connector of the stage is a lemo 0B and the big four pin connector between the post and the base module (power and video) is a lemo 1B. Hope this information from another newbie is helpful ;) Andreas www.andreaskielb.de
-
Hi, it's my first post here and I only wanted to say that I'm really looking forward to buy that DVD. I've heard so many positive comments about the EFP training tape. This is a great initiative Mr. Holway, thank you! Like David I'm a beginner and I've just finished a homebuilt stabilizer based on a Steadicam SK post and gimbal. It is designed for cameras up to 10 kg - so it's small. I didn't wanted to jump in and buy an expensive rig without any experience but I must admit that I'm infected in the meantime and even consider to join the next Workshop ;) . Greetings from Germany! Andreas