Brant S. Fagan SOC
-
Posts
378 -
Joined
-
Last visited
-
Days Won
10
Everything posted by Brant S. Fagan SOC
-
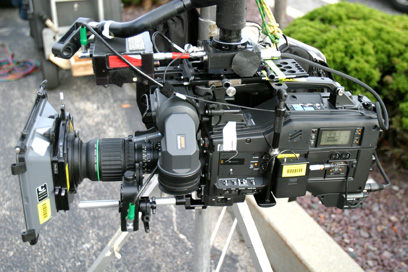
Gents-- While day playing on a little movie shooting with the RED One I experienced some of these issues firsthand. My feeling is that RED is playing this one much like some of the 4x4 truck manufacturers. That is to say they make the basic "vehicle" and you must then outfit it for the "terrain" that you wish to explore. RED obviously wish to build and sell camera bodies and some lenses as well but would rather the "nuts and bolts" were handled by third party folks. This sounds like another equipment builder we all know from years gone by... At any rate, as a Steadicam operator, you have several key issues to deal with and prepare for. 1. Camera mounting points. Think low mode and go buy the Element Technica cheeseplate. Best solution and still can be used to mount other items for other modes of operation. 2. Accessory mounting points. Think rods. Start considering the Element Technica rods made from aluminum. They say carbon rods will be available soon. 3. Front rods. If you have to carry long lenses such as the Cooke CXX or "others" that are front heavy, start planning for support OTHER than the sliding baseplate and long tripod plate. WAY, WAY, way too much weight. I bent a 12" stainless steel .049" wall "manmaker" arm post carrying a RED package that was decidedly NOT set-up for Steadicam and thus overpowered my Ultra arm. Once we switched the offending lens and accessories out (Ang. 17-80mm lens and 24" stainless rods, baseplate, and brackets) and installed the CXX and my own custom dovetail plate 15mm rods for motors and lens support, things flew just like a PFX LW. 4. Concise and solid explanations. Some people think the RED works by itself and that their package is "complete." As the Steadicam Operator, you must be prepared to give an explanation for how all this "stuff" works together or doesn't work together. Producers can be reasonable if you provide answers that make sense to them. Crying about no prep day is not going to change things out there on set. You must provide solutions and make it clear that this can actually work if there is good two-way communication. Obviously, this all should be worked out ahead of time, but let's face it, the learning curve with this camera can be steep and deep. Here's a look at my little lens support and motor rods for the RED and CXX set-up: http://www.steadicamforum.com/forums/style...e_types/gif.gif Enjoy this camera! It really does make nice pictures and can be a pleasure to carry if you ask the right questions and stand up for what you need. Best, Brant
-
Gents-- The rear wheel chatter is from a lack of weight bearing down on those casters. Just add some ballast right over the rear end to beat that one! Let 'er rip! Best, Brant
-
 Jess-- You really need to speak with Paul Dudeck at Anton/Bauer and get the low down on what will work with your gear and the expected cameras you plan to encounter. Try him at 800-422-3473. He is also a Member of this Forum as well. Explain to him your gear and what you will need to be able to power in the near future. Paul will take good care of you and give you nothing but facts and a great deal on gear. Good Luck. Best, Brant
 -
Gents-- The source for a great triax jumper is CAE -- Carmen Abato Enterprises. They custom make a slick true triax assembly with three discrete conductors and slide that into a super smooth and supple neoprene jacket. Last time I purchased one, the cost was around $400. That was for a six (6) foot cable run plus the connectors. I specified six (6) feet of cable plus the footage for the ends. They are located in California and their number is 714-895-1887. I last spoke with Becky and she was terrific. I heartily recommend this for anyone who even MIGHT have a triax job. Let's not forget, filmheads, that even in HD there are triax jobs and like Claus reminded us, there are situations where full triax is not only required it could save your life! Good luck. Best, Brant "Cable Dragger" Fagan
-
Hey...talk about a "religious" concern, this guy should read up on how many of us used to say that little prayer while our early model Steadicam® monitors were warming up. I remember preheating my Model 2 monitor and hoping it would strike and stay lit! I also remember the day it died right after the director yelled "Cut! Great! Print!" and then everyone else went to lunch while I built up my back up sled. It is too bad he "fears' gimbals. They would be a great addition to the black iron pipe post material he recommends. All that inertia from just some Home Cheapo pipe and fittings! I wonder what he recommends for rust proofing his pipe? Ron Baldwin, any guesses? Brant "Gimbal Faithful" Fagan, SOC
-
Peter-- Once you have taken a Workshop, the concept and application of getting your rig into dynamic balance will become almost painfully clear. Complicated and sometimes confusing, but in the end you will see the need for it. In short, by getting your rig into dynamic balance, this allows the operation and transportation of the camera to become more transparent while leaving more brain power available for other important jobs like framing, navigating, listening to the dialog or copy or music for cues, and watching out for dangerous developments around you. The less you need to concentrate on the hardware the better to allow you more brain space for creative aspects of the job. Good luck at the Workshop! Best, Brant S. Fagan, SOC
-
Boats. Just think of the possiblities...Great shots on the water, lunch at sea, death by drowning, sharks, jellyfish...The list is endless. So should your list of concerns for working in such an environment. Having said that, there are ways to conduct yourself and make killer Steadicam shots on the water. First and foremost, ask all the questions you would for land-based operation. Then, start working on everything else. How big is the vessel? Licensed captain? Deck issues and access, below deck(s) rules and safety, engineering issues, power for charging your batteries, location for dead case storage, etc. Start thinking about being able to wear a PFD (personal floatation device) that fits UNDER your Steadicam vest. Think about an inflatable pfd for comfort reasons. How about lifelines, spotter, AD to handle communication and cues? How cold is the water when and where you will be working? What about survival suits? This would be my list of starting point for investigation into how feasible and safe this operation could be. I am sure that this list will likely generate more questions and issues. Yes, you can work on a boat. Make things safe by asking all questions before boarding. Make sure because your life depends on how you handle all the issues. No one else is really concerned about you, except the Captain and his ChEng and maybe the Bosun. I have done some solid work aboard vessels as small as 18' but under tight restrictions. I have also come very close to going overboard from a 42' sloop on the East River in NYC because, well, no one cared about my safety enough to help. My assistant and I shared a lifeline; he started to head for the rail and the passing wake from the Staten Island Ferry almost tossed him and me overboard. I was able to use the weight of the Steadicam to counterbalance me long enough to yank him back from the rail and then stop the Steadicam from bumping me overboard. Stupid situation, stupid job and almost a stupid ending to our day. Bottom line, if you have any doubts, don't do it. The reaction time will not be enough to allow escape from the rig before you hit the water. Offer to join a tech scout on board the vessel. Make them pay for your time, too. If they ask, just suggest that a small accident while shooting will quickly consume their insurance aggregate. Trust me, they will know what that means! Good luck! Best, Brant
-
antler used looking
Brant S. Fagan SOC replied to luis castro's topic in Steadicam Marketplace - Wanted
Gents and Ladies-- Antlers V2 cost is US$875. plus shipping. Thanks to the sky-rocketing prices of base metals, we will likely see a price increase for the next production run which most likely will get underway very soon. There are only a few units left in stock as of today so if you have a need, please don't delay. Thanks for your interest! Best, Brant -
antler used looking
Brant S. Fagan SOC replied to luis castro's topic in Steadicam Marketplace - Wanted
Gents-- For Antlers V2 sales and information, please email me directly at brant@brantsfagan.com or call me 9A - 9P EDT at 603-826-3445. Send me your shipping address and/or FedEx account information for shipping quotes and information. Thanks! Best, Brant -
Having a vibration issue.
Brant S. Fagan SOC replied to Chad Schwartzenberger's topic in General Discussion
Chad-- Two things are apparently working against you with this setup. One, try shoes that have more absorbtion in the footbeds and soles. All vibration is coming from you. Second, try and loosen your grip on the post and the arm/yoke. Because you have a smaller rig and lighter camera, your grip and touch must be adjusted for the lighter mass you are flying. The smaller camera and sled combination is exponentially harder to finesse than a large rig which naturally has more inertia to overcome tighter and more energetic grip. This is the hard part; figure out just how little you can hang on and still execute the shots as required. Good luck! Best, Brant -
Shooting with Fiber Optic Cable
Brant S. Fagan SOC replied to Colin Donahue's topic in Cameras (Film/Video/HD)
Gents-- My sense here is that you need a fiber jumper. A company called Mohawk makes a VERY nice jumper. Tomorrow when I get in the truck, I will get that contact data posted here for all to use. Cost is around US$600. for the assembly. Very well made and durable. Best, Brant -
Daniel-- Low High Mode is a great method for shooting that doesn't take a large effort to build or balance into like regular low mode. Take a look at the photo I have attached and you can see why this is a great way to drop the lens and avoid the flip into low mode. And also avoids being trapped at the top end of low mode and fighting the limited boom range while in low mode. I try and offer low high mode when people are not terribly specific about the lens height but keep stating that it must be in low mode even though they are showing me, either with a finder or fingers, a shot that would be just fine in low high mode. In my experience, even when they tell me it's low mode, I always ask to watch a rehearsal, but let them watch with the finder and then I watch what they do with it. Good luck! Best, Brant BSF_Low_Hi_3400.jpg (152
-
Mark-- Do you have the Workshop Workbook that came with your Workshop purchase? Well, you know the answer to that one. At any rate, here is how the Ultra Arm is adjusted. You must load up the arm with a loaded sled and camera to be able to adjust it to float properly. Once wearing the rig, you must move the arm sections up and down VERY slowly to find the point at which the adjustment screws will move freely. This is a very subtle place you must find. Move the arm lightly up and down until you find that position. Try adjusting the upper arm section first and then match the lower unit to it's performance. The outer arm section should "lead" the inner arm section in both directions. You must make small adjustments in the arm sections and try to sneak up on this performance attribute. I can not stress enough how subtle this adjustment and settings result is. Take your time and work empirically. Make notes and try to make a pattern to how you analyze and adjust the arm sections. Best, Brant S. Fagan, SOC
-
3A Arm post and clamp in NYC
Brant S. Fagan SOC replied to Chris Heikel's topic in Steadicam Marketplace - Wanted
Chris-- I have raw tubing which can be cut to length in both aluminum and stainless steel. What length did you have in mind? I think I even have some arm post clamps as well. Drop me a line and we can set you up. Best, Brant -
Gents-- How about a solid VLS bracket which grasps the entire Varicam chassis with complete rigidity and adds complete functionality for low mode rigging and accessory mounting like Antlers and transmitters while in high mode? Allows for all tape functions and button access. In stock and ready to ship. Best, Brant

-
help! need bartech, mine broke
Brant S. Fagan SOC replied to Colin Donahue's topic in Steadicam Marketplace - Wanted
Colin-- Too bad I had no wi-fi on set as I was right down the road from you in Rhode Island! Since I was using my Preston, I have two BFD units as backups. If you need further help, just give me a call as I am a short ride away! I am PM you contact information for direct access. Best, Brant -
Charles-- Thanks for the sale and the kind words of praise about my VLS brackets! Gents, come and get 'em before I run out of stock! No telling when the stock runs out! And with all the "new" HD cameras having more integral and solid handles and chassis arrangements, I don't know how many of these I would want to make for future stock. Go get 'em! Best, Brant
-
Gents-- I would venture that WHO dips the strawberry ones into the chocolate ones is almost as important as who SERVES them! Best, Brant
-
Gents-- I just ran some comprehensive tests with the Boland 8.4" HD Daybright and boy do I love it! A client of mine has the Marshall which is nice for INT work but not nearly bright enough for EXT shots. I am sure there are others but for my money, the Boland is the one to fly. Best, Brant
-
What would your perfect LCD monitor include?
Brant S. Fagan SOC replied to JohnPinella's topic in Monitors
Gents-- The Boland 8.4" DayBright HD-SDI and composite video monitor DOES exist and is sitting in my workshop getting put through some tests this week. So far, I can tell you all that this monitor is very, very good. Looks great even with "crappy" videotap footage fed to it via NTSC (SD). Even with direct sunlight on the screen and lots of snow blindness from the recent snow fall. The next step is to feed it some HD-SDI material later this week. Report to follow. Regarding the sunlightlcd.com referenced above, I checked their site and found that the 8.4" unit they offer is in fact made by Boland and this information is clearly visible in the spec drawings shown on their site. I will try and post some picture(s) of a screen under hard Steadicam® use on daylight exterior with direct and indirect sunlight later in the week. Best, Brant "monitor quest" Fagan -
Gents-- A bracket that is affixed to the entire chassis such as my VLS beats any cage or handle bracket. Period. No wiggle or shake. No depending on those little M3 screws which hold a plastic handle to the camera chassis. Check out my bracket below. Drop me a line if you want one. Best, Brant S. Fagan, SOC http://www.steadicamforum.com/forums/style...e_types/gif.gif

-
Replacing CRT with LCD. Where to add weight?
Brant S. Fagan SOC replied to Jess Haas SOC's topic in Batteries/Power
Gents-- Why add weight when you could maintain dynamic balance by simply extending the monitor out away from the post? Check into the DB primer from Jerry Holway which is available from the SOA site and see what you need to do to make this mod to your sled. A parallel rod monitor bracket system would make a more suitable addition to a sled rather than a block of dead weight. Just my .02 Best, Brant -
Gents-- Your rate is a reflection of both your skill set and your personal reputation. If you cut your rate, you end up undermining your reputation in the marketplace as well. I hear all the arguments for taking the job but the overriding reality is you are left with yourself and your reputation at the end of the day. You cut, you lose and in the end we all lose. What would you rather be known for? Cheap? Cheap? Just like the freedoms we all enjoy in this country, someone else fought (worked) to make them. Do your part. And don't forget to thank a Veteran this weekend. They deserve our thanks. No matter what you think about the war on terror or this current administration. Best, Brant S. Fagan, SOC
-
Gents-- Over the years, I have found that good old denatured alcohol has proven to be a great gimbal bearing solvent. Just remove you bearing and place in a container of the liquid deep enough to submerge the bearing in the liquid. After about 4-6 hours, your gimbal bearing will be strikingly clean and free of contamination. Check the bottom of the container--you will be surprised what you find! I also recommend running the bearing dry; no lube, less goo! Also, try cleaning after 6-8 weeks instead of 6-8 years! Best, Brant
-
Gents-- I happen to have a whole bunch of those Rockport Classics! Let me know who needs them. Most are on a DVD already. Best, Brant S. Fagan, SOC Steadicam/Camera Operator