


Rusty Geller
-
Posts
24 -
Joined
-
Last visited
Posts posted by Rusty Geller
-
-
Hi, is this unit still available? My old MDR-1 Digital carked it. Is this one converted to digital, will it run digital motors?
Thanks, Rusty Geller
-
-
Thanks guys. Anybody know anyone who wants to sell a 3A socket block?
-
Does anybody know if the mounting holes on a 3A socket block will match those on a Flyer vest? I have an old male 3A arm bottom mount assembly that looks like it will fit on my (upgraded) Flyer arm, but need to upgrade the female socket block to make it work on my vest.
-
Theo, did you get a socket block, and if so, where?
-
Does anyone know if you can shoot the new Sony F5 at 2K using PL mount Super 16mm lenses like you can with the Scarlet?
-
This has been sold. Rusty
-
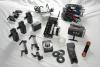
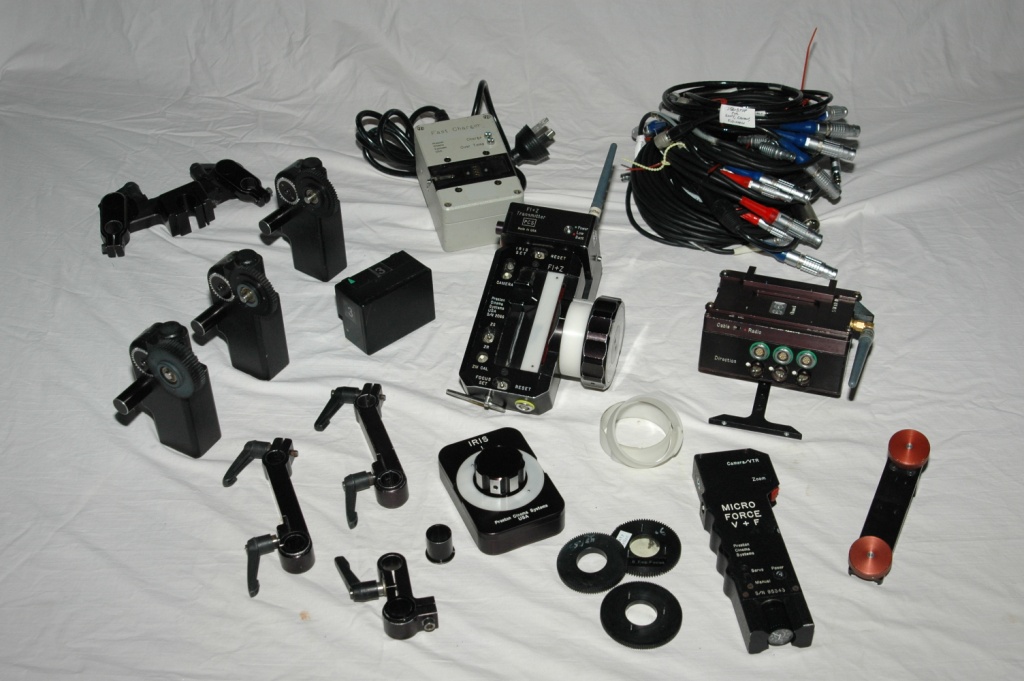
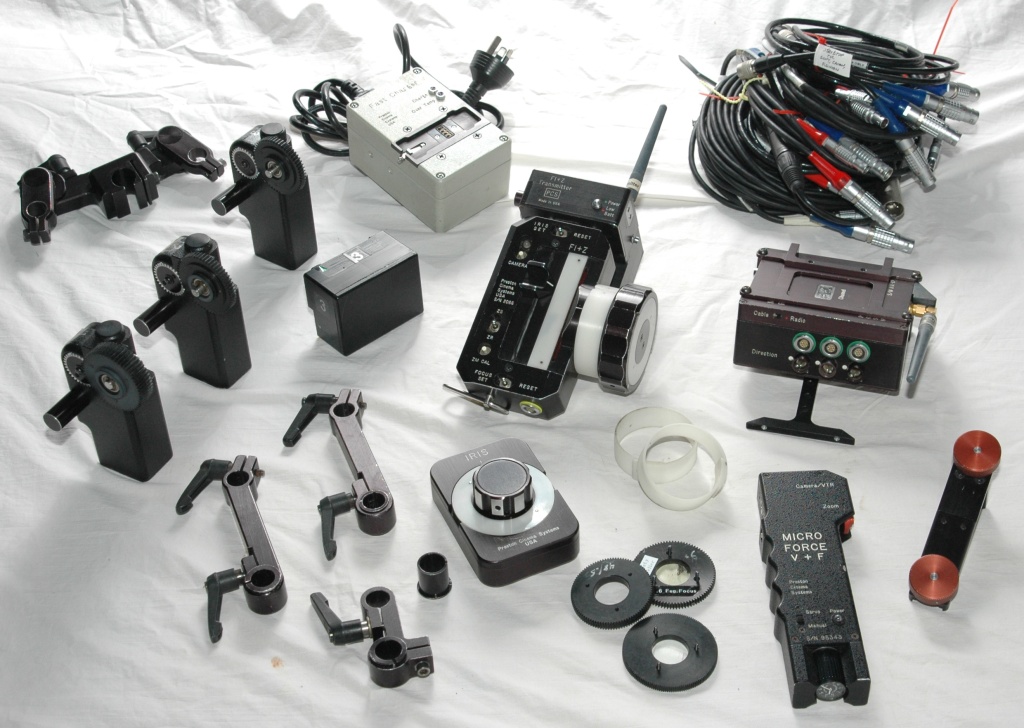
Preston
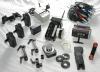
FI+Z Hand control, 3 focus rings
FI+Z Transmitter w/2 antennas, 2 batteries, fast charger,
MDR-1 receiver/motor driver w/2 antennas, MDR top mount, MDR top mount to PRO bracket, 20' remote hardwire command cable
Microforce zoom control, zoom control to hand controller bracket, 1’ cable, 12' cable
Remote Iris control w/ 10’ cable
3 motors w/32 pitch gears (1 has 1/2" wide gear)
.6 gear (Fujinon), 48/.5 pitch gear (Canon focus, Panavision zoom) 64 pitch (Panavision iris)
2 Preston long dogbone motor brackets (19mm) w/2 Kip connectors ea.
1 Preston short dogbone motor bracket (19mm) w/1 Kip connector
2 Panavison motor bracket sleeves
2 15 mm motor bracket sleeves
Panavision front mount dual motor brackets with 2 articulated arms, 2 Kip connectors4 motor cables w/90 degree elbows
RED One start-stop cable
Arri/Moviecam 3 pin start-stop cable (Alexa, 435,SR3 etc.)
Moviecam 2 pin start-stop cable
Canon 4429 start-stop cable
Fujinon 8 pin start-stop cable
Fujinon 4428 start-stop cable
Sony 4430start-stop cable
Arri 11 pin Fischer start-stop cable
Panavision start-stop cable
PRO short power cable
12' long power cable, 3 pin XLR 24v w/4 pin XLR 12v pigtail
in 2 Pelican cases
$11,000 rustygeller@bigpond.com
-
 FI+Z Hand control, 3 focus rings
FI+Z Transmitter w/2 antennas, 2 batteries, fast charger,
MDR-1 receiver/motor driver w/2 antennas, MDR top mount, MDR top mount to PRO bracket, 20' remote hardwire command cable
Microforce zoom control, zoom control to hand controller bracket, 1’ cable, 12' cable
Remote Iris control w/ 10’ cable
3 motors w/32 pitch gears (1 has 1/2" wide gear)
.6 gear (Fujinon), 48/.5 pitch gear (Canon focus, Panavision zoom) 64 pitch (Panavision iris)
2 Preston long dogbone motor brackets (19mm) w/2 Kip connectors ea.
1 Preston short dogbone motor bracket (19mm) w/1 Kip connector
2 Panavison motor bracket sleeves
2 15 mm motor bracket sleeves
Panavision front mount dual motor brackets with 2 articulated arms, 2 Kip connectors
4 motor cables w/90 degree elbows
Cables:
RED One start-stop cable
Arri/Moviecam 3 pin start-stop cable (Alexa, 435,SR3 etc.)
Moviecam 2 pin start-stop cable
Canon 4429 start-stop cable
Fujinon 8 pin start-stop cable
Fujinon 4428 start-stop cable
Sony 4430start-stop cable
Arri 11 pin Fischer start-stop cable
Panavision start-stop cable
PRO short power cable
12' long power cable, 3 pin XLR 24v w/4 pin XLR 12v pigtail
2 Pelican cases
rustygeller@bigpond.com
-
Just removed the spring, quite easy, no pullies, chains or dramas. I ended up only having to remove one axle-pin, the one on the non-adjusting end of the spring.
I adjusted the arm so the spring was shortest, then c-clamped the bottom of the arm flat to my work bench. I removed the circlip & fabric washer, then had my Lovely Wife apply leverage under that end of the spring by prying with a large screwdriver under the spring hook and against the inner shell, taking the load off the axle-pin. I gently drove out the axle-pin with a flat-ended punch of the same size, being careful with the bearings and washers. The axle pin out and my Lovely Wife back in the house, I placed the parts safely on a paper towel in a tuperware tub, and sketched the order of the parts. I then unclamped the arm, turned the arm adjuster to the opposite end until I could extract the spring from the adjuster.
Monday it's off to Boing Boing Springs so my main man Jarran can build me a pair the same size but 10-15% stronger.
Next episode: the reassembly.
-
Currently the upper stage (gimbal end) spring is weaker than the lower stage spring. I noticed the upper section drops 45 degrees while the lower stage is still horizontal. Tiffen says this is normal.
Tiffen won't sell a Zephyr arm seperately, so I'm having a pair of springs for the Flyer arm made up here in Perth by a company that specializes in making custom springs for industrial and commercial equipment. They're going to make the new springs to the same exact size, but make them 10-15% stronger than the stronger one of mine. They're making them up for about $100 total--obviously they're not aware of camera gear pricing.
A few months ago I made a Garfield mount for the Flyer arm. I'll use that to anchor the arm to do the deed. The Flyer arm sections unpin from the elbow. I'll do each section pinned to the male end of the socket block. I intend to pull the upper cross axle from the end of the arm, flop the end on the lower axle exposing the end of the spring, then pry the spring end off the axle with a brake spring tool (big bent pry bar with a screw driver handle) while withdrawing the axle by having my wife push it thru. "Oh, honey..." Alternately, I can push several screwdrivers into the coils to partaiily expand the spring to make it longer. I intend to reassemble it the same way. I'll drop the old spring off at the company on Monday so they can build the new ones to it. I should have it back in a week.
Wish me luck.
-
 1
1
-
-
James, have you taken a Flyer arm apart? How hard is it to reattach the springs?
-
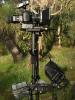
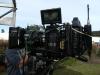
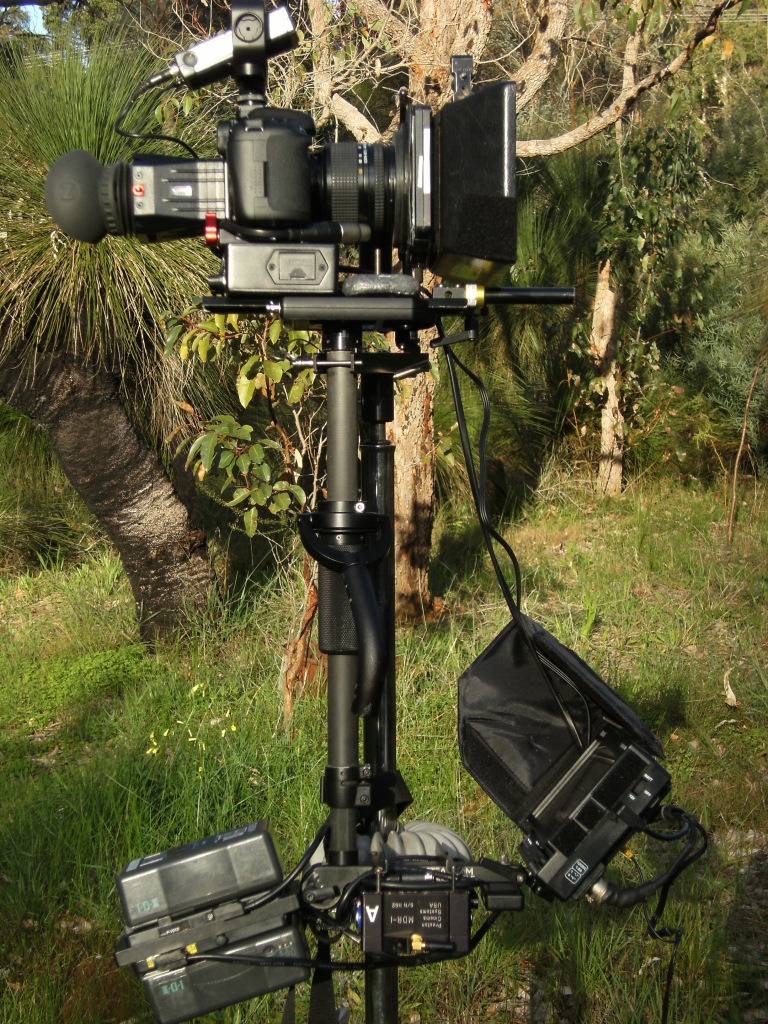
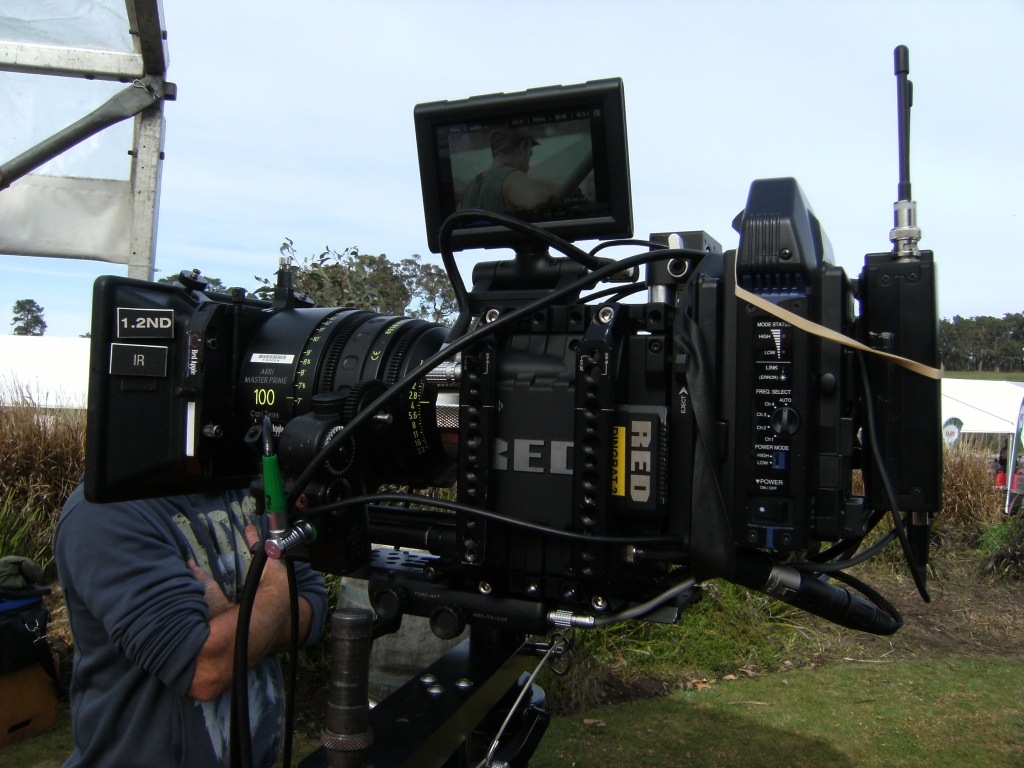
Sold the PRO, bought a Flyer, figured it could handle the light cameras I use these days. This is supposed to be the 19lb. arm, which I have determined is actually 21lbs.I found the limit this week. One of the arm sections seems to be stronger than the other. I had a full load on: EPIC,Master Primes, HD transmitter, sound receiver, 2 Preston motors,, mattebox, glass, etc. (see photos). I'm also flying a Preston MDR-1 on the bottom for stability and a MARSHALL 7" with electronic level display box.
I punched out the 1/2" insert in the arm post socket and it carries 5/8" posts, much more solid and can take long posts.
Here's my problem, with a full load the ARM section closest to the vest is out straight, the one closest to the sled is dipped 60 degrees down, so that means that spring is weaker. There is a spring manufacturer here in Perth that can make stronger springs, any size, any material. I want to dismantle the arm to replace the springs. Maybe get them to make a set 15% stronger. Is it possible for me to do this without special tools or jigs to re-fit the springs? Does Tiffen make stronger springs? What are the spings made of?
-
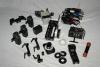
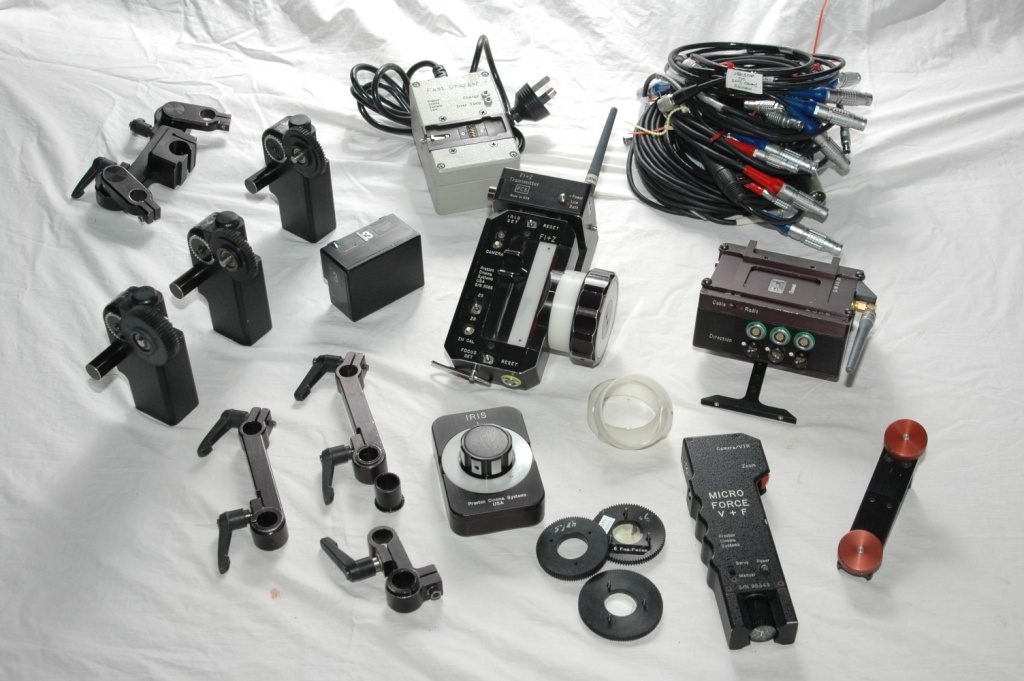
FI+Z Hand control, 3 focus rings
FI+Z Transmitter w/2 antennas
MDR-1 receiver/motor driver w/2 antennas, 2 batteries
MDR top mount
MDR top mount to PRO bracket
Microforce zoom control
Microforce zoom control to Hand controller bracket
Remote Iris control
3 lens motors w/32 pitch gears, 1 with 1/2" wide gear
.6 gear (Fujinon), 48/.5 pitch gear (Canon focus, Panavision zoom) 64 pitch (Panavision iris)
fast charger
2 Preston long dogbone motor brackets (19mm) w/2 Kip connectors ea.
1 Preston short dogbone motor bracket (19mm) w/1 Kip connector
Panavison and 15 mm motor bracket sleeves (2 ea)
Panavision front mount dual motor brackets with 2 articulated arms, 2 Kip connectors
4 motor cables w/90 degree elbows
RED One start-stop cable
Arri/Moviecam 3 pin start-stop cable (Alexa, 435,SR3 etc.)
Moviecam 2 pin start-stop cable
Canon 4429 start-stop cable
Fujinon 8 pin start-stop cable
Fujinon 4428 start-stop cable
Sony 4430start-stop cable
Arri 11 pin Fischer start-stop cable
Panavision start-stop cable
PRO short power cable
12' long power cable, 3 pin XLR 24v w/4 pin XLR 12v pigtail
20' remote hardwire command cable
10' remore iris cable
12' long Microforce zoom cable
1' short Microforce zoom cable
$14,950 or best offer rustygeller@bigpond.com

-
FI+Z Hand control, 3 focus rings, w/LED zoom light strip
FI+Z Transmitter w/2 antennas
MDR-1 receiver/motor driver w/2 antennas, 2 batteries
MDR top mount
MDR top mount to PRO bracket
Microforce zoom control
Microforce zoom control to hand controller bracket
12' long Microforce zoom cable
1' short Microforce zoom cable
Remote Iris Control
10' remote iris cable
3 lens motors w/32 pitch gears, (1 has 1/2" wide gear)
.6 gear (Fujinon), 48/.5 pitch gear (Canon focus, Panavision zoom) 64 pitch (Panavision iris)
fast charger
2 Preston long dogbone motor brackets (19mm) w/2 Kip connectors ea.
1 Preston short dogbone motor bracket (19mm) w/1 Kip connector
Panavison and 15 mm motor bracket sleeves (2 ea)
Panavision front mount dual motor brackets with 2 articulated arms, 2 Kip connectors
4 motor cables w/90 degree elbows
RED One start-stop cable
Arri/Moviecam 3 pin start-stop cable (Alexa, 435,SR3 etc.)
Moviecam 2 pin start-stop cable
Canon 4429 start-stop cable
Fujinon 8 pin start-stop cable
Fujinon 4428 start-stop cable
Sony 4430start-stop cable
Arri 11 pin Fischer start-stop cable
Panavision start-stop cable
PRO short power cable
12' long MDR power cable, 3 pin XLR 24v w/4 pin XLR 12v pigtail
20' remote hardwire command cable
Pelican 1500 case, might need re-foam
$15,500 please e-mail me, rustygeller@bigpond.com
-
One quick thing. Present hd monitor technology induces at least a 2 frame delay when you have frame lines or an electronic on-screen level. just an FYI
That's OK, when you're over 60 you have a built-in 2 frame delay on life, so I'll be right.
-
Rusty,
How satisfied are you with the Marshall level indicator? How does it compare with what you've used in the past?
It's not as good as the PRO or the XCS. It's a bit slow in reacting, and I have the sensitivity turned all the way up. It's a bit small on the screen, but it's red so that helps. I have an old style bubble level glued on the monitor arm also. I haven't used it much yet, time will tell.
-
I am looking for something much smaller and lighter for my custom LW sled. (While I know the next version of the Cinetronic will be smaller, I hope it is not too much smaller or lighter; I like the mass and the solidness of it for my primary sled).
Cinetronic is also building a 5" monitor for AC's and operators.... sounds like that will be perfect for your use
I went with the Marshall 7" V-LCD70XHB-3GSDI 800 nits for 2 reasons:
1. it's supposed to be the brightest
2. it has a plug-in electronic level indicator. After 25 years of having an on-screen level indicator I wasn't going to fly without one. The indicator is a little unit the size of a match box with a 1/4-20 hole and a cable. It powers off the monitor and delivers the level signal thru this cable. I mounted it under the monitor arm of the Flyer, which is fixed (doesn't swing vertically). It's always there and it's always on, so it's a no-think. It has horizontal and vertical levels, I turned off the vertical. The level indicator is a little red triangle that moves along a horizontal line with a few cross hatches, it has adjustable sensitivity, I put it on the fastest but it's still a bit slow. I also have always had a bubble level glued to my monitor arms as a rfeference to set the electronic level, so that is visible also. I also have a bubble level glued to the top stage close to the camera to compare.
The Marshall is bright in sun, with a matte screen. I also bought the Marshall monitor shade. The sun will glare off the screen if it's right down the pipe. In that situation I'd have get someone follow me with a flag. There's always a trade-off. The TB6 is still the brightest thing out there.
-
Thanks, I bought the Marshall 7" 3G/SDI with their electronic level-indicator plug-in box. I figure most of the jobs I'll be doing will be digital, where everything I see is in frame, and I can use the camera's framelines. The Marshall also has preset aspect ratios. I went from a PRO with a TB6 to this Marshall, I have to give up something. The picture sure is big and in color. And for jobs when I'm DPing it has false color. When sun hits it directly it glares off the matte screen, but the Marshall sunshade helps a bit. There's always the old trick where you have a grip with a flag follow you shading the screen.
-
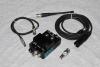
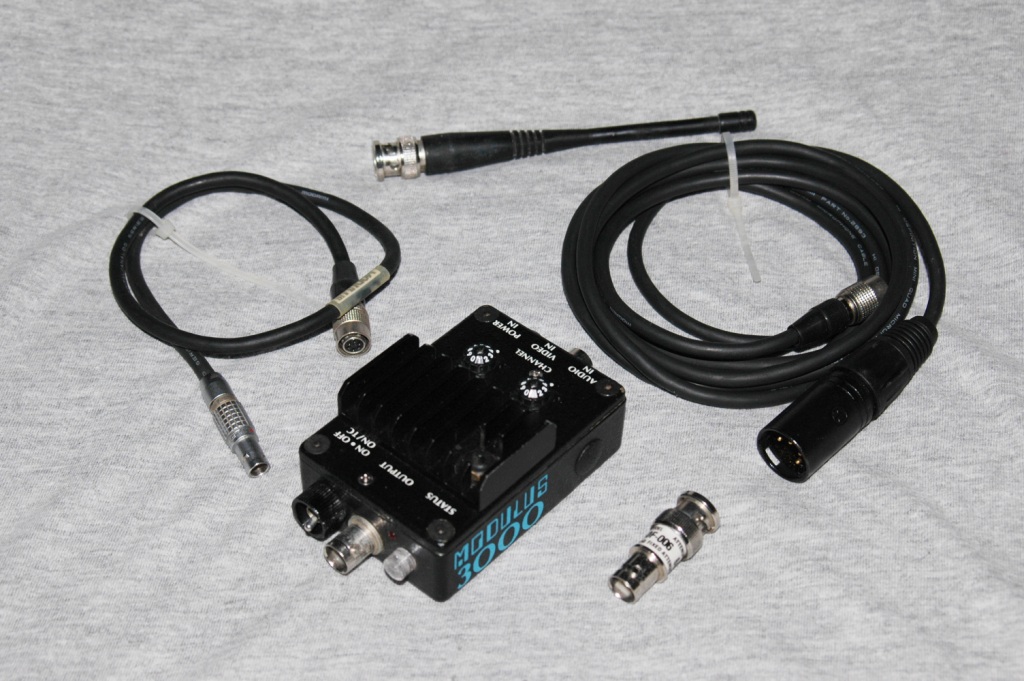
Modulus 3000, antenna, 6 db pad, 1 PRO combo video&power cable (1'), 1 4-pin XLR power cable (3'), case.
$900 rustygeller@bigpond.com
This item has been sold. Rusty
-
Modulus 3000, antenna, 6 db pad, 1 PRO combo video&power cable (1'), 1 4-pin XLR power cable (3'), case.
$900 rustygeller@bigpond.com
-
I'm interested in the DM2 motor and accs. rustygeller@bigpond.com
-
Sold my PRO and down-sizing to EPIC proportions. I have a line on a slightly used Flyer LEF24LEVLBH but would have to upgrade it to HD. Can anyone reccommend a reliable monitor under 2 grand with frameline generator and electronic level, good outdoors with a wide viewing angle, that will power by 4-pin XLR and have HD/SDI BNC & HDMI input?
-
Check the BNCs on the decimator itself, they can come loose. It happened to me, my focus puller tightened the nuts that hold the BNC's in place and it worked perfectly after that.

WTB Preston MDR-1 Digital
in Steadicam Marketplace - Wanted
Posted
Looking for a Preston MDR-1 that is updated to drive digital motors. email: rustygeller7@gmail.com
or any 2 channel wireless system that will drive Preston digital motors.
Cheer, Rusty