William Demeritt
-
Posts
1,094 -
Joined
-
Last visited
-
Days Won
64
Everything posted by William Demeritt
-

High End Music Video non payment
William Demeritt replied to Ramon Engle's topic in Legal / Business Practices
Contact the label, or have an attorney contact the music label. Inform them that you'll be sending a cease and decist letter to the label (a formal one) over non-payment of work for footage you shot. You're the primary copyright holder until paid, and until then, they're distributing content which does not belong to them. Inform them you'll be filing a copyright takedown notice to the platforms steaming the music video (YouTube, Facebook, VEVO, etc) and will be seeking to recover revenue made by the video's syndication, or they can pay you the fee you invoices the bankrupt production company. They'll pay you, and then they'll sue the bankrupt production company. But you'll be paid. Screw them. -
wireless teleprompter for steadicam
William Demeritt replied to axel ebermann's topic in General Discussion
For working in live TV, I have a 7 inch and 10 inch IPS monitor that I can put on the camera just above the lens.Your prompter op will probably come with only the equipment to send you a CVBS signal with the prompter lines OR send an SD-SDI signal. I did a job with Kristen Bell a few months ago, and was told about wearing a prompter in advance, and would be a long walk and talk. I used a wireless HD transmitter/receiver (IDX CW-3) and wore the RX while handing the TX to the prompter op. On my rig, I also wore a Decimator 2 to convert the SD-SDI signal to CVBS, and sent that signal into my prompter. Boom, wireless teleprompter. I had to do a similar thing a few years ago for a special show for FOX. Prompter ops generally don't have the equipment to send HD-SDI signals, just SD-SDI and CVBS. The prompter folks I had on the FOX gig were very nice, but not very technically knowledgeable about the signal coming from their system, and insisted they were sending an HD signal. After a couple frustrations, we got it working, but I basically had to get it running without their assistance, and you'll probably be in the same position. If you're trying to make it wireless, you'll either need a standard def transmitter for CVBS signals (CanaTrans, Modulus, Boxx Meridian) or a digital transmitter that handles HD or SD over SDI (Teradek, IDX Camwaves, Boxx Meridian, etc). If you don't have a wireless system to rent to your production, they can grab one from the rental house specifically for prompter signal. -
MK-V Omega "AR2"
William Demeritt replied to William Demeritt's topic in Steadicam Marketplace - For Sale
SOLD. Thank you everyone! -
MK-V Omega "AR2"
William Demeritt replied to William Demeritt's topic in Steadicam Marketplace - For Sale
I PM'ed you Jarrett -
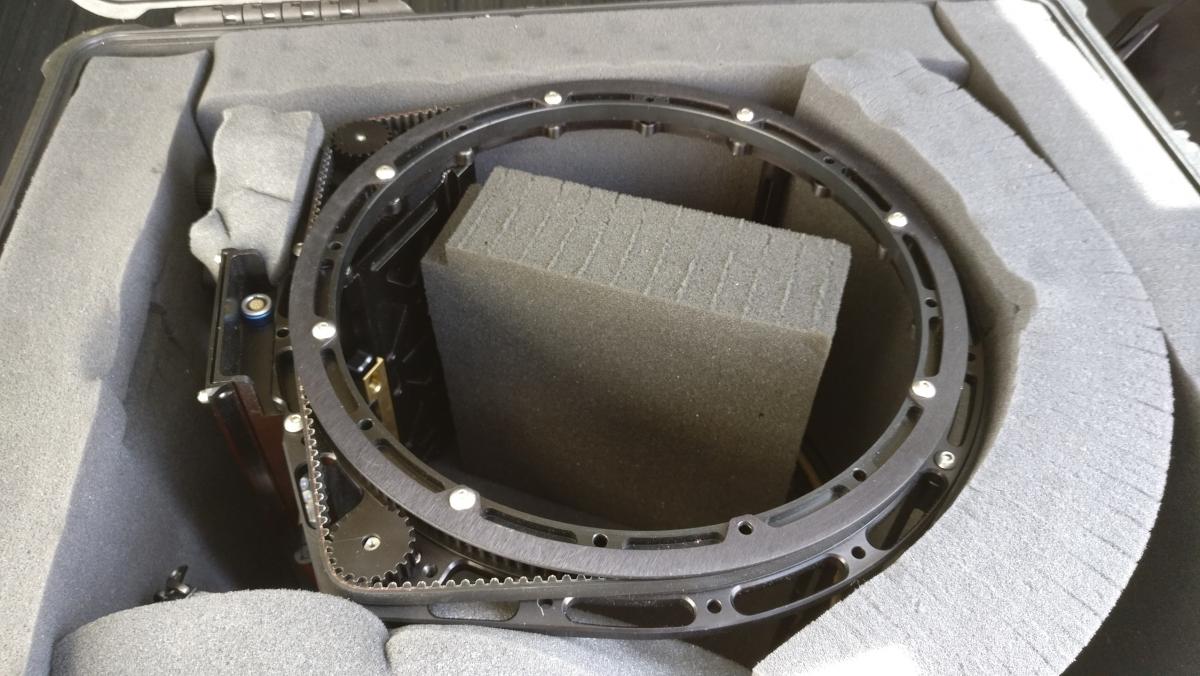
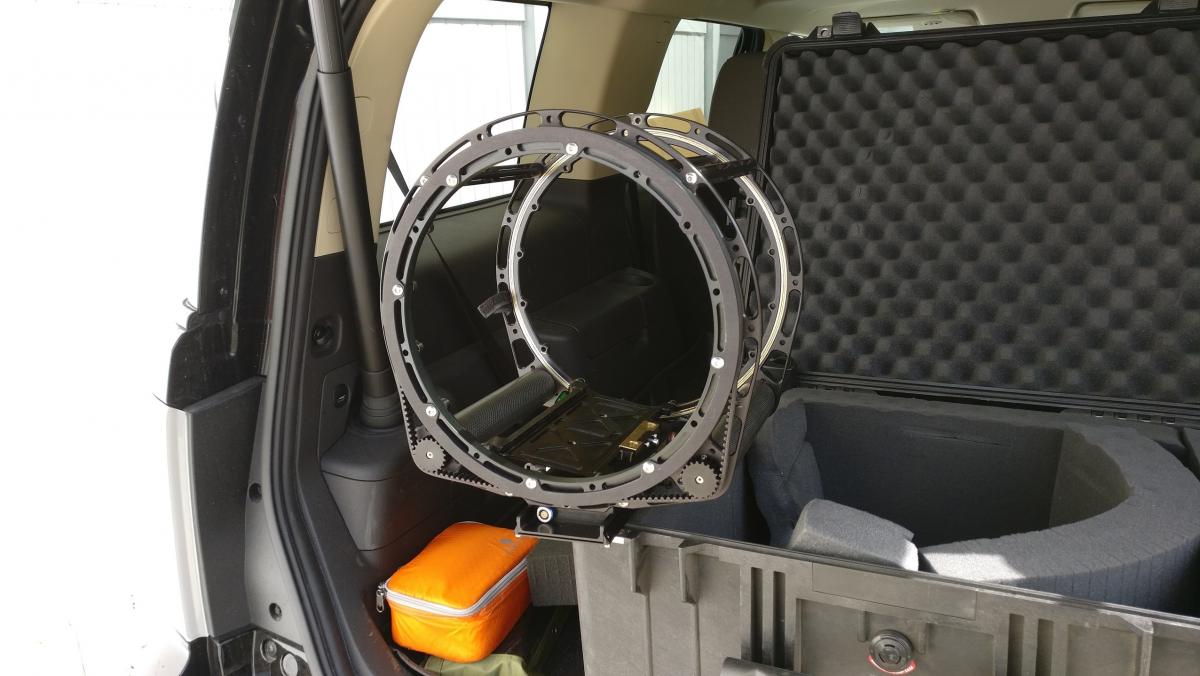
Offering my MK-V Omega "AR2" for sale (it's the current generation AR where the whole device is contained in the platform). I thought I would have time to integrate it into my work, but it turns out I don't. Includes the power cables and device along with Pelican case. No camera weight limit, works great when I've used it, I'm sure it'll make someone else very happy. Doesn't include the motorized monitor arm, but you can contact MK-V about purchasing one from them (I think it's about ~$4,600).
-
I just got one of these, I'll take it onto pickups for a feature this Friday and report back. Morning exterior Santa Monica beach, so that should be a good test, even with the marine layer.
-
Sachtler Tilting Telescoping Monitor arm for sale. Bought in 2011 New for $805. Asking $650. Pics available on request.
-
I have 2x 7ft long fiber jumpers with my live kit, and I had one get yanked a few weeks ago when my vest had a sudden gust of gravity. The repair was slightly delayed, probably an oversight on my part since I didn't send them my tracking number or indication of when it would arrive, followed by a mammoth winter storm. Anyway, Zak jumped right on the case, got my cable repaired and fixed up, and shipping it back to me today! Very happy buyer, will probably buy another fiber adapter from them again soon (backups for my backups). 2 years, coming up on 360+ shows taped at Warner Bros, and the cables have held up fantastically well! http://www.te.com/usa-en/products/families/phoenix-optix.html salesri@phoenixoptix.com
-
I believe, in this post, Eric (kinda) explained how springs in series behave according to Hooke's Law. http://www.steadicamforum.com/index.php?showtopic=11978 Paraphrased from there: assuming no friction counteracting the pure math and physics, then 2 or 4 springs acting in series will always perform the same way, no matter if the spring canister with greater lift capacity is "turned" more or if the lighter spring is "turned" more.
-
I would be curious about this outcome as well! When starting my day, I tend to evaluate my build as "heavy" or "light" for my 4 blue canisters. If heavy, I then crank my "more difficult to access" canisters to compressed (increase lift strength), and decompress them by 2-3 half turns (just so the compression bones aren't pressed against their maximum, just in case). I then pick up the rig and tune the "easy to access" canisters to the ride position that I like. Every 6 months, I swap the canister positions so they take turns in the difficult spots. However, I've been curious if having 1 canister in each section always "very compressed" or "backed off" had some impact.
-
Kind of off-topic but ... travel advice for LA?
William Demeritt replied to Brenton Lee's topic in General Discussion
If Ron Baldwin shows up in a convertible with a bottle of bourbon and tells you he's taking you to a place called Jumbo's, just get in and don't ask questions. -
Digital level that mixes in w/HD cable?
William Demeritt replied to Dan Coplan's topic in Video Assist and Video Accessories
For only $5,699, I'll come over and tape a spirit bubble to your monitor screen, just below the image. -
Hi Wolfgang! Happy New Year! I'm still very happy with my CW-3. I feel like it's actually quite the steal, and they've dropped the price on the CW-3 since I posted this review a year ago. I believe it still has an issue with PsF signals, and still does not support multicast. However, despite those issues, I'm still quite happy with my CW-3. As a simple 1:1 transmitter that handles the range, offers external antennas, and locks to the transmitter quite swiftly, I'm happy with the price and the unit itself.
-
Track lots of receipts for accounting?
William Demeritt replied to William Demeritt's topic in Legal / Business Practices
I'm using Lite right now throughout the year, and digitally submitting receipts via upload throughout the year. I started out with the trial of the regular account, and the magic envelopes are pretty fantastic. However, I've definitely got less than 50 receipts per month, so I just went back to the Lite plan. The online service or functionality doesn't change, it's just if they give you the envelopes vs I could mail in with my own envelope. -
Track lots of receipts for accounting?
William Demeritt posted a topic in Legal / Business Practices
Just wanted to give a heads up to anyone who tracks receipts or expenses throughout the year, or have a big envelope full of receipts end of year that they sort out with their accountant. I started using this service, Shoeboxed.com, to upload scans of my receipts or mail them in an envelope full of receipts every month. They scan the receipts, try to categorize them, and give an online interface to let you re-categorize them, export as an Excel spreadsheet, etc. My accountant has me tracking my receipts during the year, so this gave me a simple way to scan all the receipts, have an online archive, quickly export end of year and get them into an expense report to hand over to him. I've had the service for a year now, and been pretty happy with it as an easy way to catalog receipts and make tax time easy. If you want to sign up, you can use my referral link here: http://ssqt.co/mzbMnZd Or, if you don't want to use the referral, just go to the site itself and sign up. Worked out well for me, perhaps you guys could use it too? http://www.shoeboxed.com -
If the sled is set to 12v power line, then the AUX power and AUX ground lines are not shared with any connection. I built a tally system for my PRO 2 sled and PRO 2 UJB/LJB. I took an old Proformer battery, wired it up to use the PTAP on the C/M battery position. When connected to the AUX battery position, it would send the signal up the centerpost to the AUX port, came out one pin to the photosensor, the return power (if light was present) came down the AUX ground line and back into the box. From there, I had two RCA style plugs with cables: 1 that connected to the connector on the Cinetronic Gen 2 tally input, and another that simply went to a bright RED LED that I velcroed to my monitor. I recently got a CineLive sled and I'm using a Media Blackout tally system, but I still have the old tally system around for my PRO 2 setup in case I have two live gigs back to back.
-
I have not tested it in any environments aside from indoors yet. Those were all ventilated, comfortable spaces with no extreme heat whatsoever. I myself am curious to see how it works daytime exterior on a HOT day, because it gets quite hot when the brightness is way up. Further, I don't think it does any kind of active cooling, it just has copper heatsinks and space for heat to dissipate.
-
I've got a Shogun Flame on my 2nd rig, and I am thoroughly enjoying it. I need to add some weight to it, so I might buy a Shape cage for it to add some functional aluminum to it. The power input is a simple circular DC plug on a coily cable to PTAP, but it works and is already better than any of the SmallHD 70x or 50x series monitors. The monitor powers up very quickly, and it VERY bright. Reminds me of my Cinetronic Gen 1 monitor, very bright. The glare could easily be remedied with an antiglare screen protector, but it hasn't really been an issue for me yet. Brightness control is in a touchscreen menu that isn't too buried, once you learn where it is. I also bought a Transvideo clamp/spud adapter to mount it to my Sachtler Tilting Telescoping Monitor mount, but it would work on most/all PRO style spud mounts. http://www.transvideo.eu/store/Clamp-for-Slide Mounts to the bottom 1/4-20 and the 4 additional pegs keep it from spinning. The monitor accepts the SDI record flag, so on any scripted stuff I've done with it, I set the monitor to automatically record once it gets the record flag. Helps serve as a tally/confidence that the camera is rolling. The screen is pretty big, very bright, and only problem I've noticed so far is it gets HOT at full brightness, which also means it chews up batteries pretty quickly. That's fairly common among most bright monitors, though, so it's not a big deal. I do wish that the monitor input voltage could be set to stay on screen, but you can see the voltage input by tapping the power icons in the top right corner (it places the battery readings as an overlay on the screen, would be nice if it could be more discrete). All the inputs are there, I haven't tried making a cable for the REMOTE plug yet but that might be my next project. Anyway, for the price and the versatility of the monitor (and it records!), I am happy to use it on my scripted stuff.
-
Stay metal, my friend! See you in the pit!
-
Just received my CineLive package, but I still love my old PRO vest. So I'm selling a brand new PRO vest, NEVER worn, literally still inside the cardboard box GPI shipped it to me in. Chest: 47in Waist: 38in Would love to get $5,200, and we can work out a deal where I knock down the price by the amount for a replacement chest and waist pads in the event your chest isn't as big as Gaston... sorry, your chest or waist may vary from mine? Anyway, drop me a line here, or via email: will AT w b d 3 DoT com Pictures of the box it arrived in available upon request. Buyer: I will cross out on the box MY name and instead write your name, so it says "CONGRATULATIONS **BUYER**"
-
- 1
-

-
I just ordered a CineLive package from PRO, but I don't need a new vest (I enjoy the sweat stains and chipped paint on mine). I literally ordered the package 4 days ago, but I thought I'd start the conversation about who might want the new vest. So if you're considering buying a new PRO vest, give me a buzz and I'll set it aside for you. Once I get it, we can complete the sale. Will arrive in Los Angeles. It will literally be a BRAND NEW PRO vest, so I'd like to just sell it PRO's price: $5,200. PM or email me.
-
How/where can you buy one of these monitors?
-
Anyone got a Starlite HD5 they're looking to sell? Might as well take a stab, maybe someone's looking to hand theirs off.
-
Wireless Video System + Tally
William Demeritt replied to Daniel Lassnig's topic in Video Assist and Video Accessories
I too am interesting if the Beam can support Sony cameras yet? I'll give Andrew a buzz, maybe they have some new information? -
Were you ever in a situation where you said "No" ?
William Demeritt replied to Beau Cuizon's topic in General Discussion
I've said no to going to Jumbo's with Baldwin. I'm still not sure that was the right decision.