Search the Community
Showing results for tags 'modification'.
Found 3 results
-
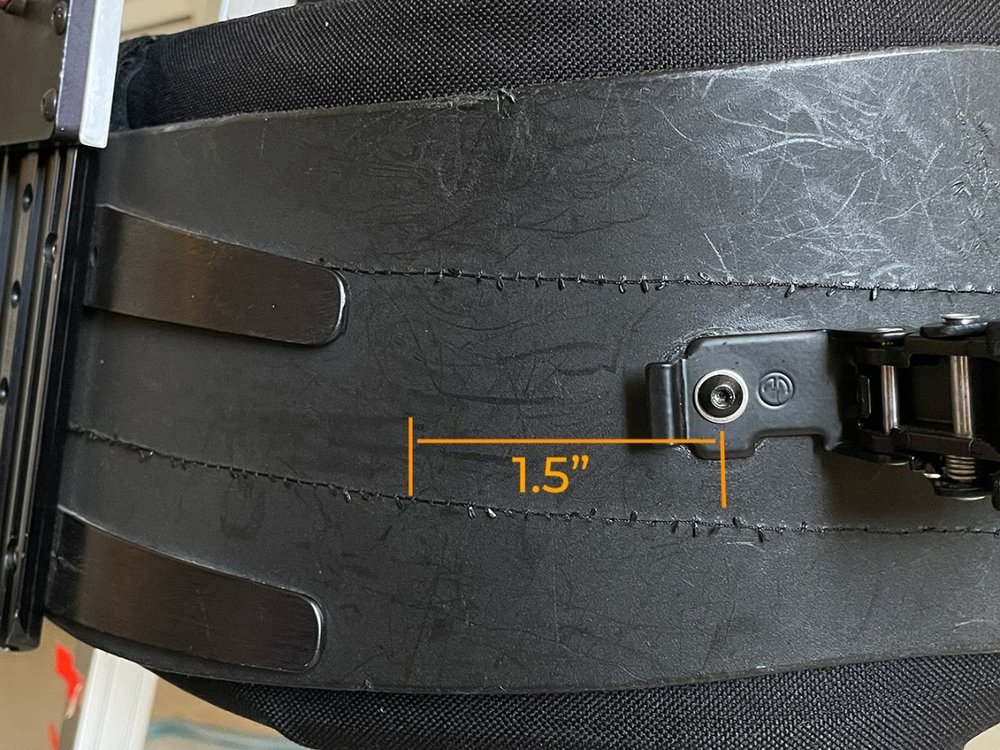
Hey All. I run into a situation with my vest that the aluminum stiffening block on the waist straps gets caught in the strap guide at the end of the waist pad plastic. This means that I have to run the block right up against the last tooth of the plastic ratchet strap in order for that piece to clear the strap guide. A solution I thought would work is to drill a new hole for the ratchet buckles on either side of the vest about 1.5" in from where they currently sit. (see pic) However I don't want to invite cracking or a loss of shear strength in the plastic because there is now a hole "downstream" of the load. Then again, the load is between the new hole and the spar connector to the waist plastic. Hmm. Any thoughts on bringing the ratchet buckles closer to the center of the vest? I see that the Ultra vests have the ratchet buckles very close to the center spar, granted that they are attached directly to the front stiffening plate. Thanks for your help!
-
 So after a long wait I managed to get Tiffen to send over a few new pieces so that I could tool around with our Gen 1 flyer and make it a little more interesting -original top stage is backwards compatible with new CF extending post -new gimbal also works with original flyer arm -bypassed the "spar" at the bottom of the sled and instead have a 15mm rail system (thanks Tom Wills for supply the original basis for the upgrade on the old gen 1 post; I have changed it up in a lot of ways to accommodate the larger post) -yes that is a cute little J-Box at the bottom. Made from a standard aluminum project box. Prototype really, for 12v only. Don't think there's any reason to go 24v. -75ohm bnc at the top and bottom with hd-sdi run through the sled I designed the J-box with the idea in mind that I think it is more comforting to power things like Red setups by keeping the battery mounted to the camera. The power can be looped back through the sled from the top stage, and the breakouts at the bottom can accommodate accessories mounted to the 15mm rail system. Means less V-droop from extensive wiring. Means being able to exchange a ton of accessories from the top stage and putting them at the bottom instead (ex. going to be using a Hyperdeck 2 mounted to the bottom instead of up top). Fully adjustable, can have bottom rails as wide as you want via extensions for absurd levels of pan inertia. Any battery type easily swapped out. All 2 pin lemos, very easy to work with. You can mount anything you want to the bottom as well via those 15mm rails....example, I did a couple of 360 gopro steadicam shoots that requested there be no footprint below the cameras and the rails can be made to just a few inches and also provide mounting. Pretty neat stuff. Just a little project I had been working on this past week. It's been repair and upgrade season for me here. Next step is probably going to be figuring out a couple of circuit breaker points as well as creation of a j-box for the top stage. I've seen Brian Freesh's old implementation but I can't help but get the feeling that having a box so large and close to the gimbal must be troublesome.... Click the link for the rest of the photos. Rest of album
 -
 Hello guys, I decided to make a little mod on my Ultra2 and before I go ahead I’d like to have some input from U2 owners. I want to get rid of the upper monitor mount on the post3 in order to be able compress the rig another 3 inches or so. Since I bought my rig last June I never used the upper mount. In normal use, I place the monitor as down as possible. Even when I setup the rig to the extreme high or low mode the upper mount never seemed useful to me as it places the monitor too up high to my taste. But when I fly lighter loads like an epic, not being able to shorten the rig another 3 inches translates to either less space to move the gimbal down on post2–harder to go to low mode- or too much space above it. Also when I put a codex or OBI-1 deck at the base of the sled while shooting Alexa/Raw setups, the up-down weight ratio forces me to collapse the rig fully and every inch counts! Even if an unpredicted situation presents itself, I can have another 15cm or so to raise the monitor by placing the monitor rods in reverse. In order to take the mount out I have to undo the wires in the stage which is not an everyday job. That’s why I’d like to hear your input on the subject. Do you use the upper mount? In which situations?